Menu Orchestration Setup and Management
Menu Structure#
When searching for a menu position to be changed, make sure you're looking at the right level, make sure you distinguish an item from an item group and an item group from a category.
You have a search bar in the right corner that will help you find the needed items.
In this section you'll learn how to edit/manage your menu at various levels:
- Menus
- Categories
- Item groups
- Items
- Modifier groups
- And modifiers
Take a look at the menu simulation below to understand the menu structure in Franchise Suite:
1. Menu#
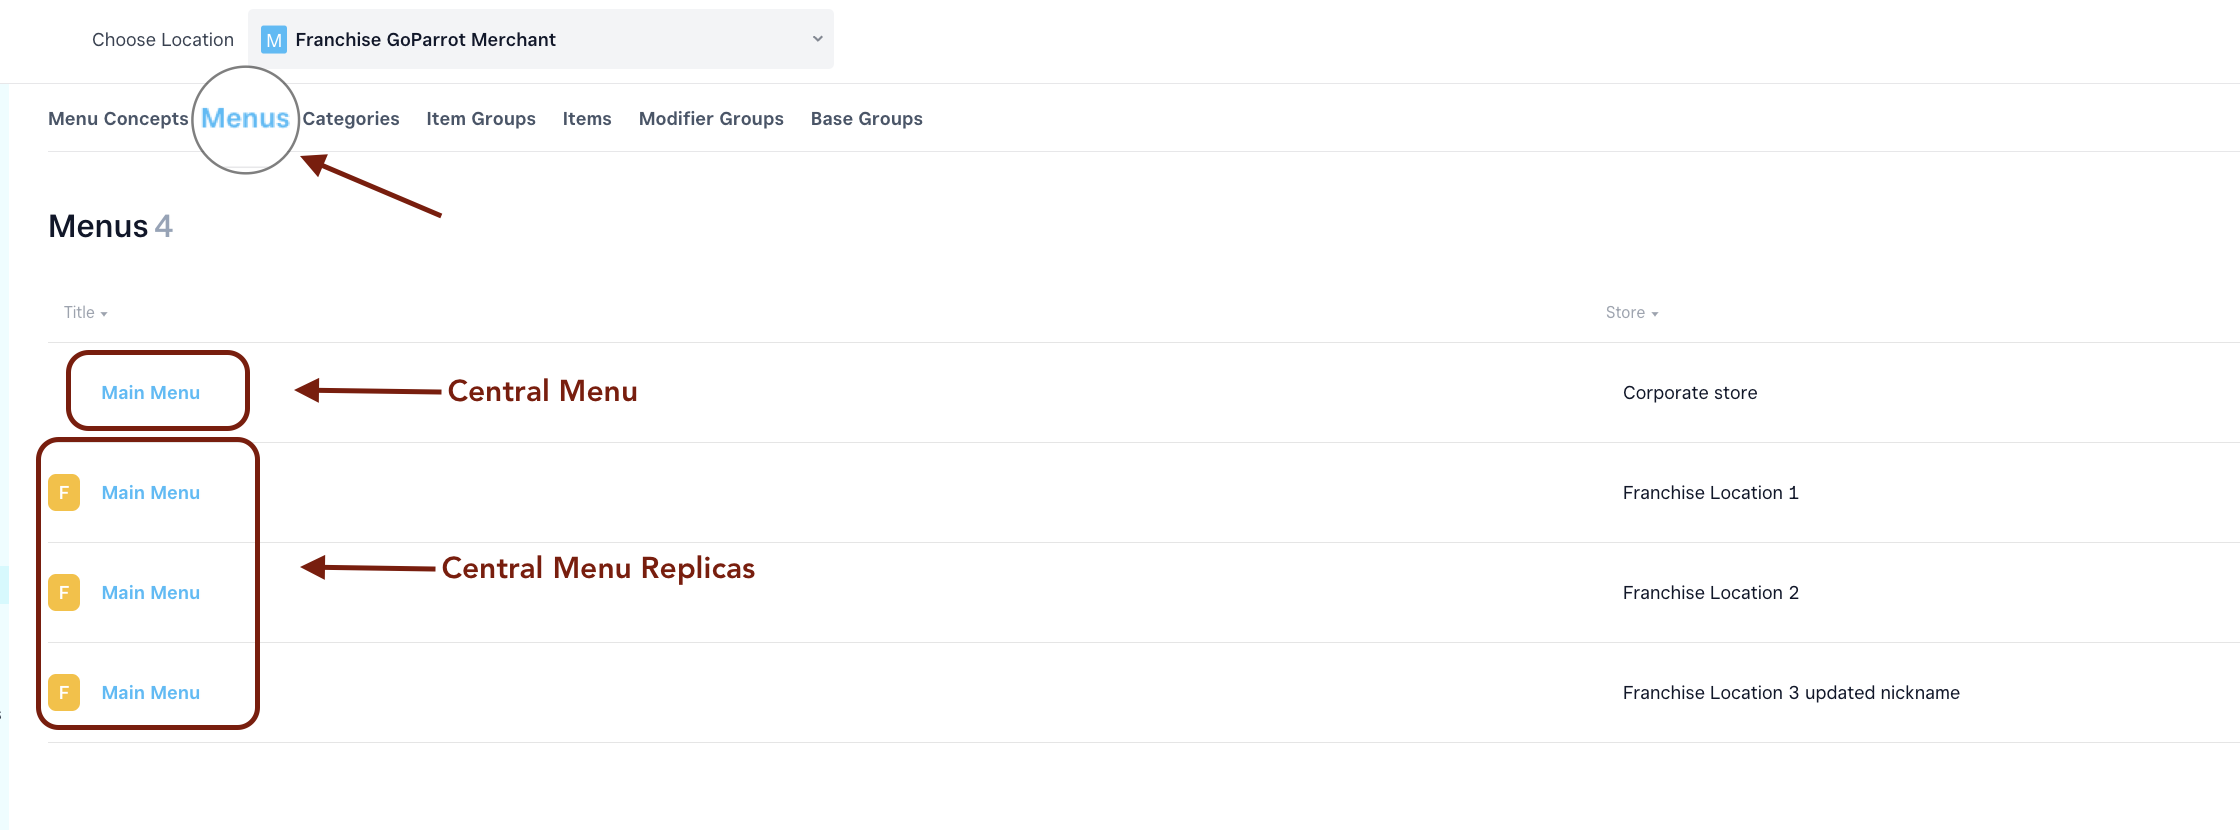
The Menu is a virtual layer on the Franchise Suite that contains all your categories into one place. To make sure that your categories are displayed on your online ordering page or app, make sure your category is connected to your pre-created Menu.
The Menu does not sync with your Square account and the synchronisation starts from the categories down to modifiers. As soon as your Franchisee locations are connected to the Menu Orchestration, the Menu will be replicated for them as well however only in the Franchise suite Dashboard.
Important! Your Central Menu (which will be orchestrated/pushed throughout all franchisee locations) has to be created on your Central Location!
2. Categories#
2.1. How to Import Categories from Square:#
If you want to import a new category from your Square POS please follow the instructions below:
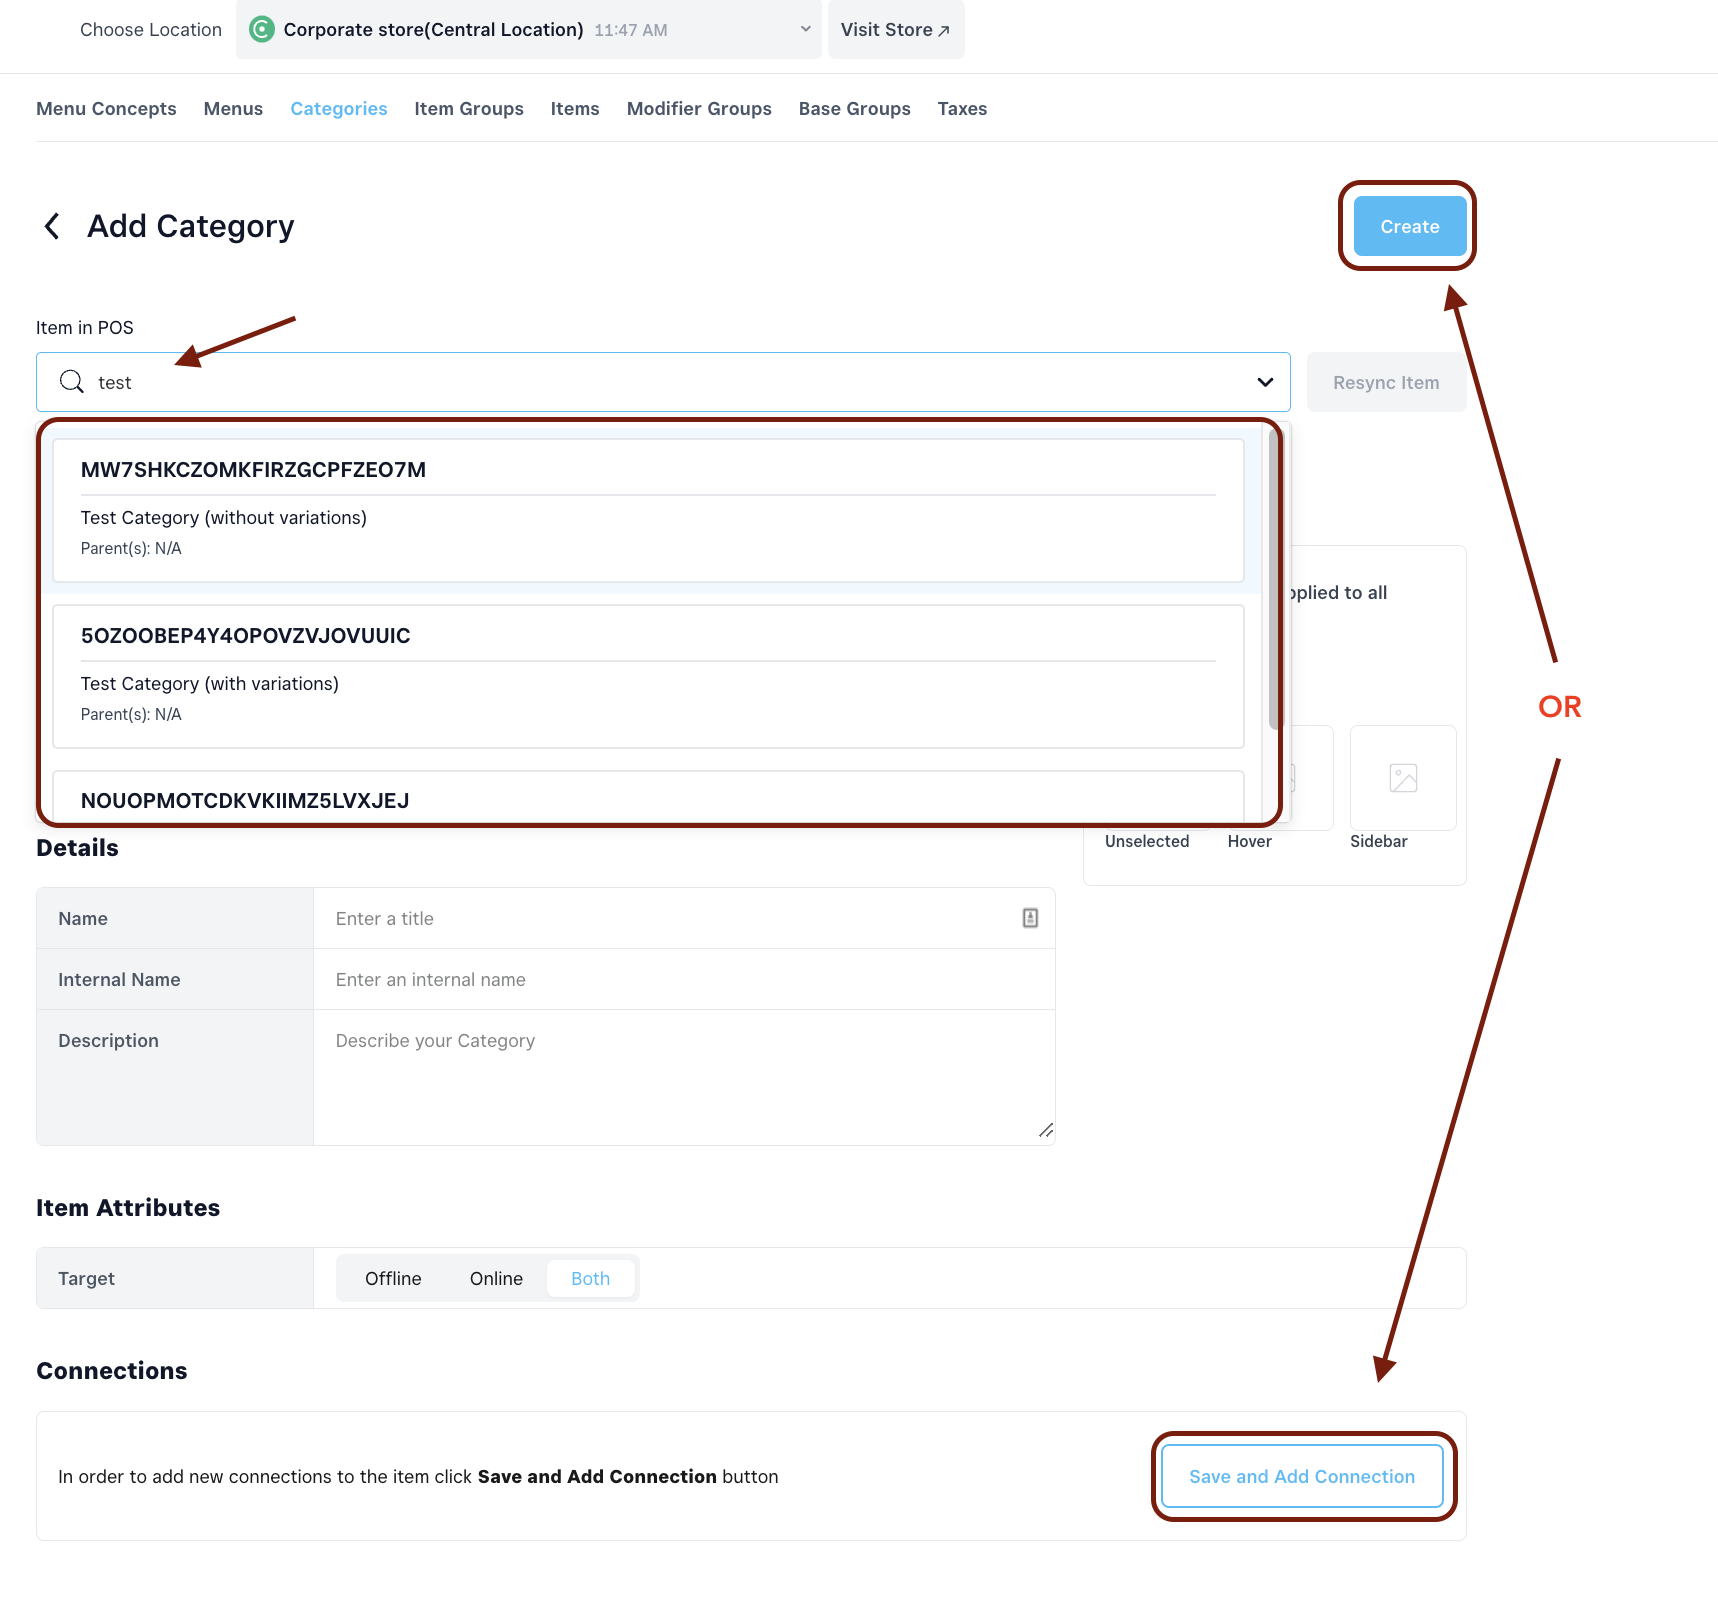
Go to Categories and click Add.

Search for the needed category in the "Item in POS" field.
Select the needed category, the system will populate with information about this category from Square.
Click on "Save and Add Connection", attach it to the menu and click Create.
DONE! Do this for each category you want to import from Square and display as part of your Central Menu and to be replicated on the Franchisee stores.
2.2. Create New Categories#
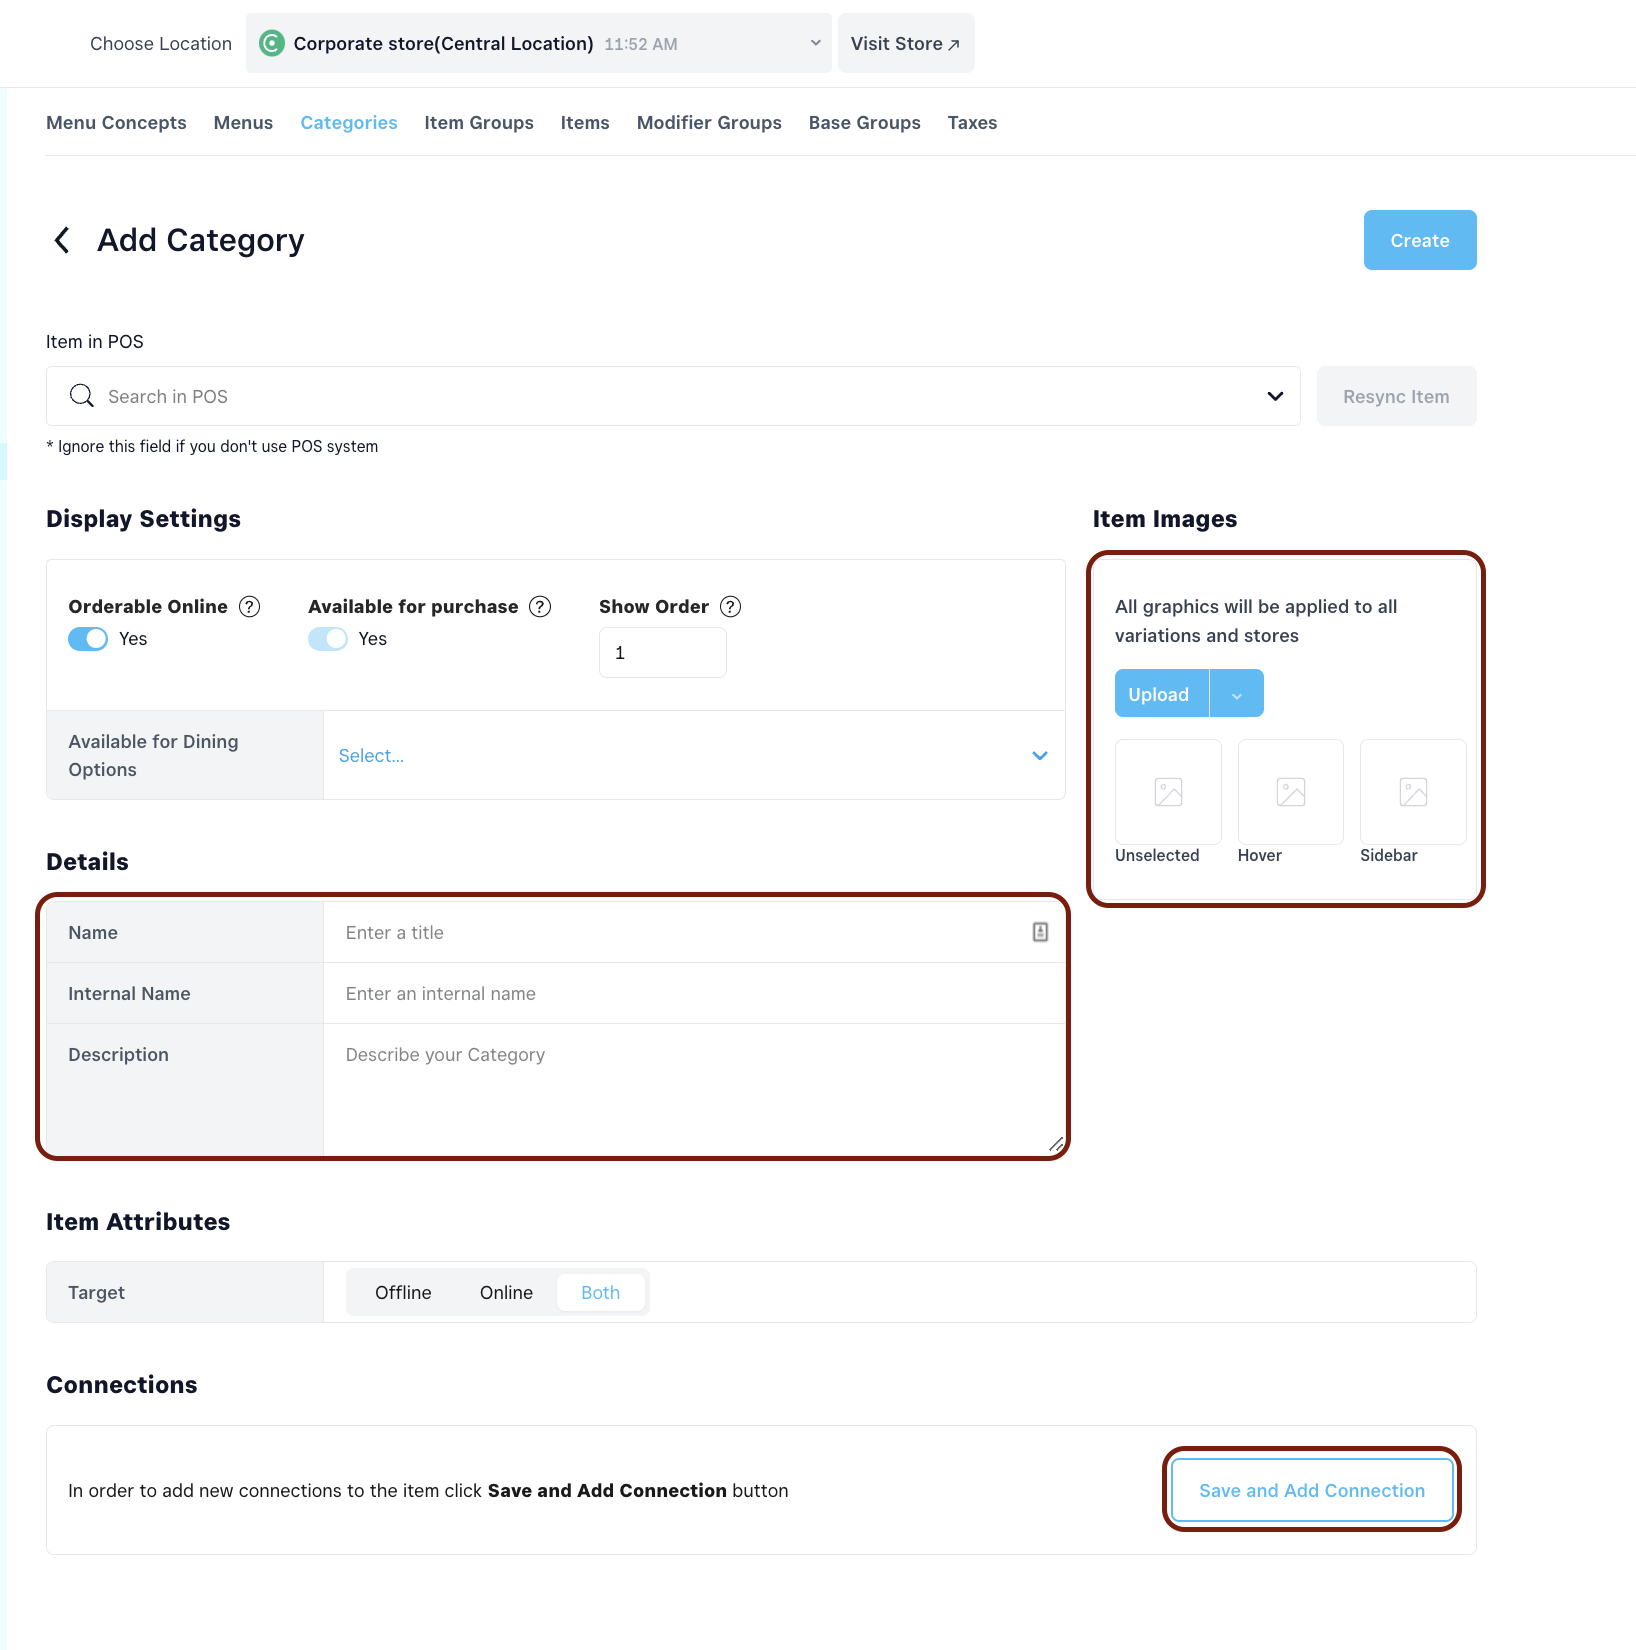
To create a new category directly in the Franchise Suite Dashboard, follow the instructions below:
Select the Location where you want to add this category (Central Location or Franchisee’s Location) and go to the Menu Management tab;
Click on the tab Categories at the top and then “Add” from the top right corner;
Complete the necessary details such as Title and Description;
Add Images (icons) for the category that will be displayed on the online ordering page (if necessary)
At the bottom of the page, click on “Save and Add Connections”
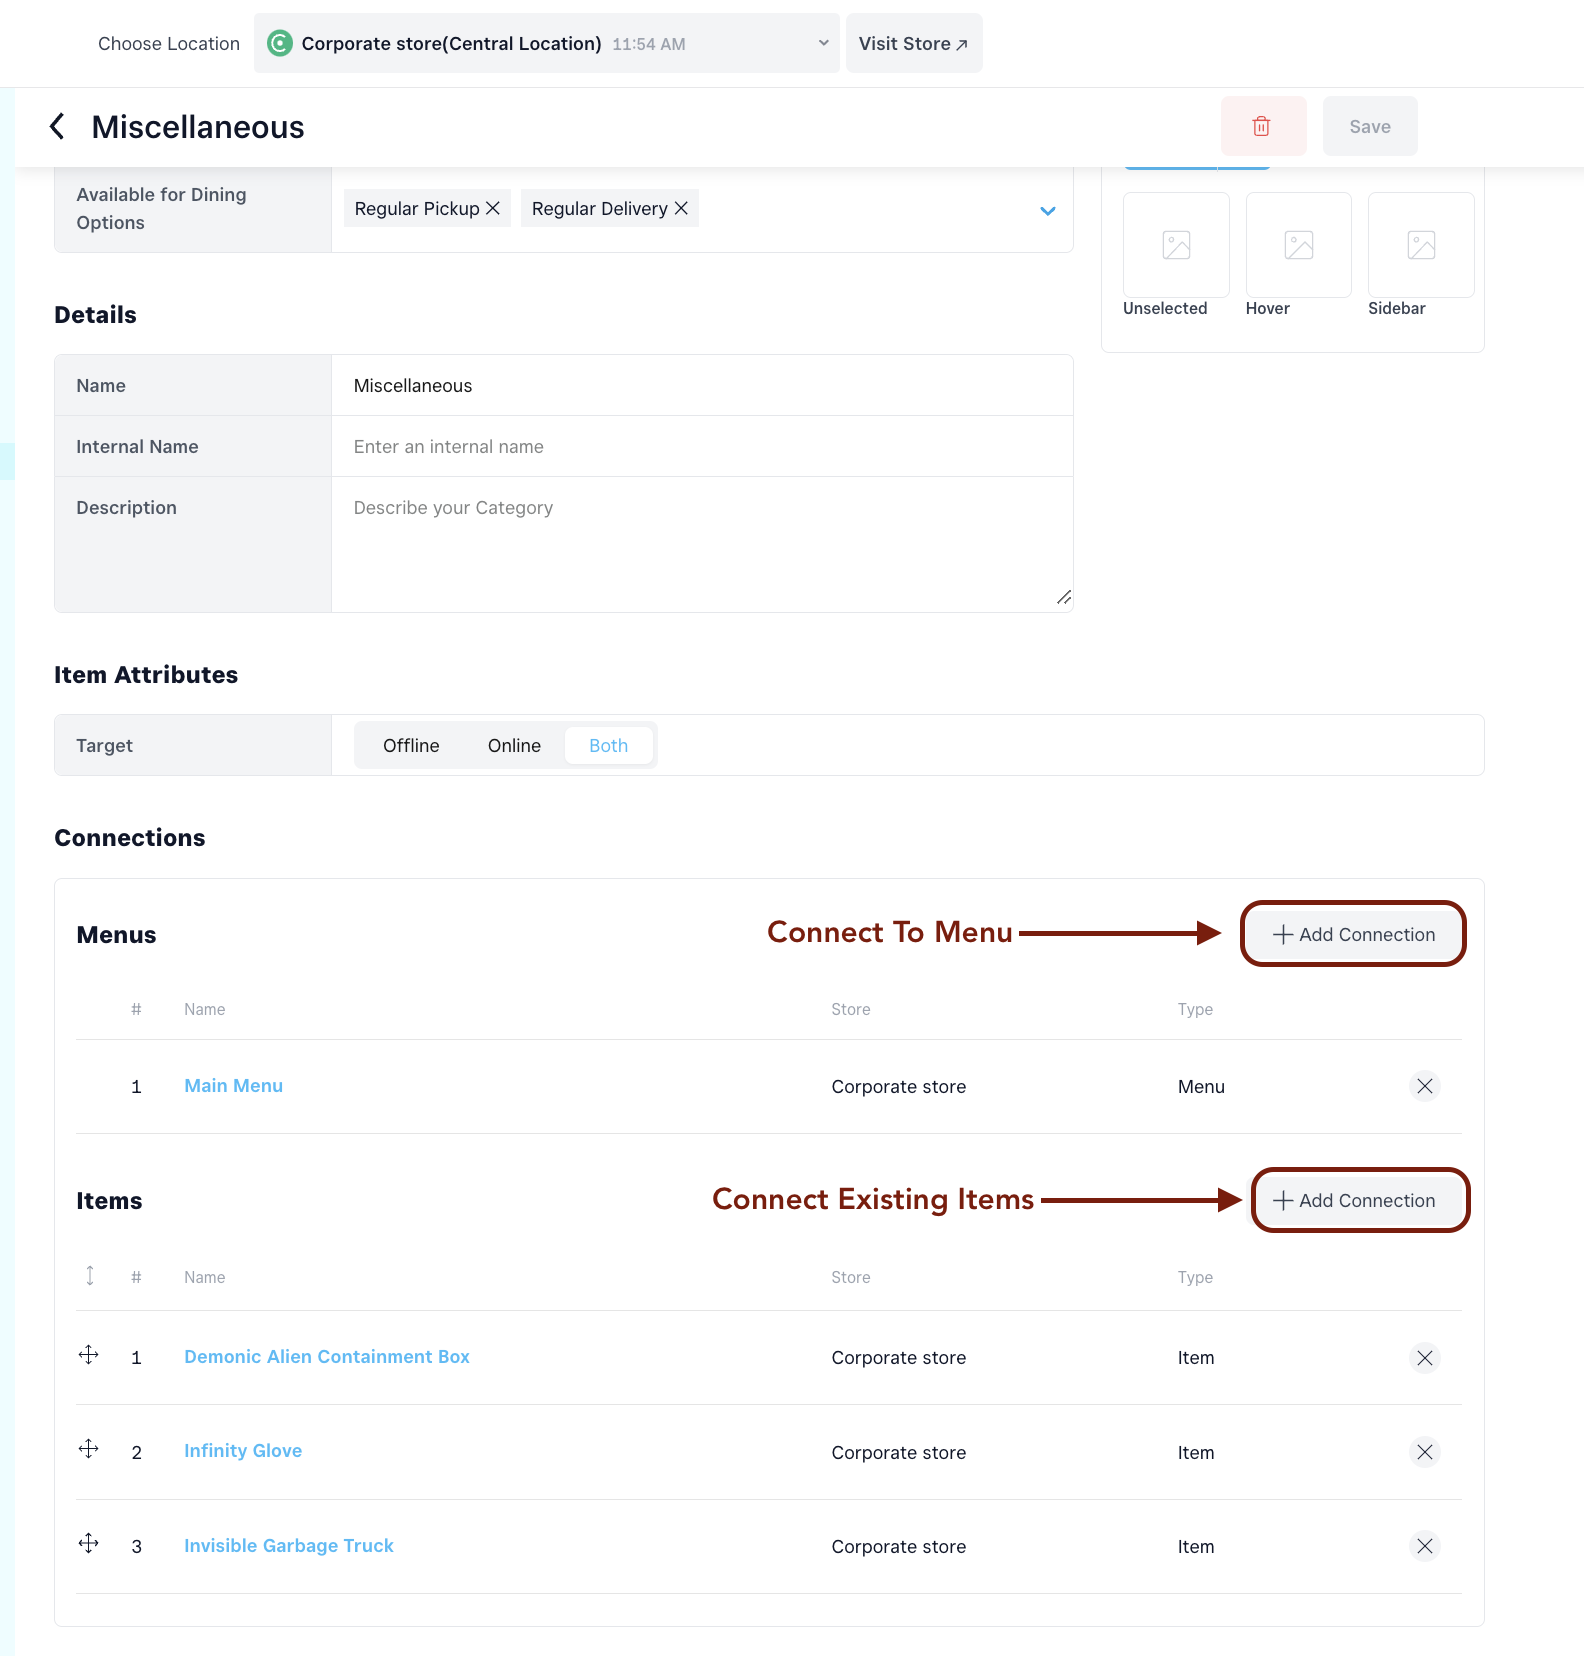
As soon as the category is saved, scroll to the bottom and connect it to the necessary Menu and Items.
2.3. Edit / Update categories#
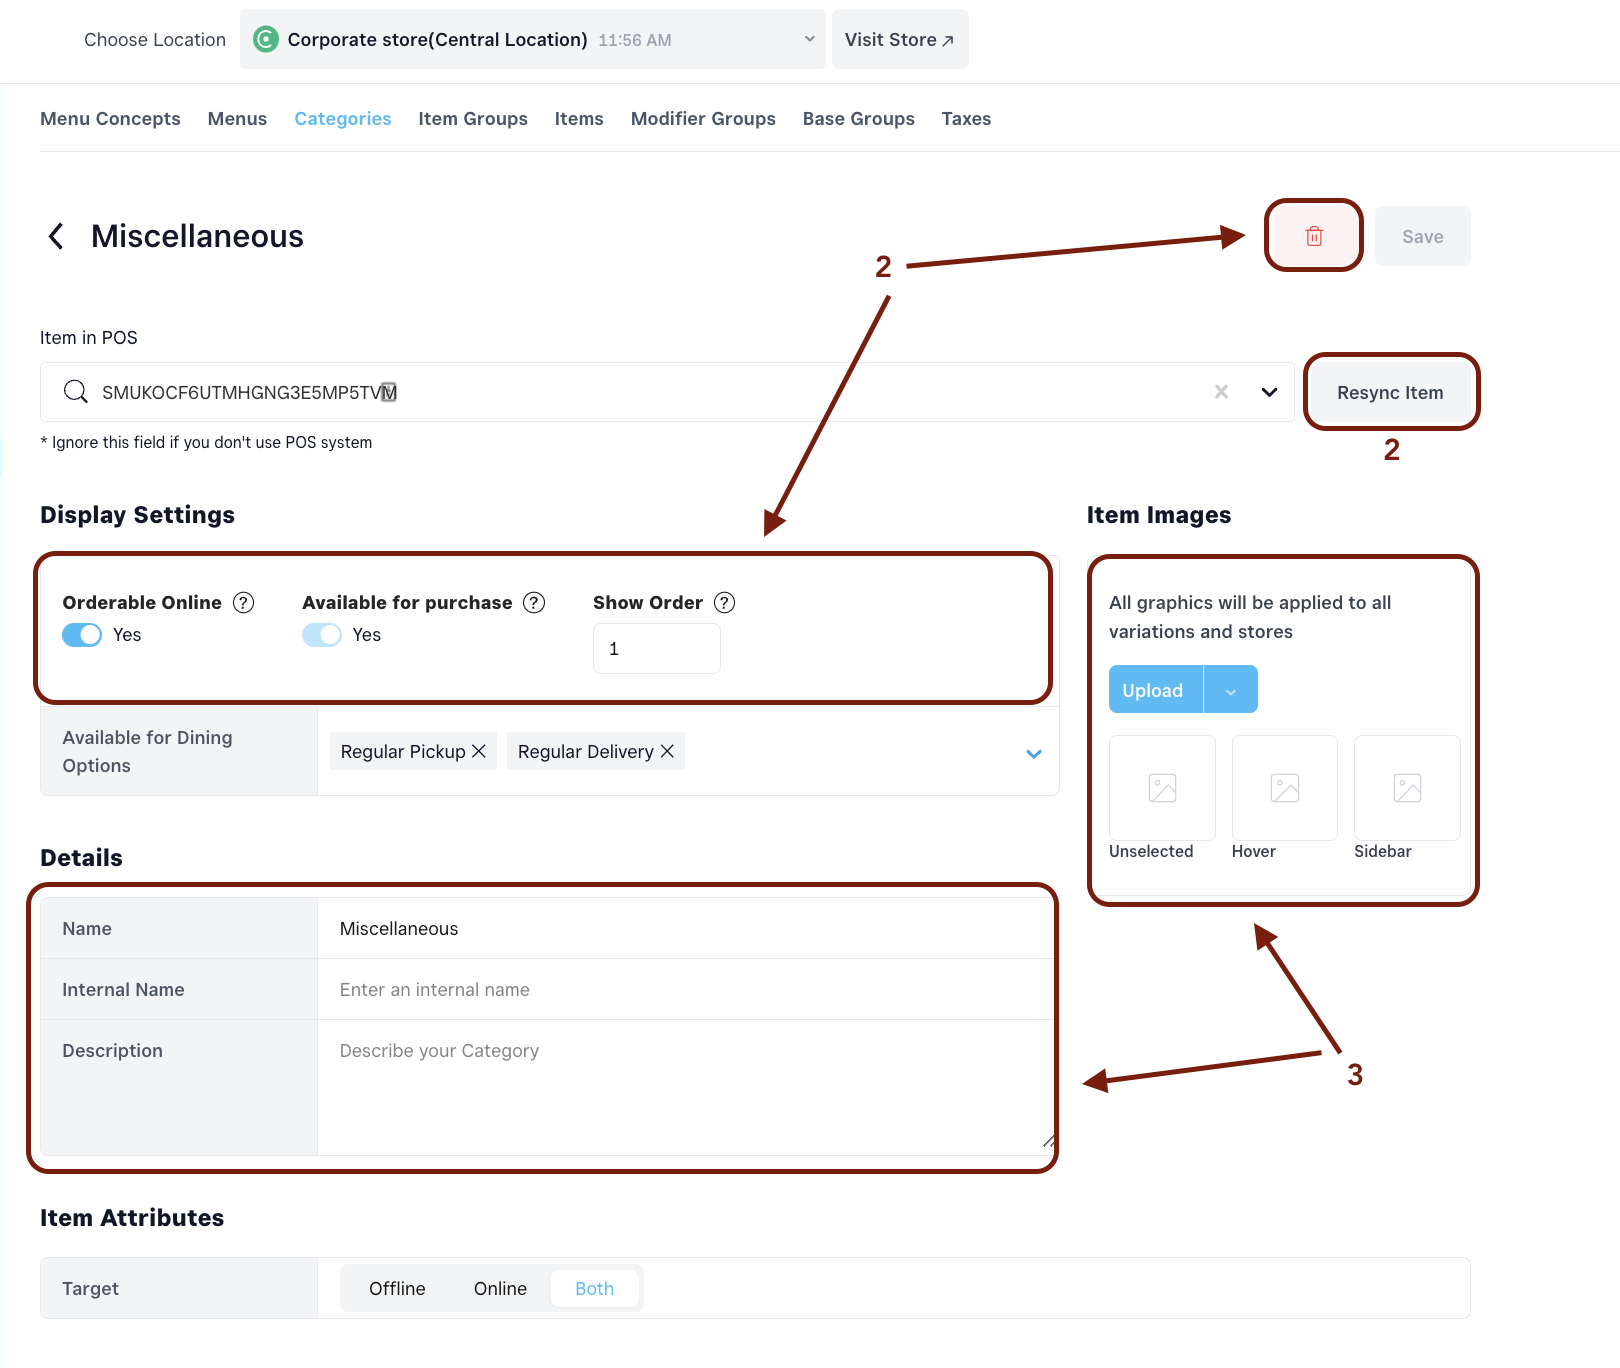
- Sync an entire category
This time saving feature will allow you to sync the changes made in POS within the entire category. The sync will pull the following changes: prices, tax percentage, internal name, availability, minimum/maximum selection for modifiers, required modifiers, different pricing at different locations.
Doing this on your central location will update the previously mentioned properties in the franchise stores, only if the properties were not changed to store specific settings.
Also, the feature will pull all the new items inside the category.
- Availability toggles:
- Orderable online - Defines if any category shall be visible on your online ordering page. By default the toggle is on for all items.
- Available (sold out) - defines the availability of the category, whether the category is in stock or not. By default the toggle is on, if switched off - the category will disappear from the online ordering page.
- Archive (delete) - removes a category from the online ordering page, Franchise Suite Dashboard and Square POS.
Note: If a category’s availability is changed on the Central Location (Orderable, Available or Archived), it’s going to be replicated in all of the franchisee stores. In case you want to retrieve any Archived (deleted) categories, filter the categories by “Only Archived”. Archiving a category will not Archive the items inside, on Square.
- Show order - defines the show order number of the category.
- Changing titles & description, images:
- Name - changes the title of the category.
- Description- description of the category that will be displayed under the name on the online ordering page.
- Internal name- only for internal use, will be visible only in the Dashboard.
- Upload Images - upload or replace category icons according to recommended size. The uploaded icons will be visible on the online ordering page.
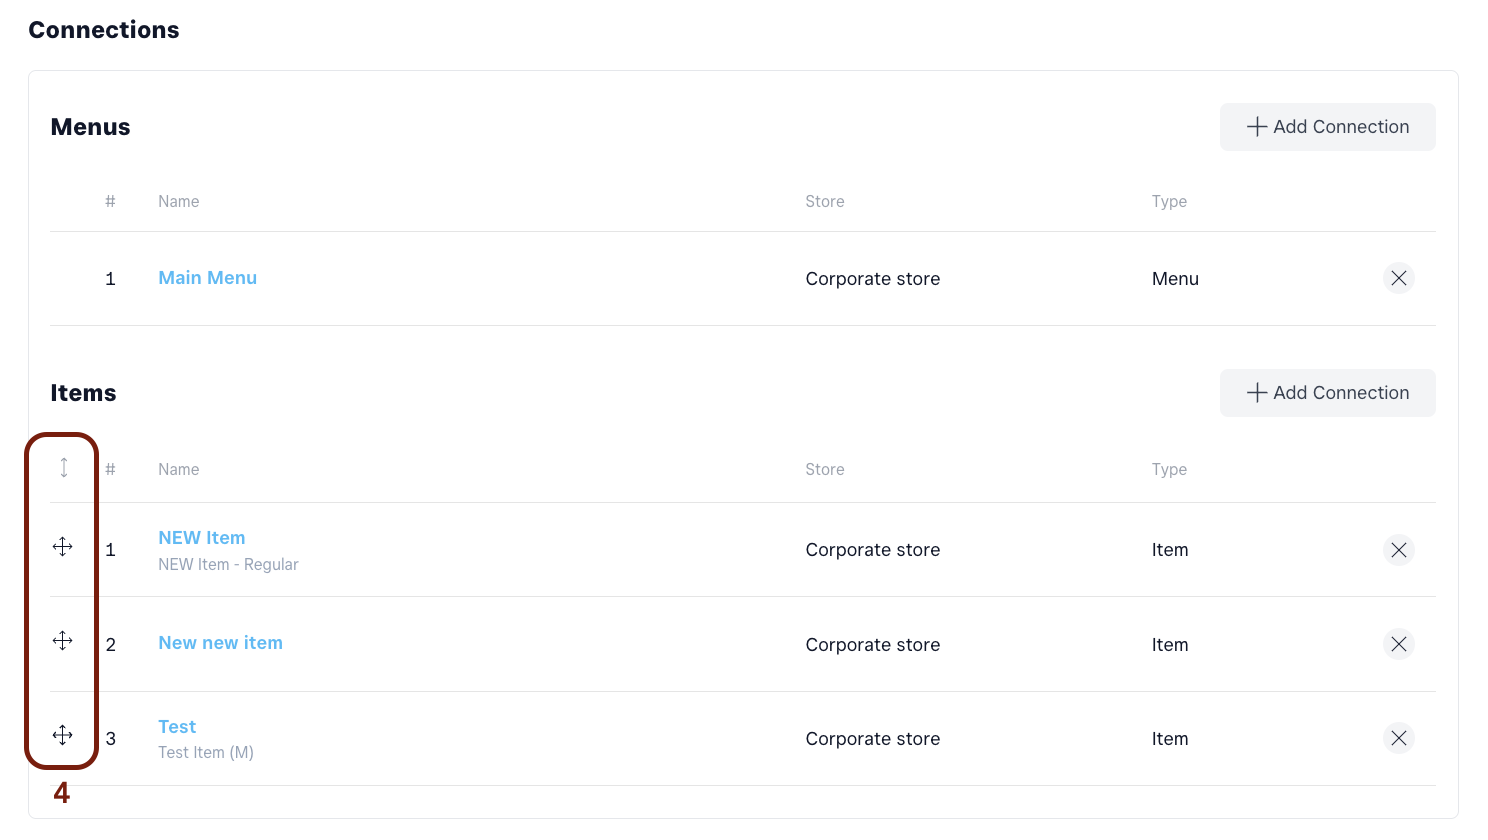
- Changing show order Drag & drop and rearrange the items/item groups inside the category. Check the changes in real time, on the online ordering page.
3. Virtual Categories#
When are Virtual Categories needed?
In cases when you prefer to have a different structure of your categories on your online ordering page to your in-store/POS structure, Virtual Categories come in handy. The functionality allows you to group two or more categories together or fully re-structure your menu. The restrucured menu will be visible only on your Franchise Suite online ordering page and will not affect your menu structure on Square in any way.
If it is necessary to add a Virtual Category (to be displayed on the online ordering page only), please follow these steps:
Step 1 & 2 - Are the same as above
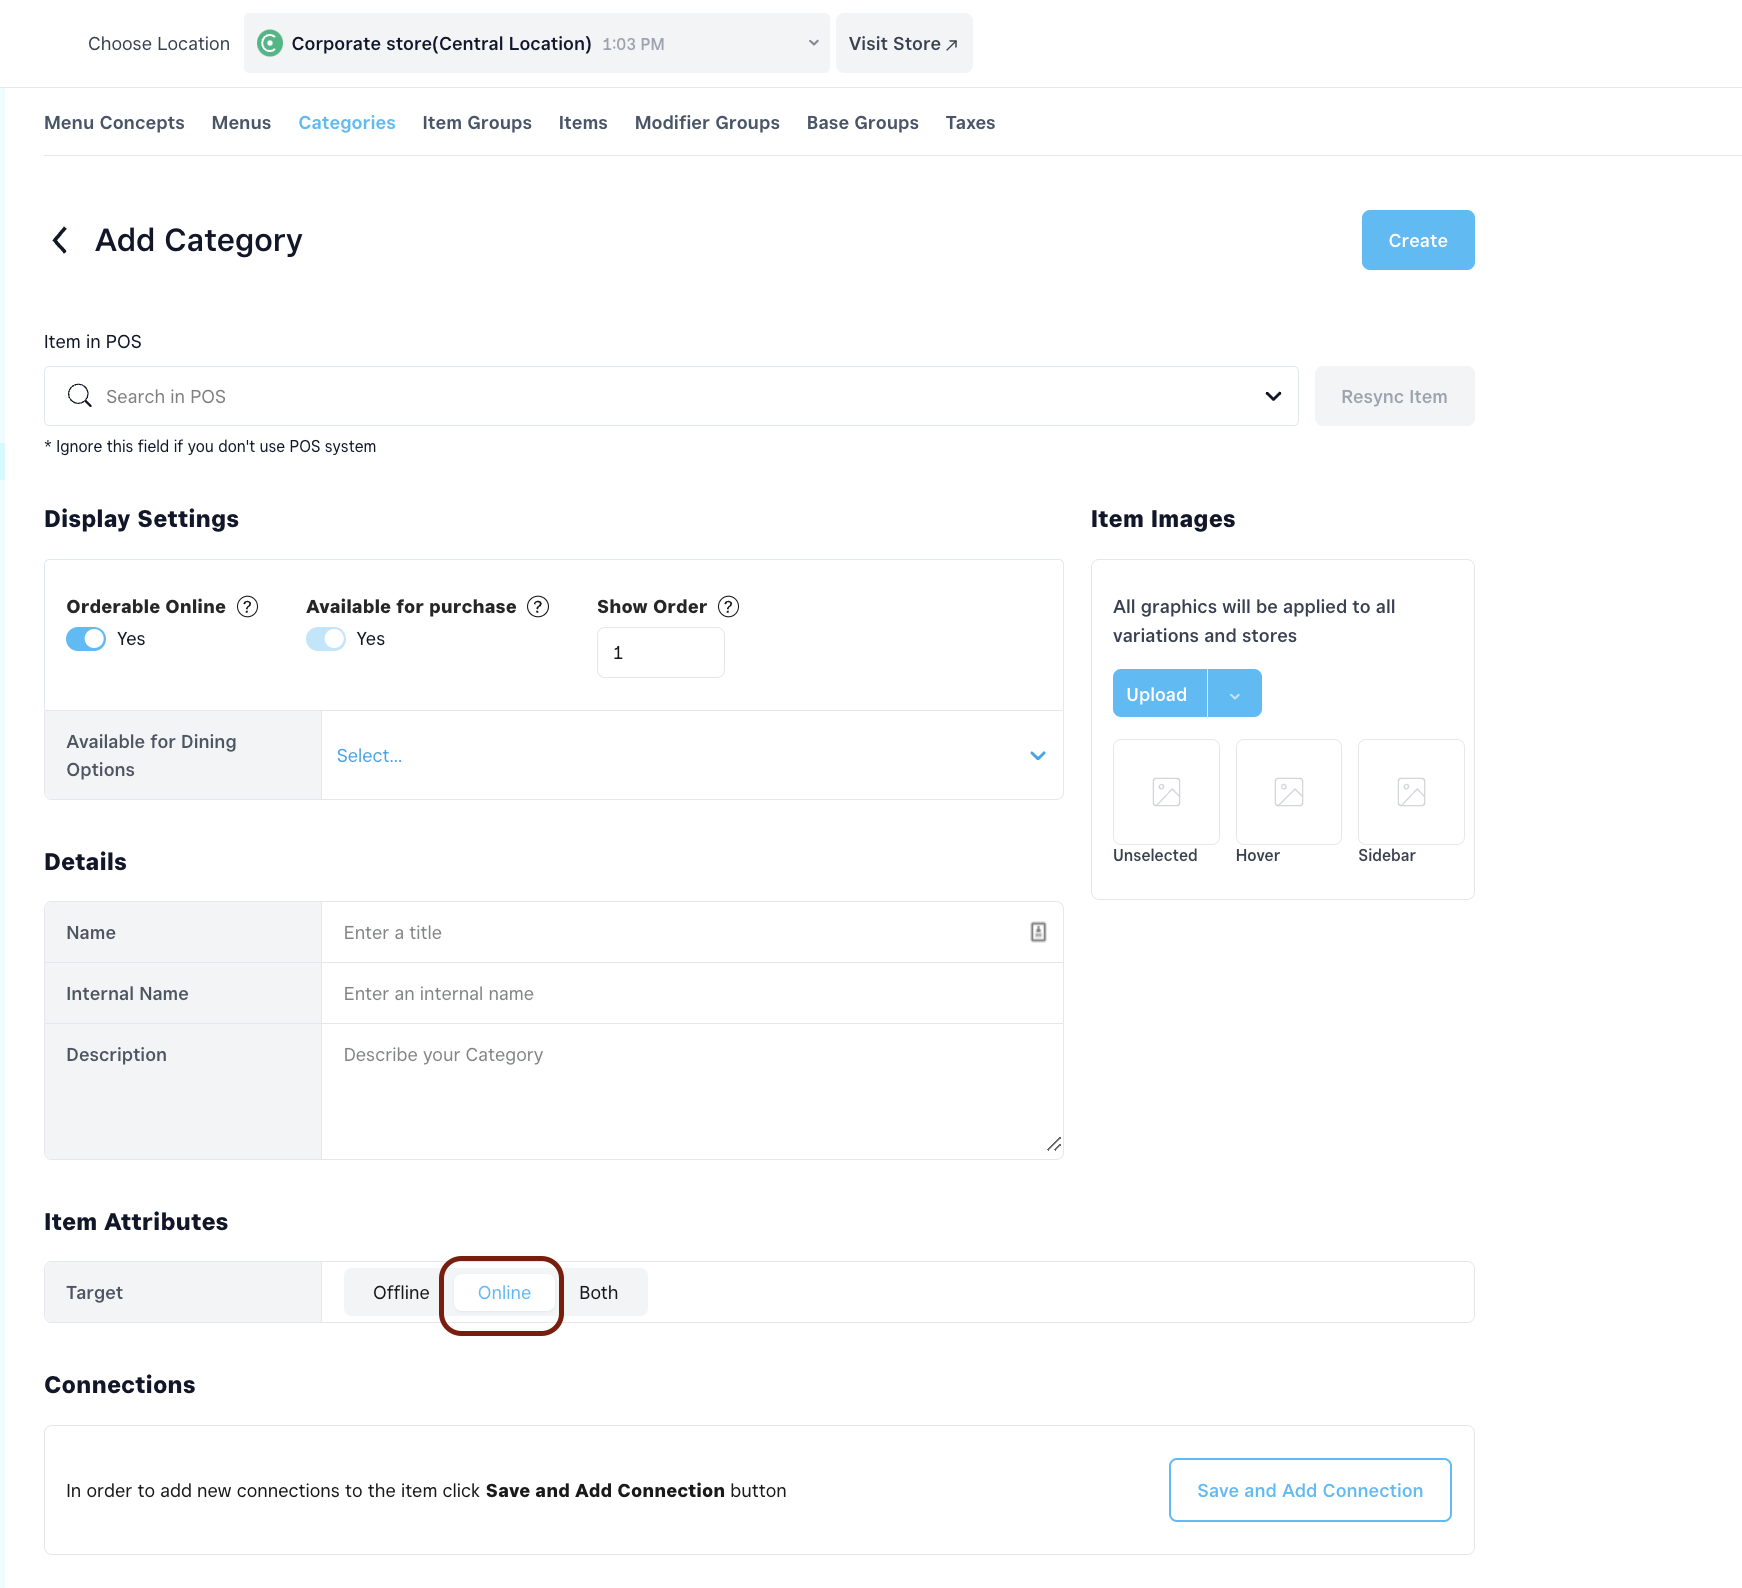
Step 3 - Write in the title and description. Under the Target setting, select “Online”. The category will be created only on the GP dashboard and not in Square.
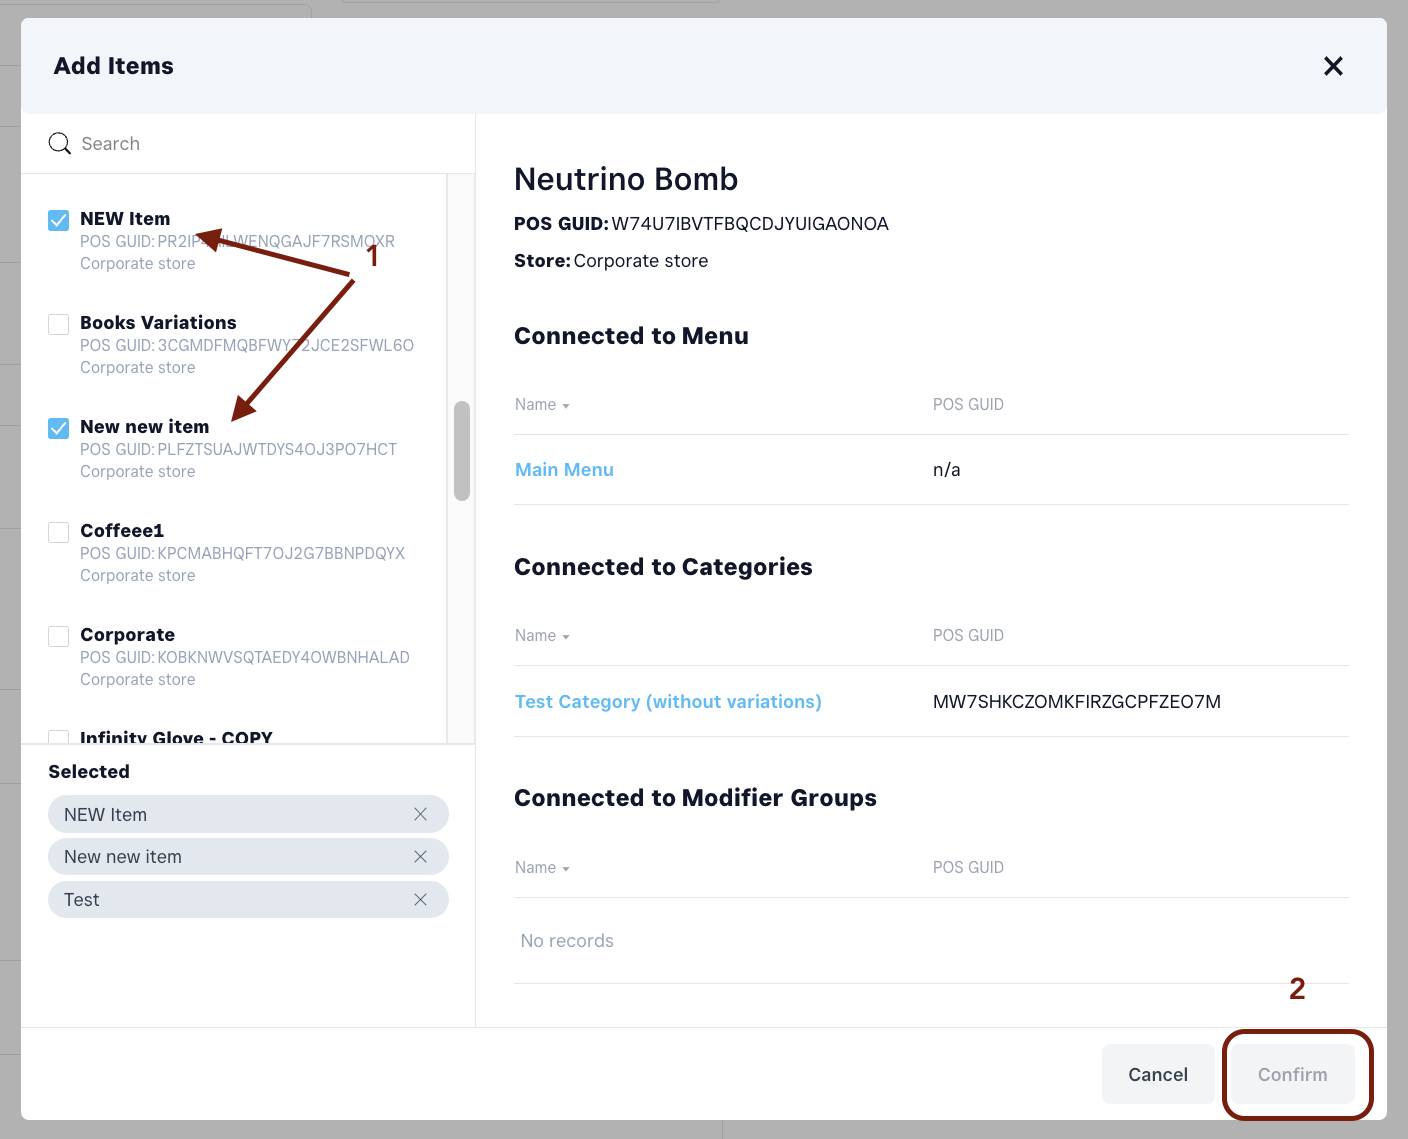
Step 4 - After creating the virtual category, scroll down to the “Connections” section. Under the Menu attach the category to the correct Menu, then under the items section, “Add connection”, and from the list select the items that have to appear in the new virtual category.
4. Item Groups#
When are Item Groups needed?
Item Groups serve the possibility of assembling items that are under the same category under a group based on similarities.
Let's say you have a category called "Drinks" with 9 items inside. To avoid customers having to scroll too long to find their drink, you can group the in Item Groups based on their similarities. For example, we will have 3 groups: 1. Coffees (adding all coffee based drinks); 2. Teas (adding al tea based drinks); 3. Cold Beverages (adding all iced drinks);
4.1. How to create an Item Group:#
If you want to add a new category from your POS please follow the instructions:
Go to Item Groups and click Add
Add the General Details (Title, Internal Name, Description and Price + Price Prefix)
Click on Save and Add Connections
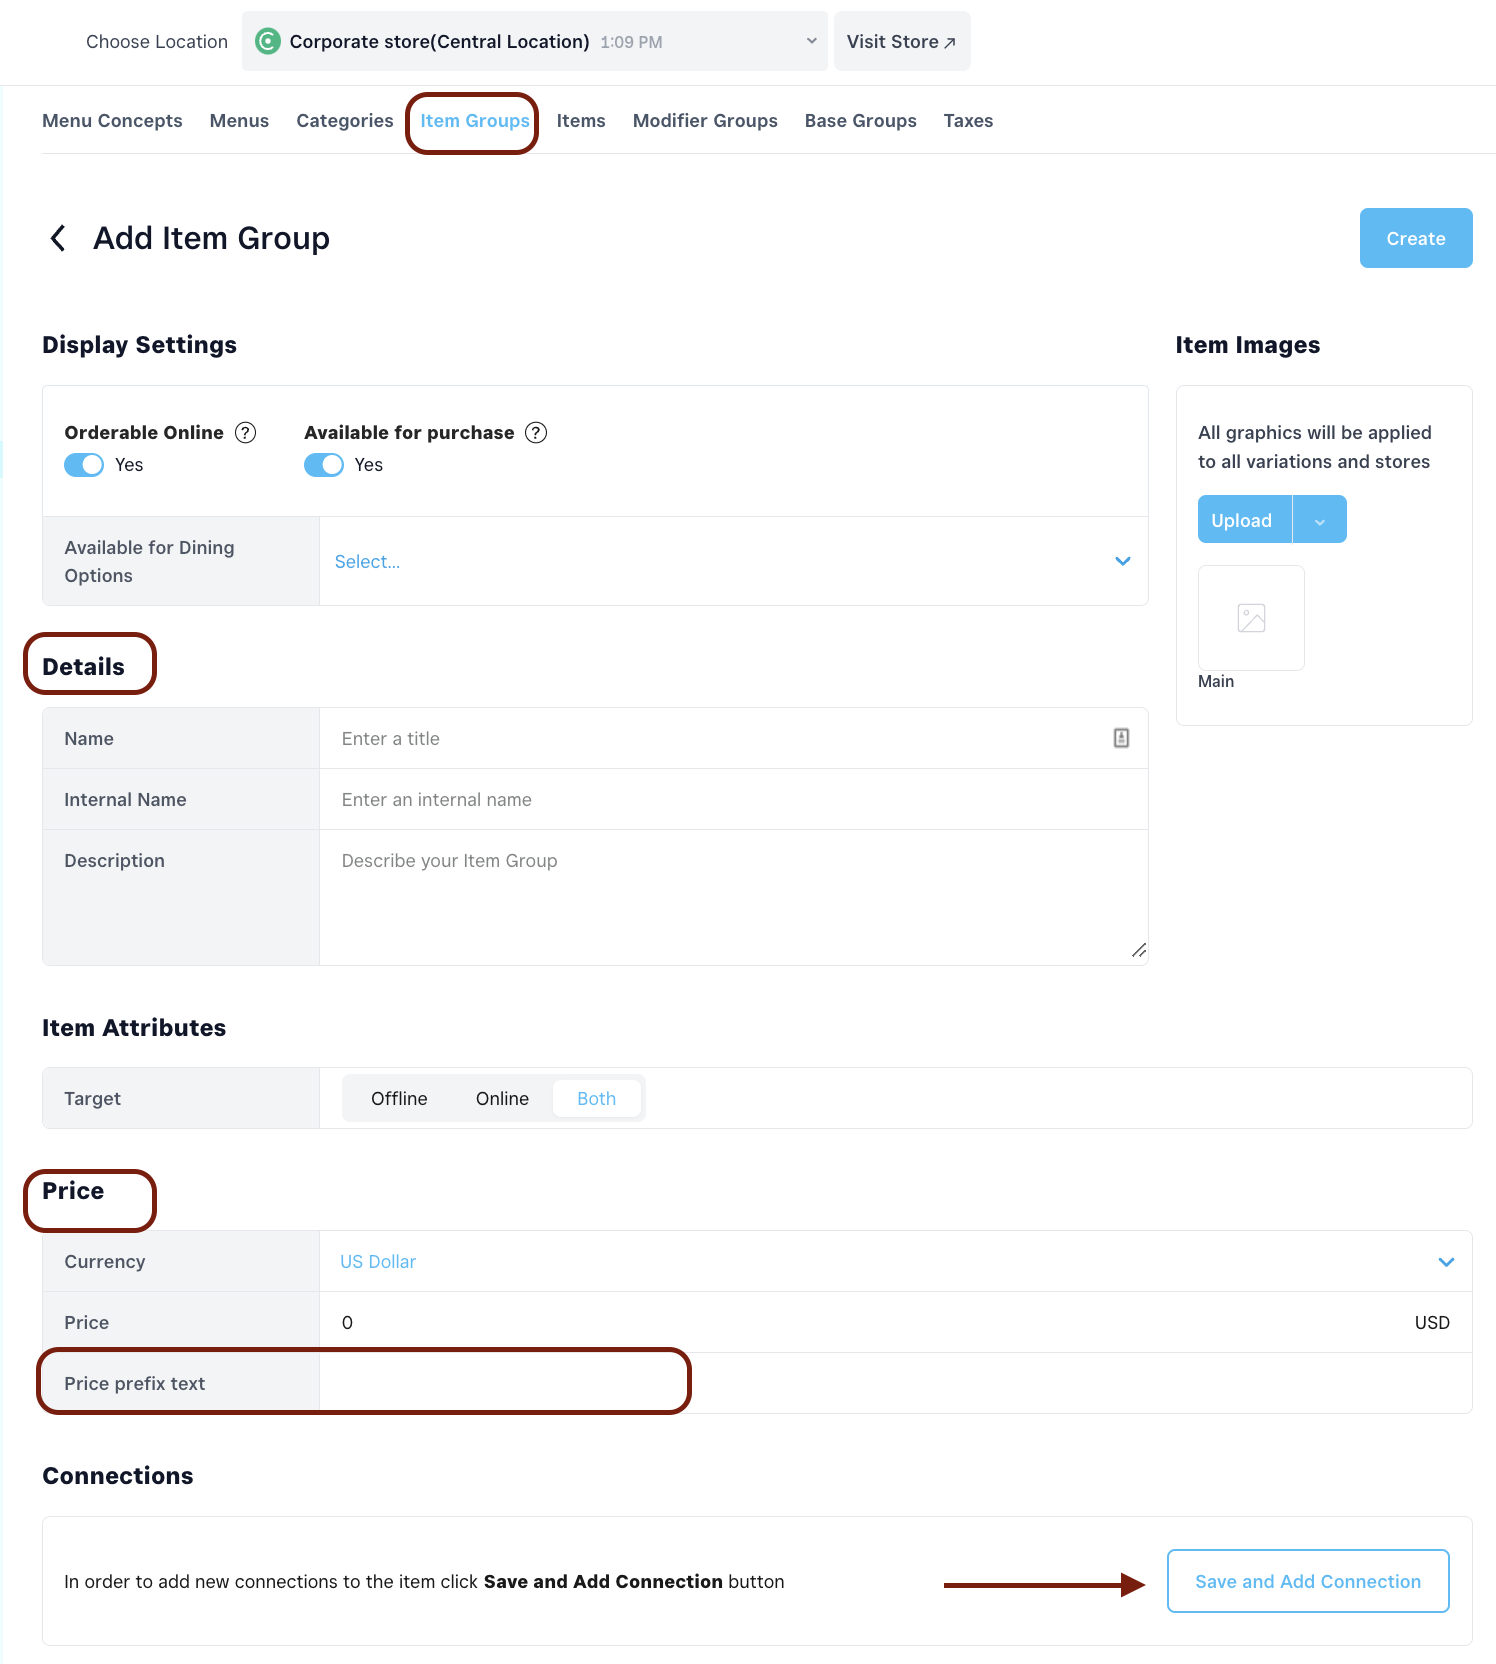
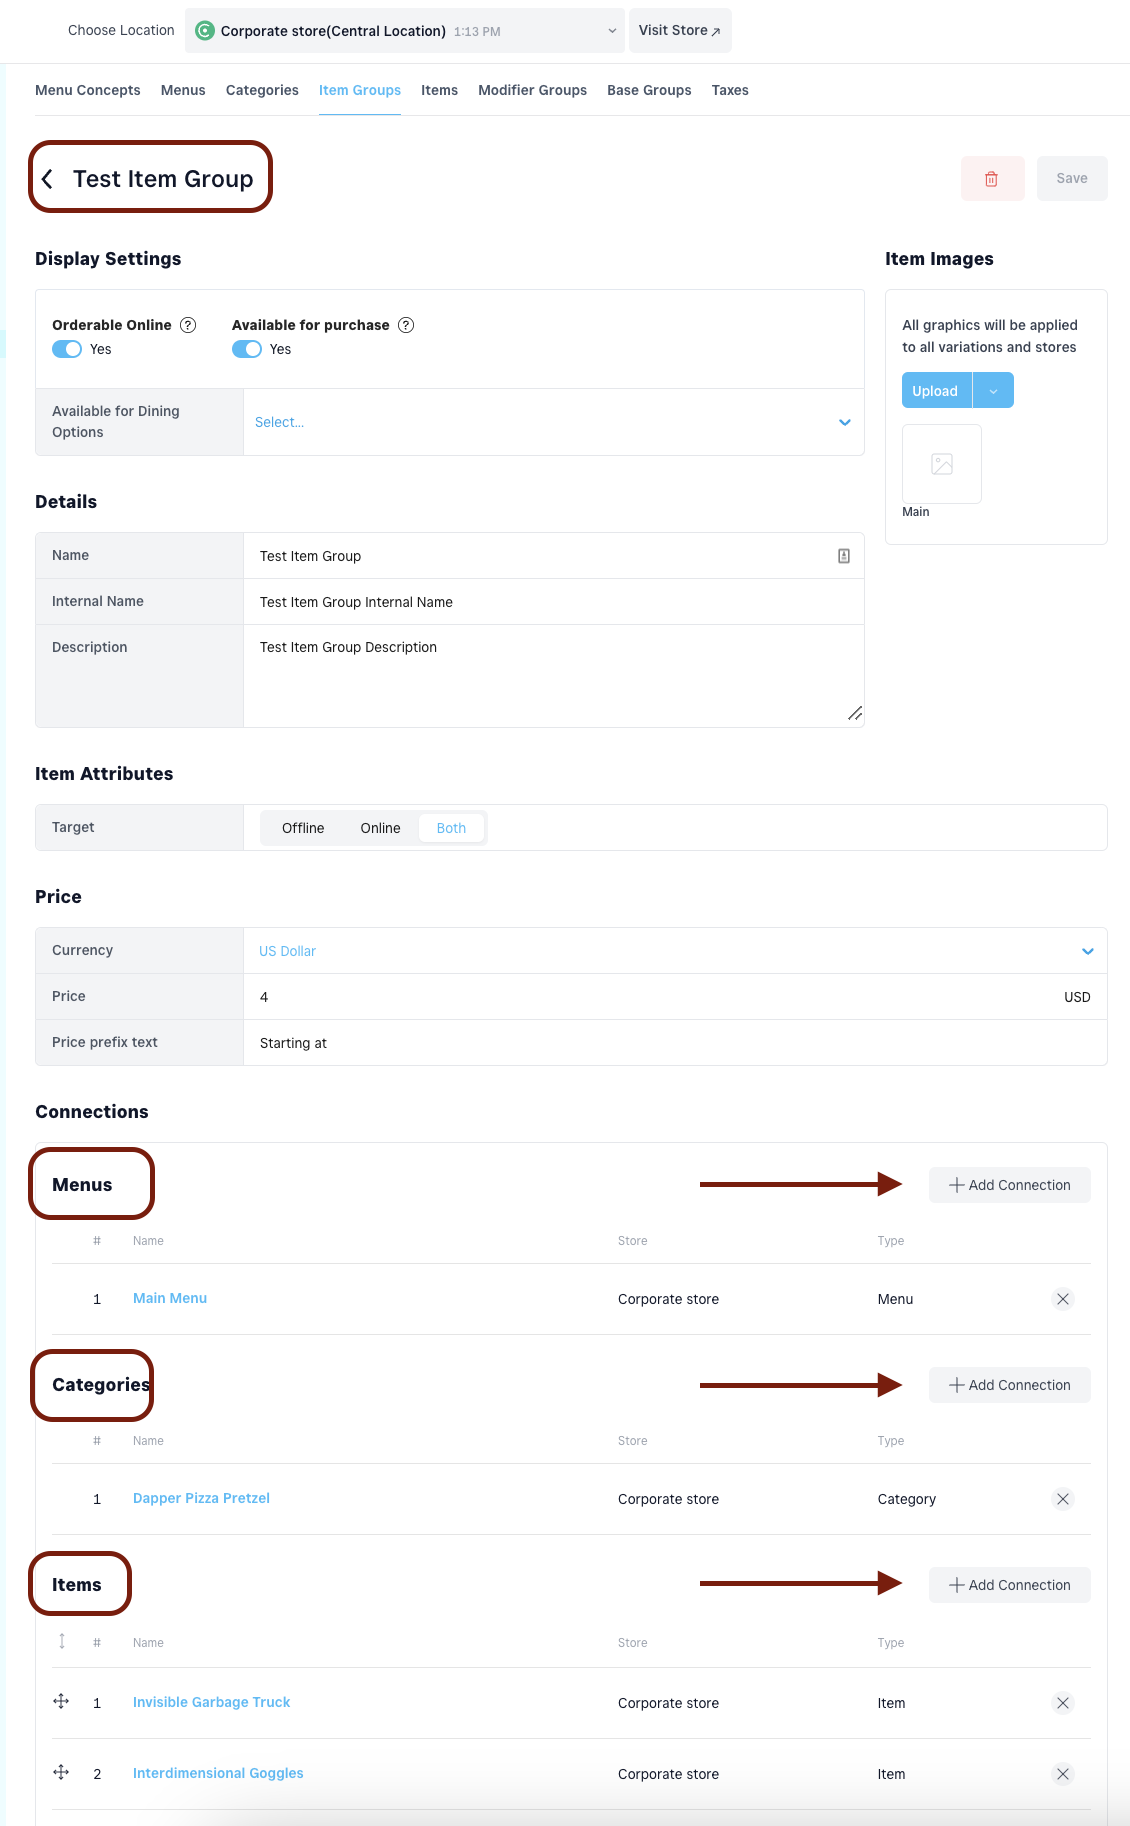
Connect the items you want to group
Connect the Item Group to the relevant Category, and Menu. The added connections will be saved automatically
4.2. How to edit item groups:#
An item group is a virtual layer of items, in GoParrot, that contains one or more items inside. The Item Groups will be visible only in Franchise Suite online ordering.
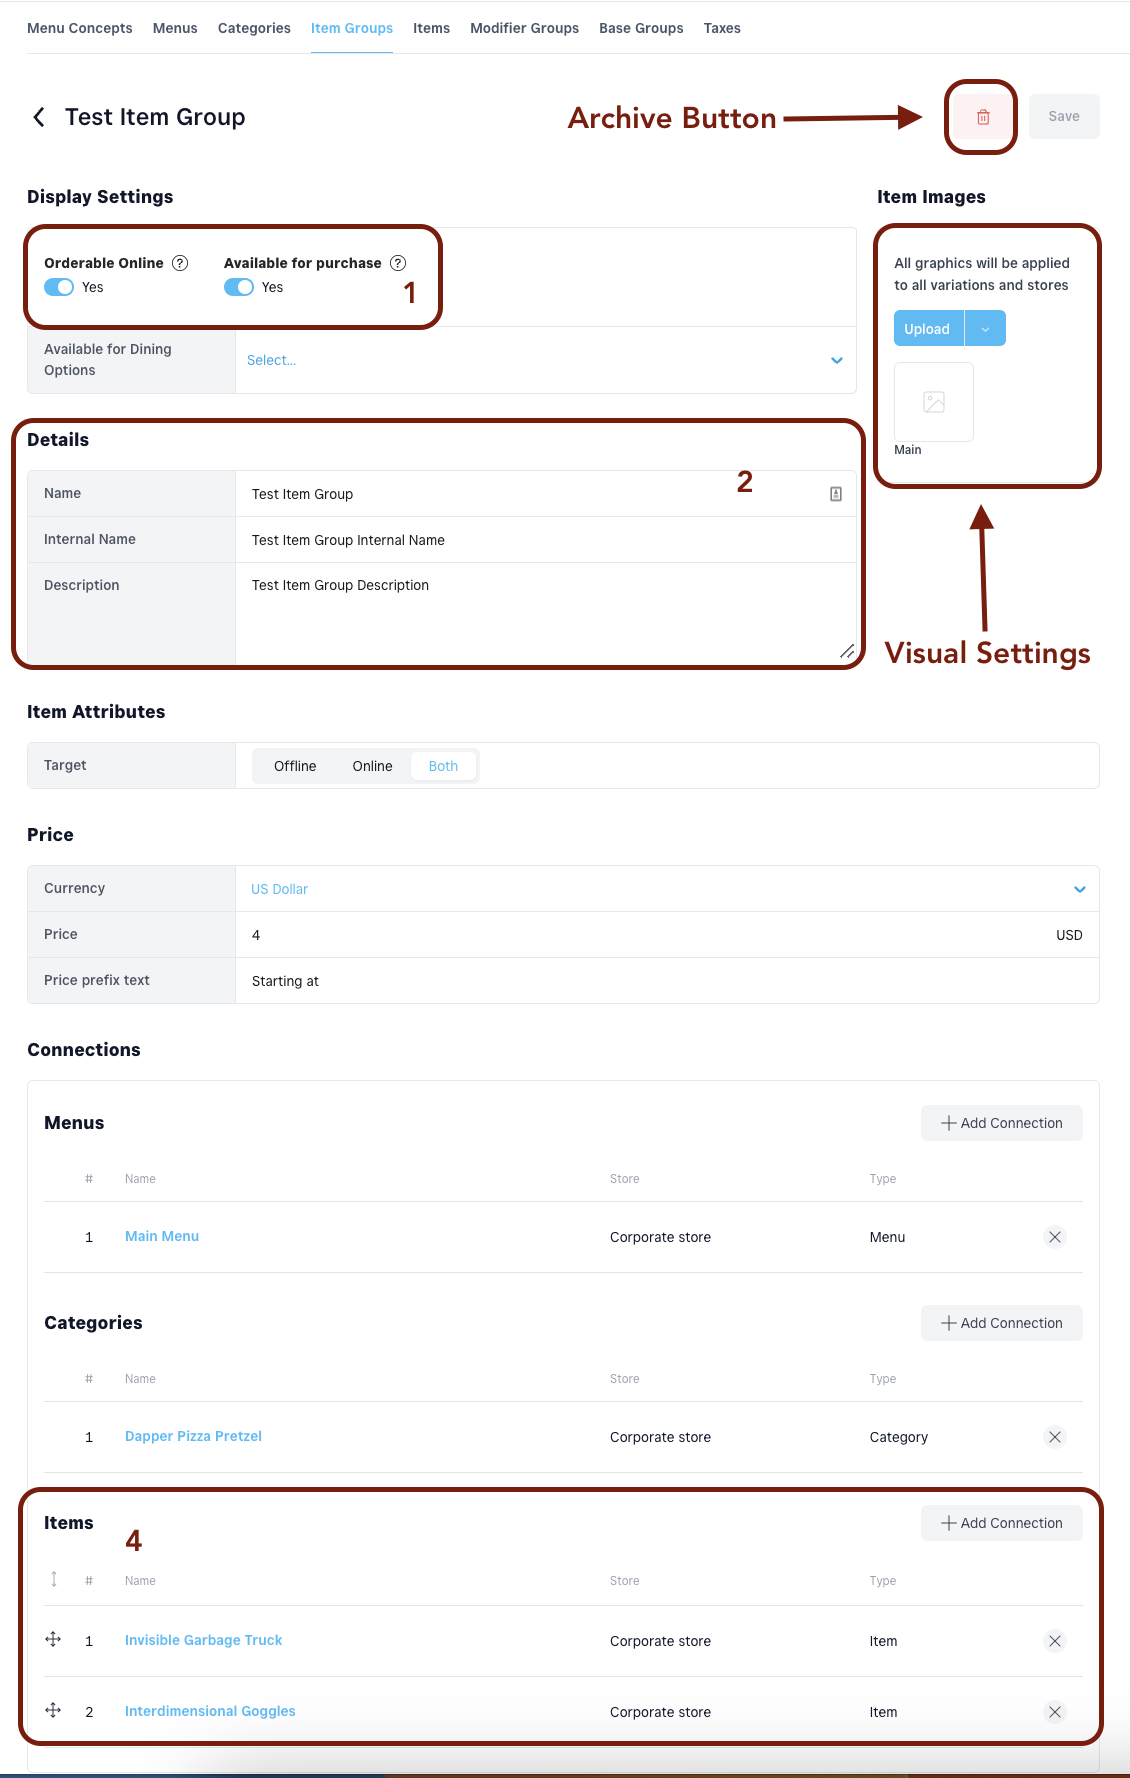
- Availability toggles:
- Orderable online - defines if any item group shall be orderable online. By default the toggle is on.
- Available - defines the availability of the item group. By default the toggle is on, if switched off the item group will disappear from the online ordering page.
- Archived - removes an item group from the online ordering page and the Dashboard. By default the toggle is off. In case you want to retrieve any archived item groups, filter the categories by “Only Archived”.
- Show order - defines the show order number of the item group.
- Changing titles & descriptions:
- Name- changes the title of an item group.
- Description- description of the item group that will be displayed under the name.
- Internal name - will be visible only in the Dashboard.
- Visual Settings - upload a picture for the item group. Recommended size 955 x 500 pixels, you can upload bigger sizes as well.
- Changing show-order - drag & drop and rearrange the items inside the item group. Check the changes in real time, on the online ordering page.
5. Items#
5.1. How to create items in Franchise Suite:#
Important!
If the item will be present at all franchisee locations (Central Menu), complete the action from the Central Location.
If the item should be store specific and the Menu Permissions are enabled, the item should be created at store level (franchisee)
Select where you want to create the item (Central Location or Franchisee)
Go to Menu Management and then Items,

Click the "Add Item" button in the top right corner;
Add all the necessary details such as:
- Title
- Description
- Target “BOTH”
- Price and Currency
Go back to the top and click Create;
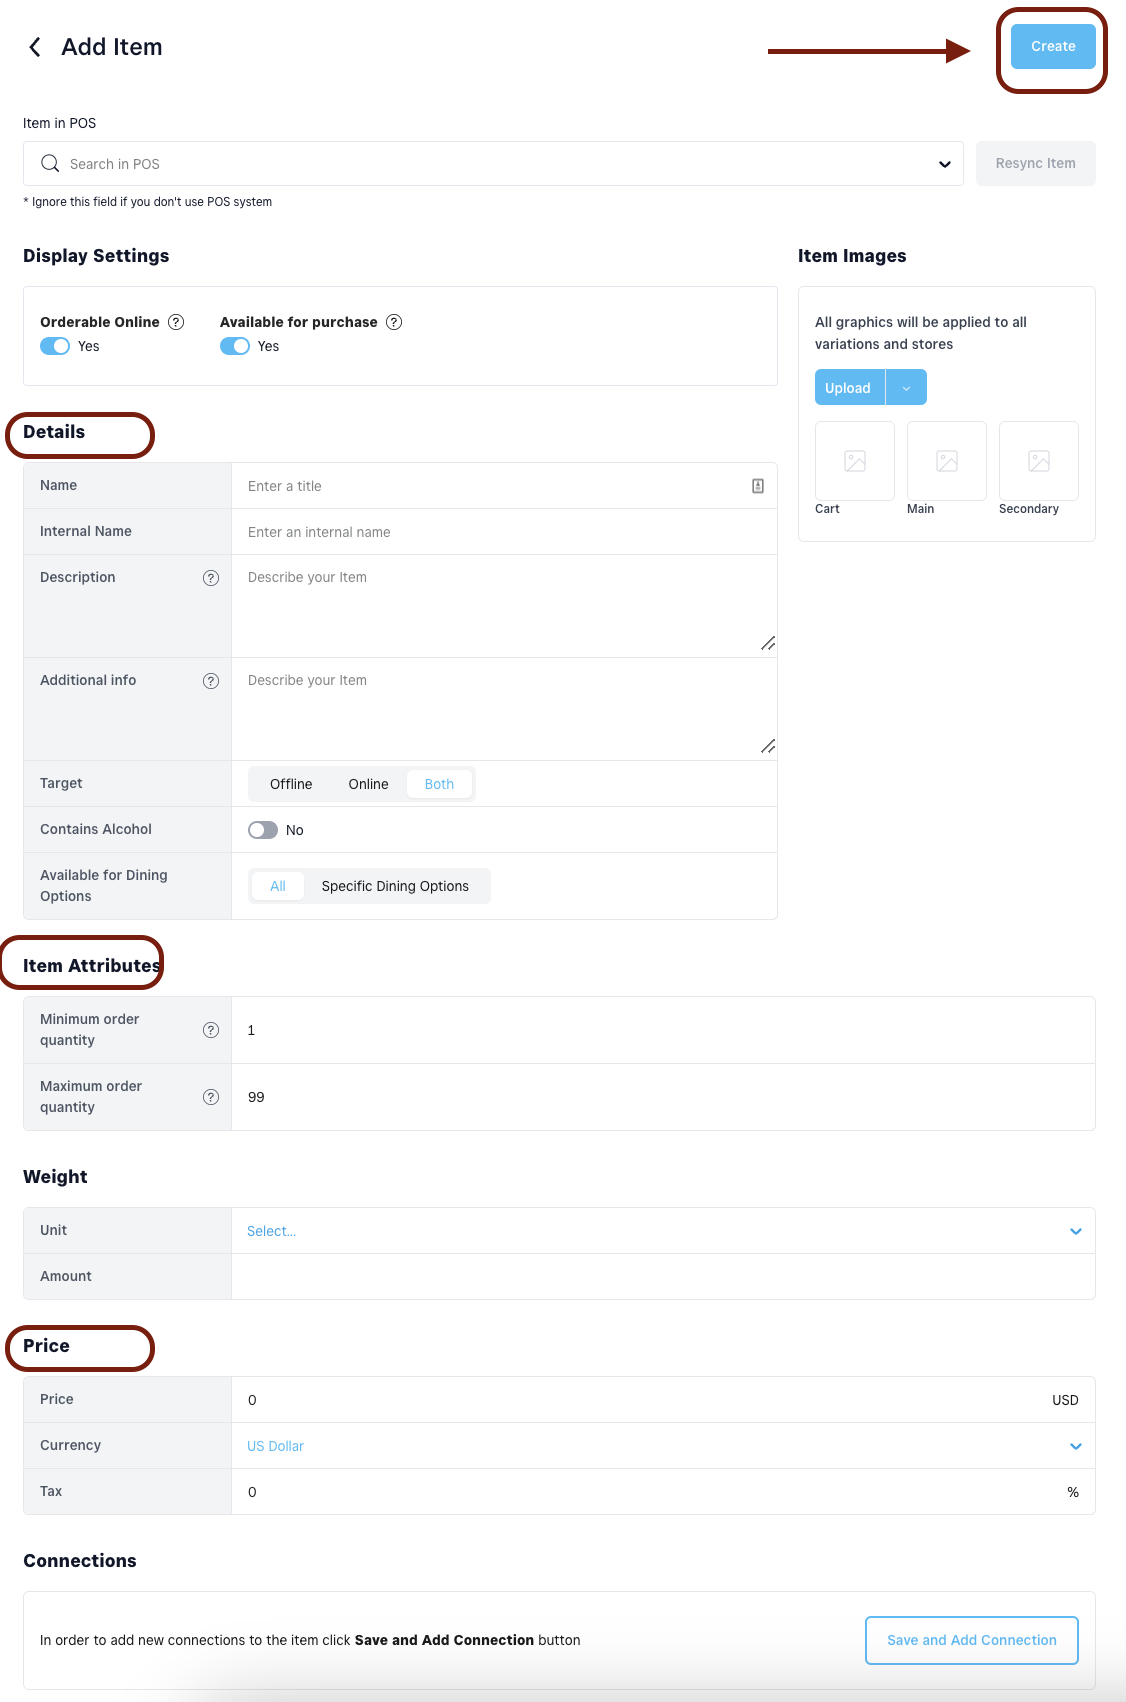
The item is now saved! On the same page scroll down and add Connections. Connect the item to the appropriate Menu and Category and attach to it the necessary Modifier Groups (if needed).
5.2.Creating Items With Variations#
Go to Menu Management and then Items,
Click "Add Item" button,
Create your item by adding the necessary details (same as for regular items)
After the item is saved, scroll down and click on “Add Variation”
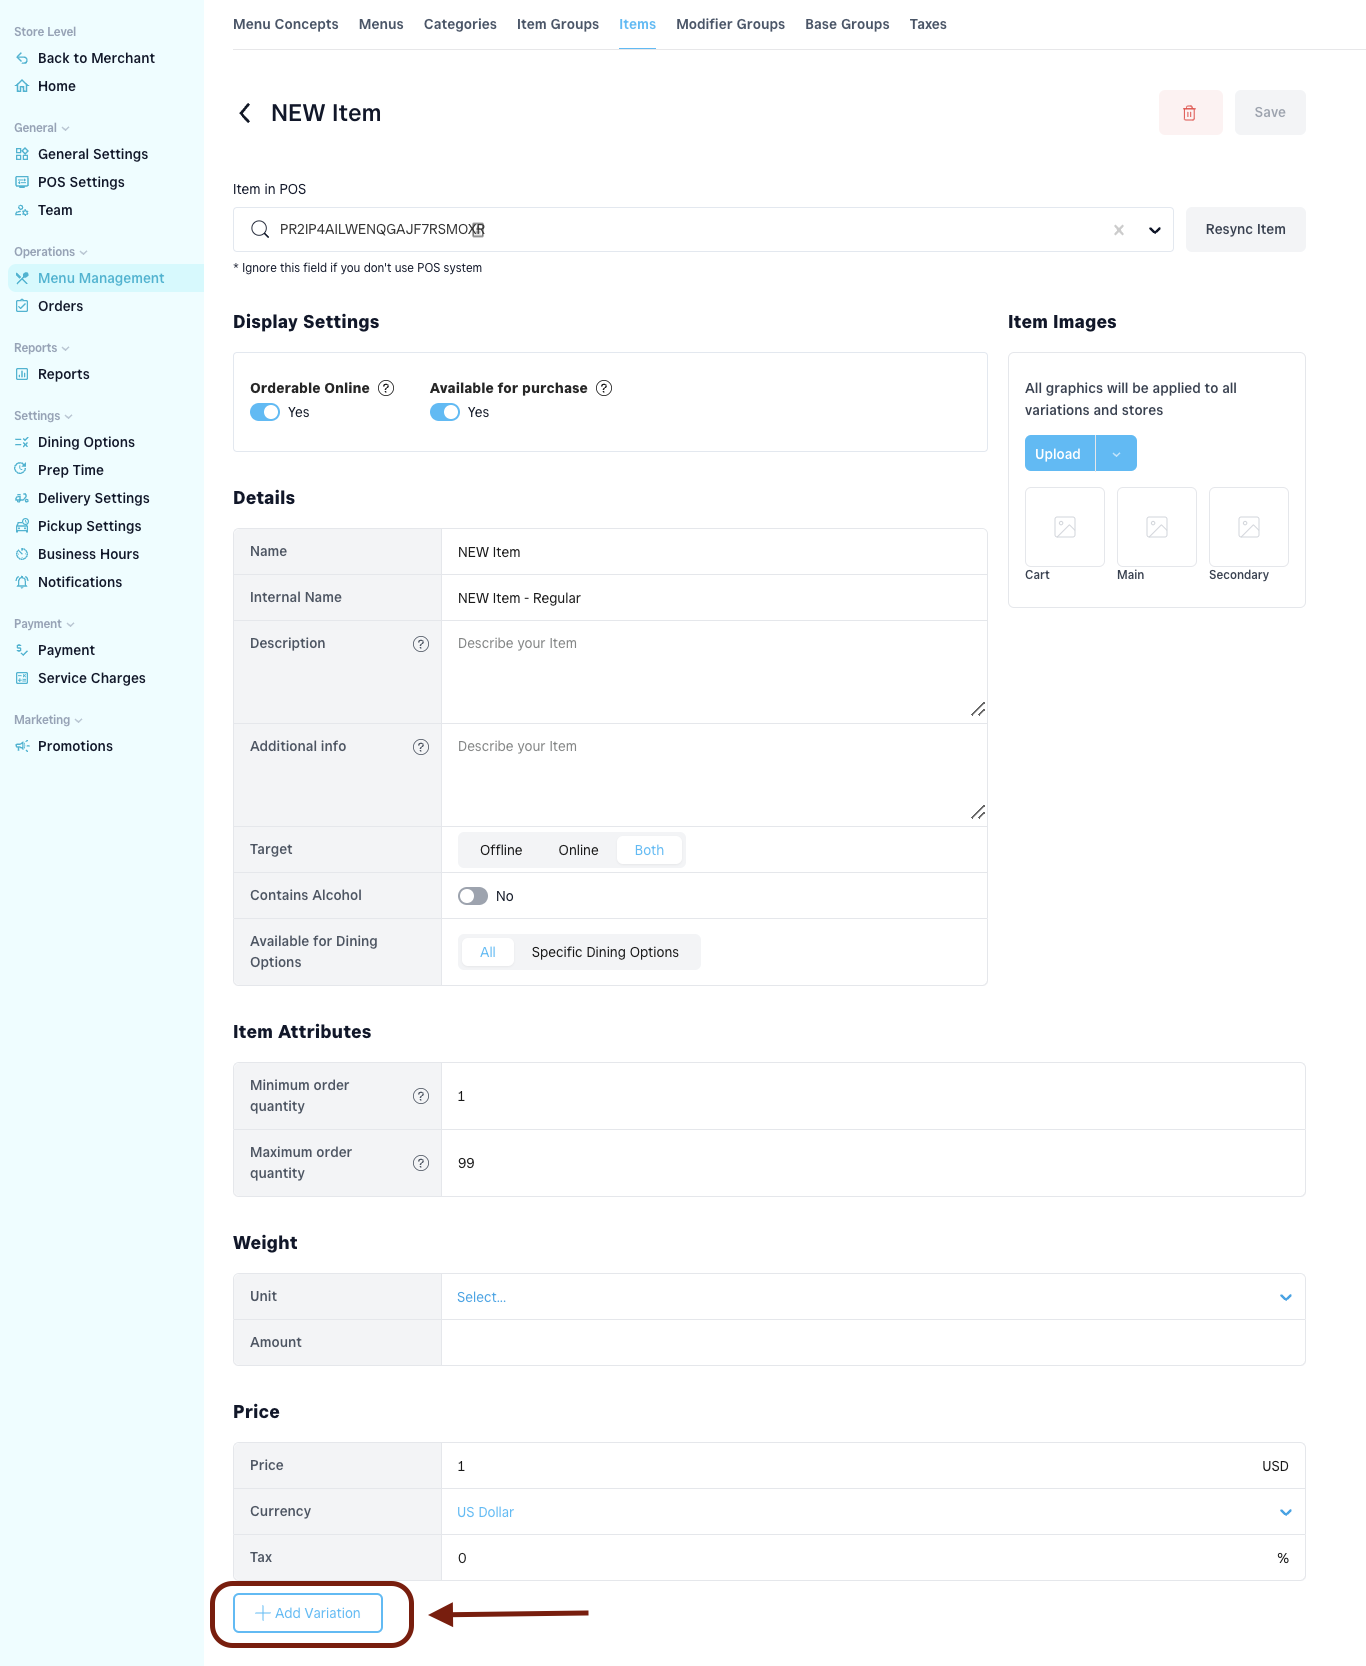
Add the Details for your variation and click Create from the top right corner
By default your variation will be saved together with a default one that is the copy of your original Item (if need be, edit the default created variation and save)
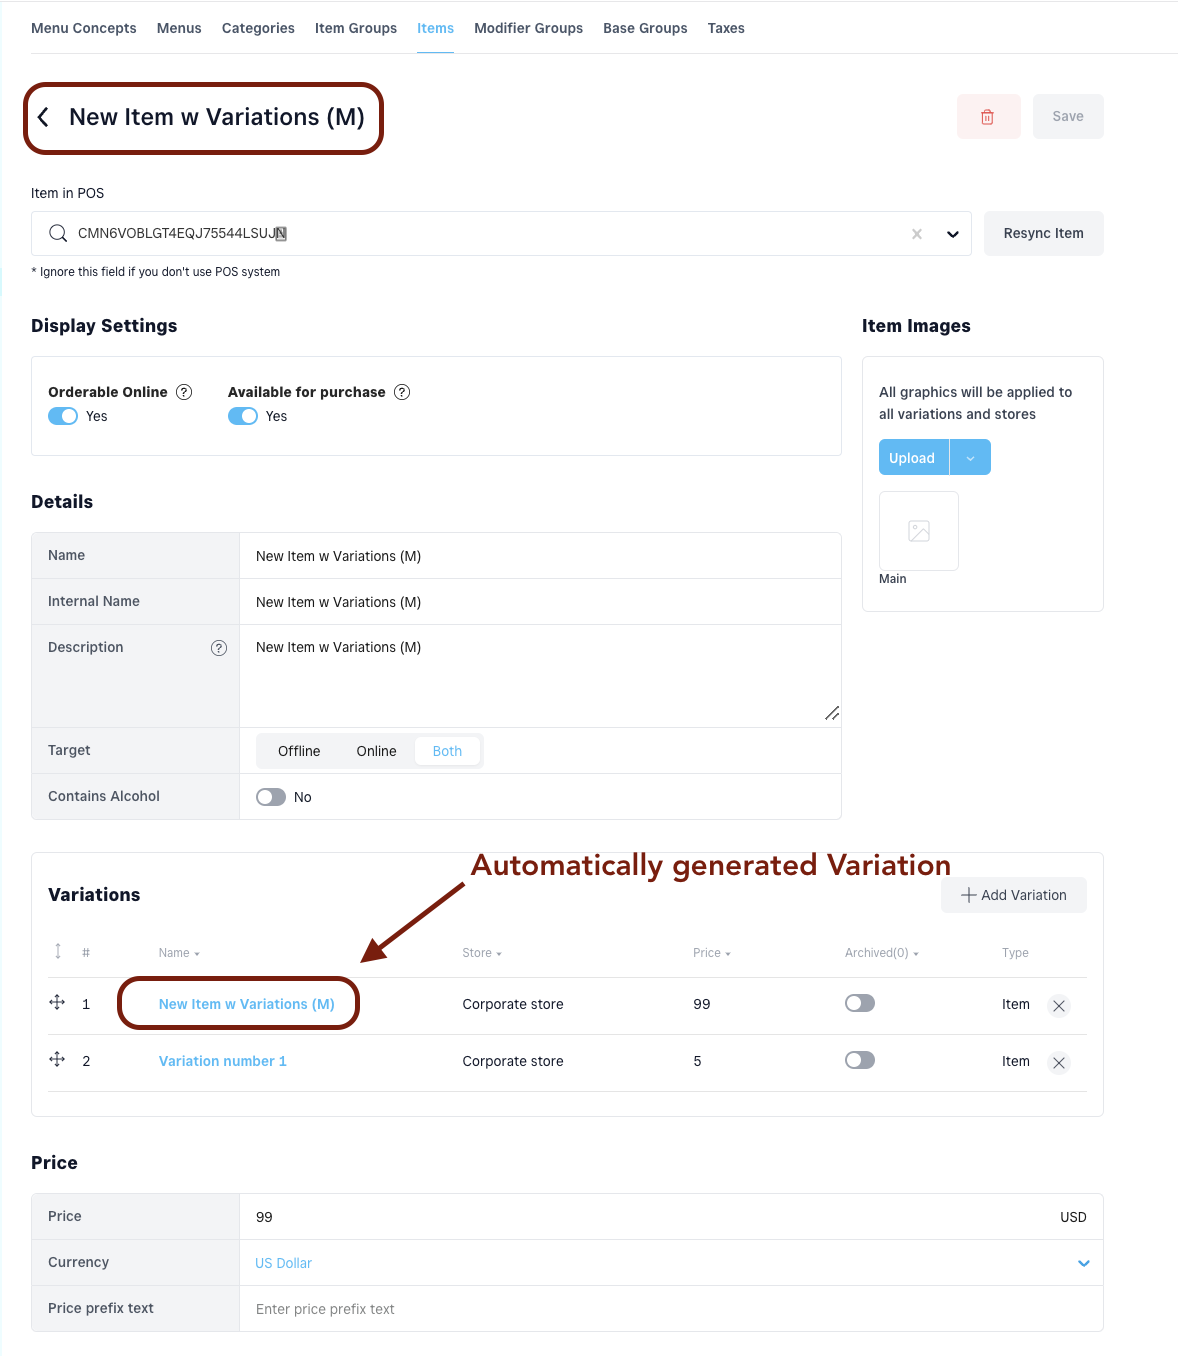
After finishing, don't forget to attach Modifier Groups;
Congrats, you’re all done!
5.3. How to edit/manage items:#
- Sync an item
Sync the changes made in POS to any item. The sync will pull the new price, internal name, availability, minimum/maximum selection for modifiers, required modifiers.
- Availability toggles:
- Orderable online - defines if any item shall be orderable online. By default the toggle is on.
- Available - defines the availability of the item. By default the toggle is on, if switched off - the item will disappear from the online ordering page.
- Archived- removes an item from the online ordering page and the Dashboard. By default the toggle is off. In case you want to retrieve any archived items, filter them by “Only Archived”.
- Item show order - defines the show order number of the item.
- Changing titles & description:
- Name -changes the title of the item.
- Description - description of the item that will be displayed under the name.
- Internal name - will be visible only in the Dashboard
- Uploading pictures
- Minimum/maximum order quantity - defines the order quantity of the item. Customers will not be able to order less than the minimum and more than the maximum.
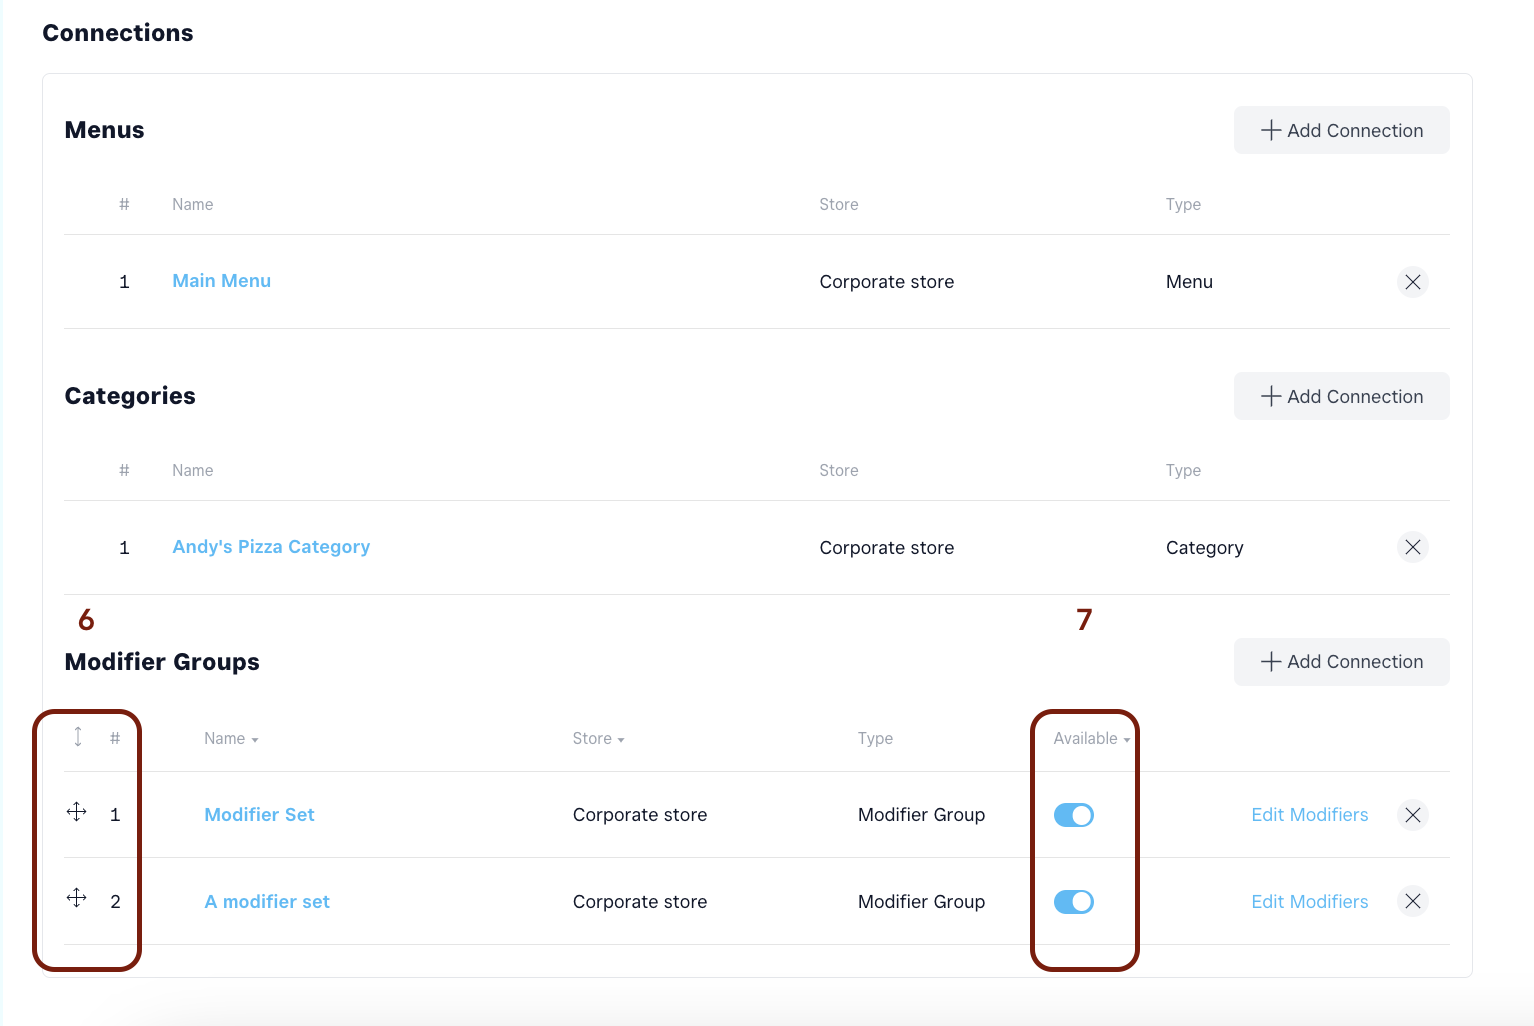
- Changing modifier groups show-order - drag & drop and rearrange the modifier groups inside the item. Check the changes in real time, on the online ordering page.
- Disable the modifier groups that aren't relevant for the item. This change is being performed in GoParrot Dashboard only, no need to mirror this in POS.
Note: Each item you want to sell in the Franchise Stores, as a part of the Central Menu Replica, should be created on the Central Location. When adding a new item in GoParrot you must build the connection to the menu and category. Each item must belong to a menu and a category.
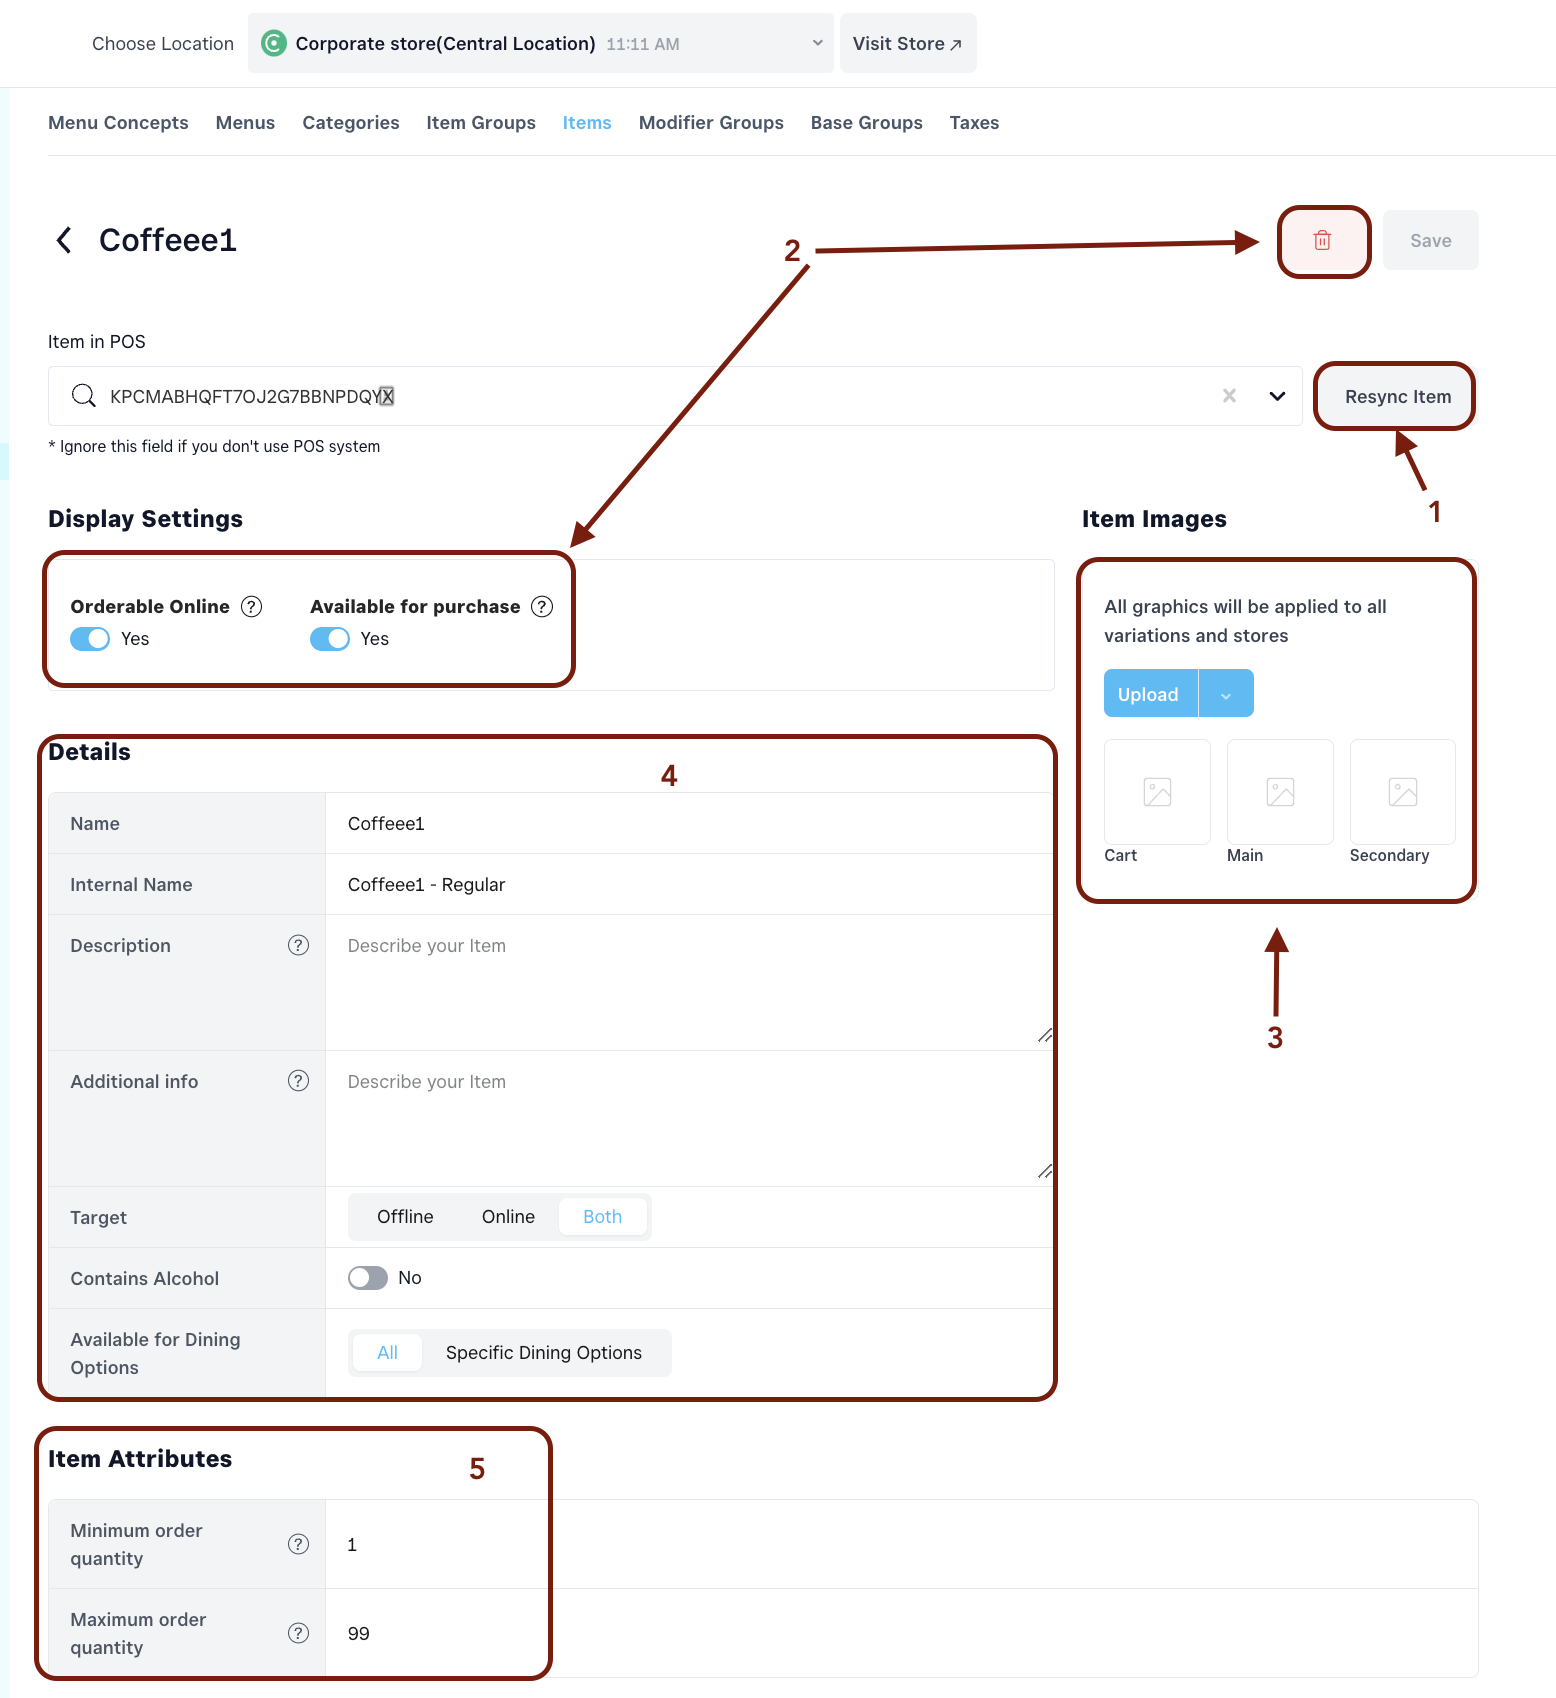
5.4. How to Upload Item Images for Online Ordering#
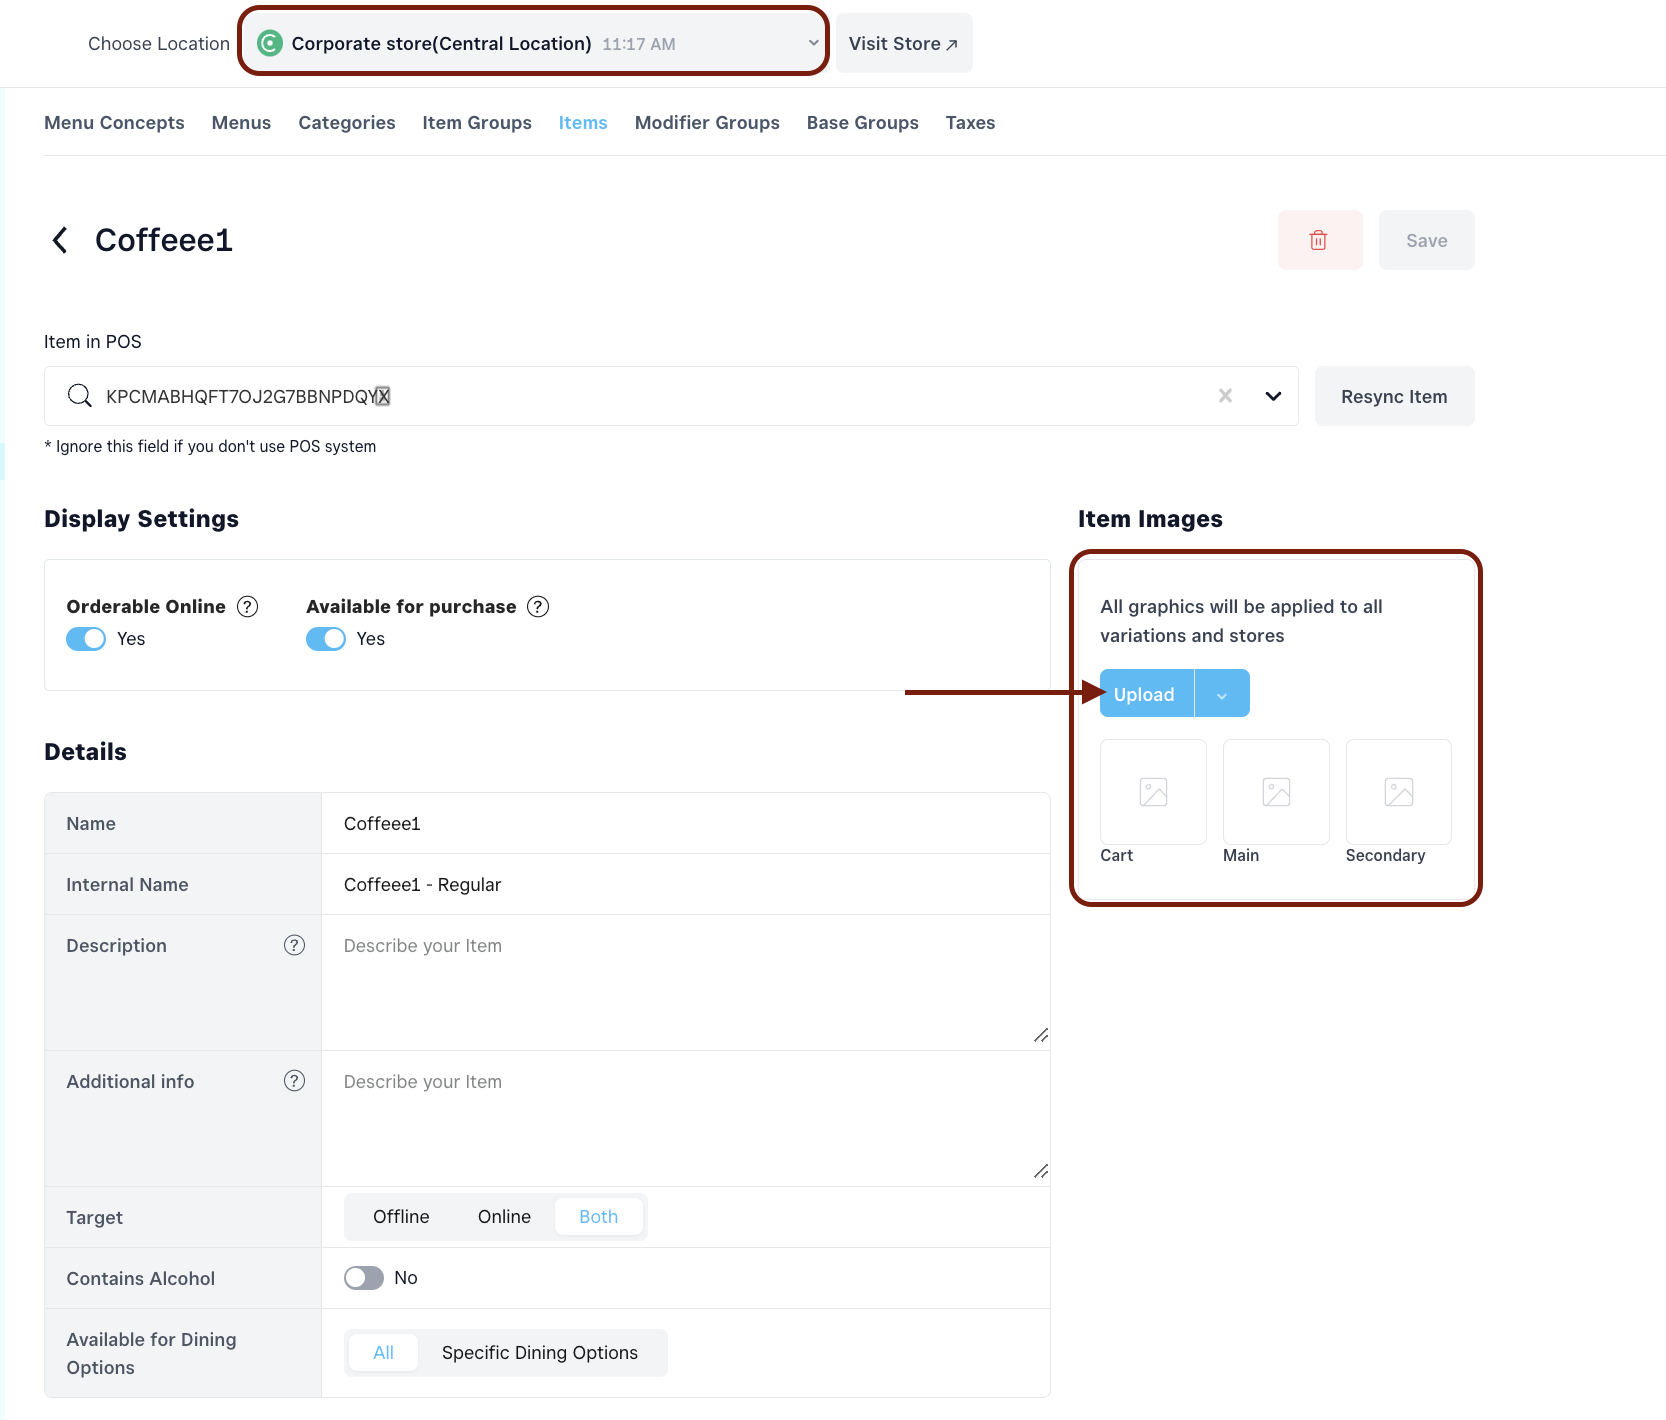
The Franchise Suite does not pull the Square Item Images to the GP dashboard and does not apply it for online ordering pages. In this case, it is necessary to upload them manually to the Central Menu in the GP Dashboard.
Step 1 - Log in to the GP Dashboard. Select the Central Location from the dropdown menu.
Step 2 - Go to Menu Management, click the “Items” tab and select an item from the list.
Step 3 - On this page - you can upload 3 types of images - Cart, Main and Secondary.
Step 4 - After clicking on the Save button - the images will be replicated to the items in the franchise menus in the GP Dashboard.
6. Modifier Groups#
6.1. How to create Modifier Groups
Important! If the modifier group should be franchisee specific,. And the permission yo have a store specific menu is on, select the needed franchisee location in the dashboard. If the Mod. Group will be part of the Central Menu, select the Central Location from your dashboard.
- Under the Menu Management tab, select Modifier Groups
- Click Add from the top right corner
- Fill out all the necessary details such as: -Name (Internal Name) -Description -Item Attributes (Min/Max selections allowed) -Select if the Modifier Group is Mandatory or Optional
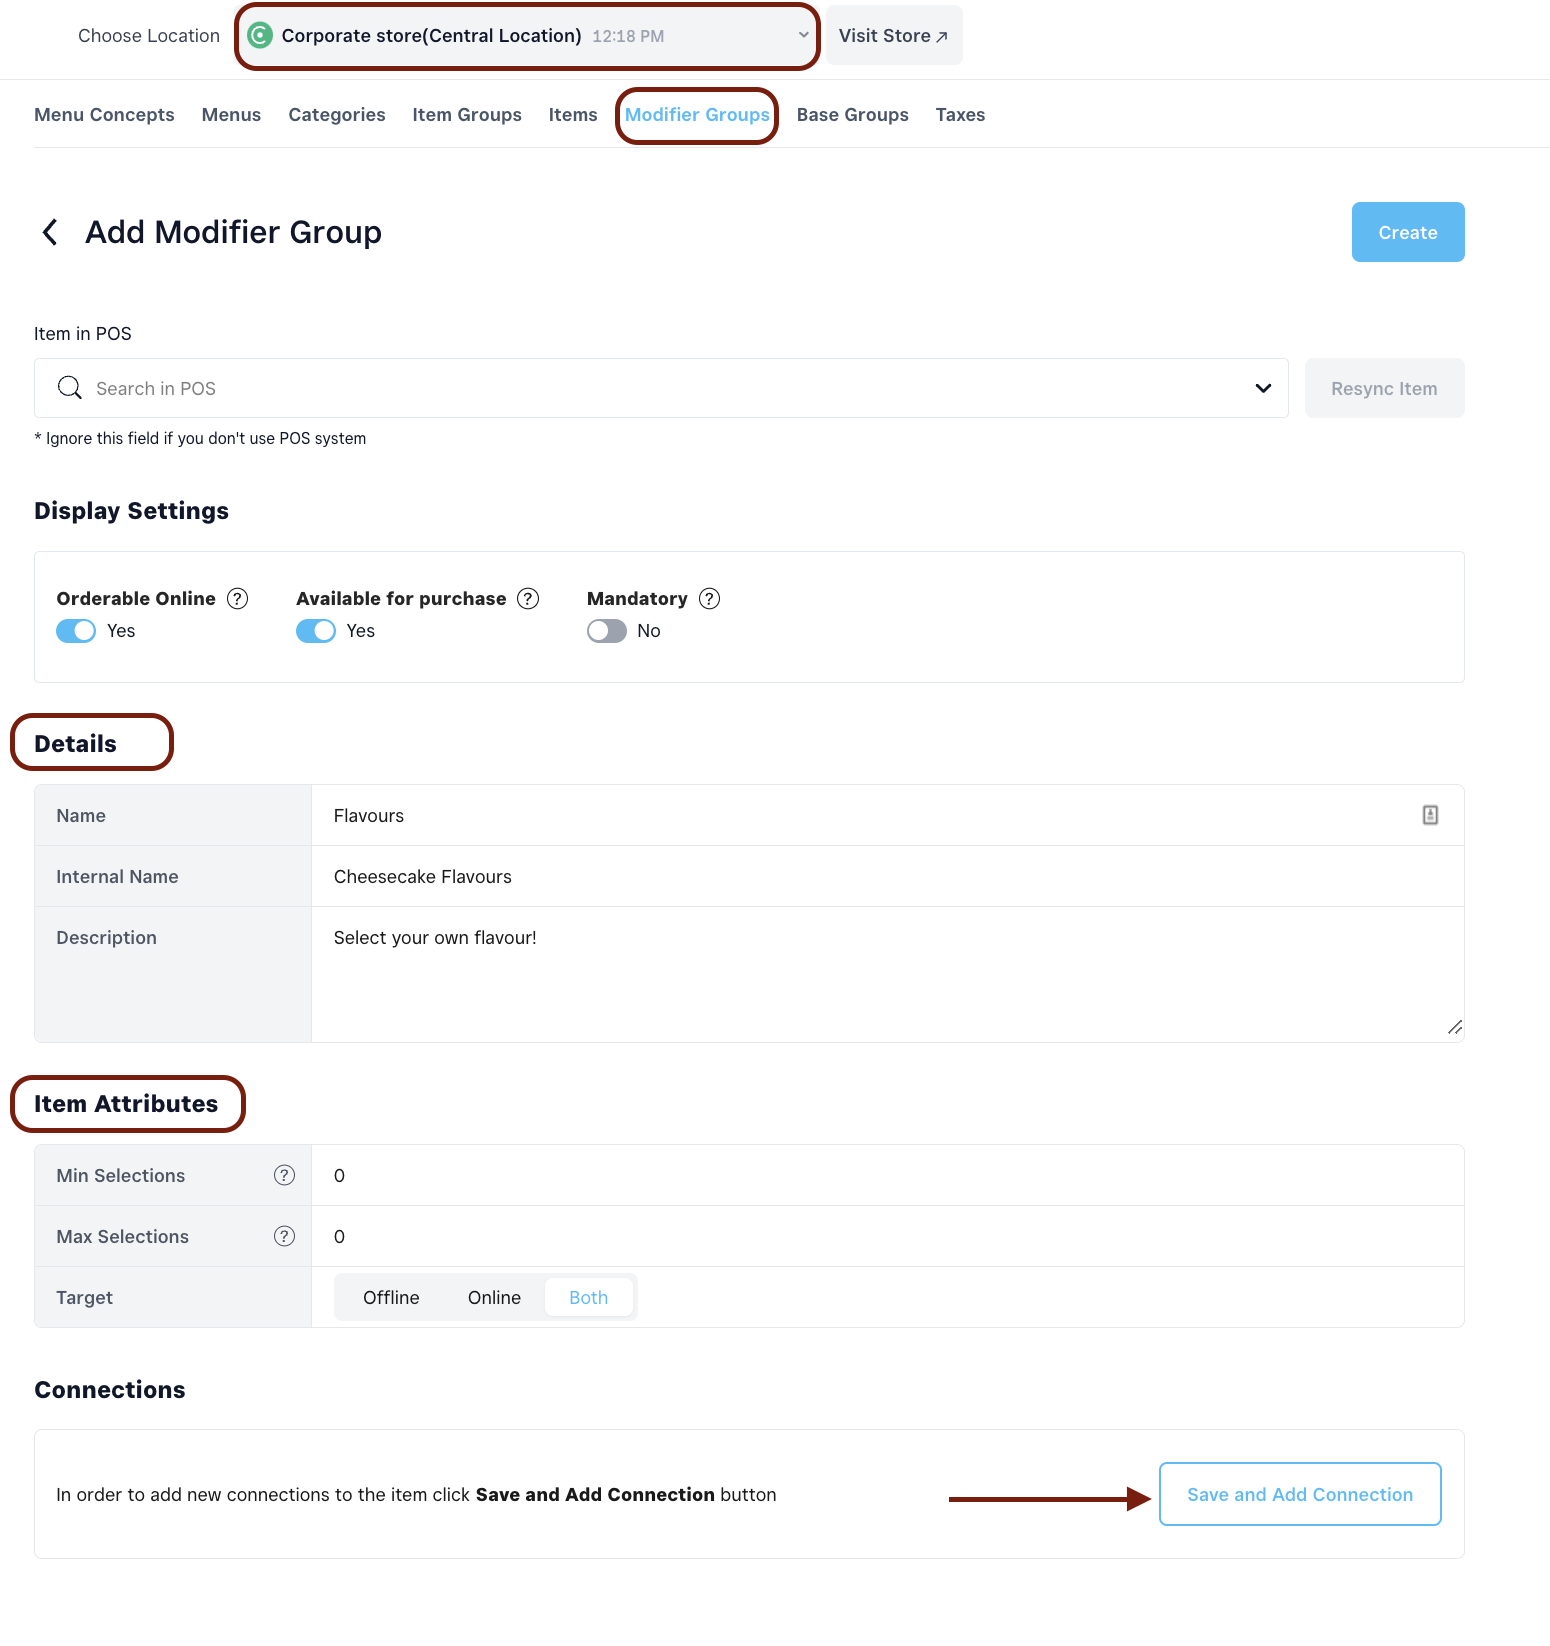
- Click “Save and add Connections”
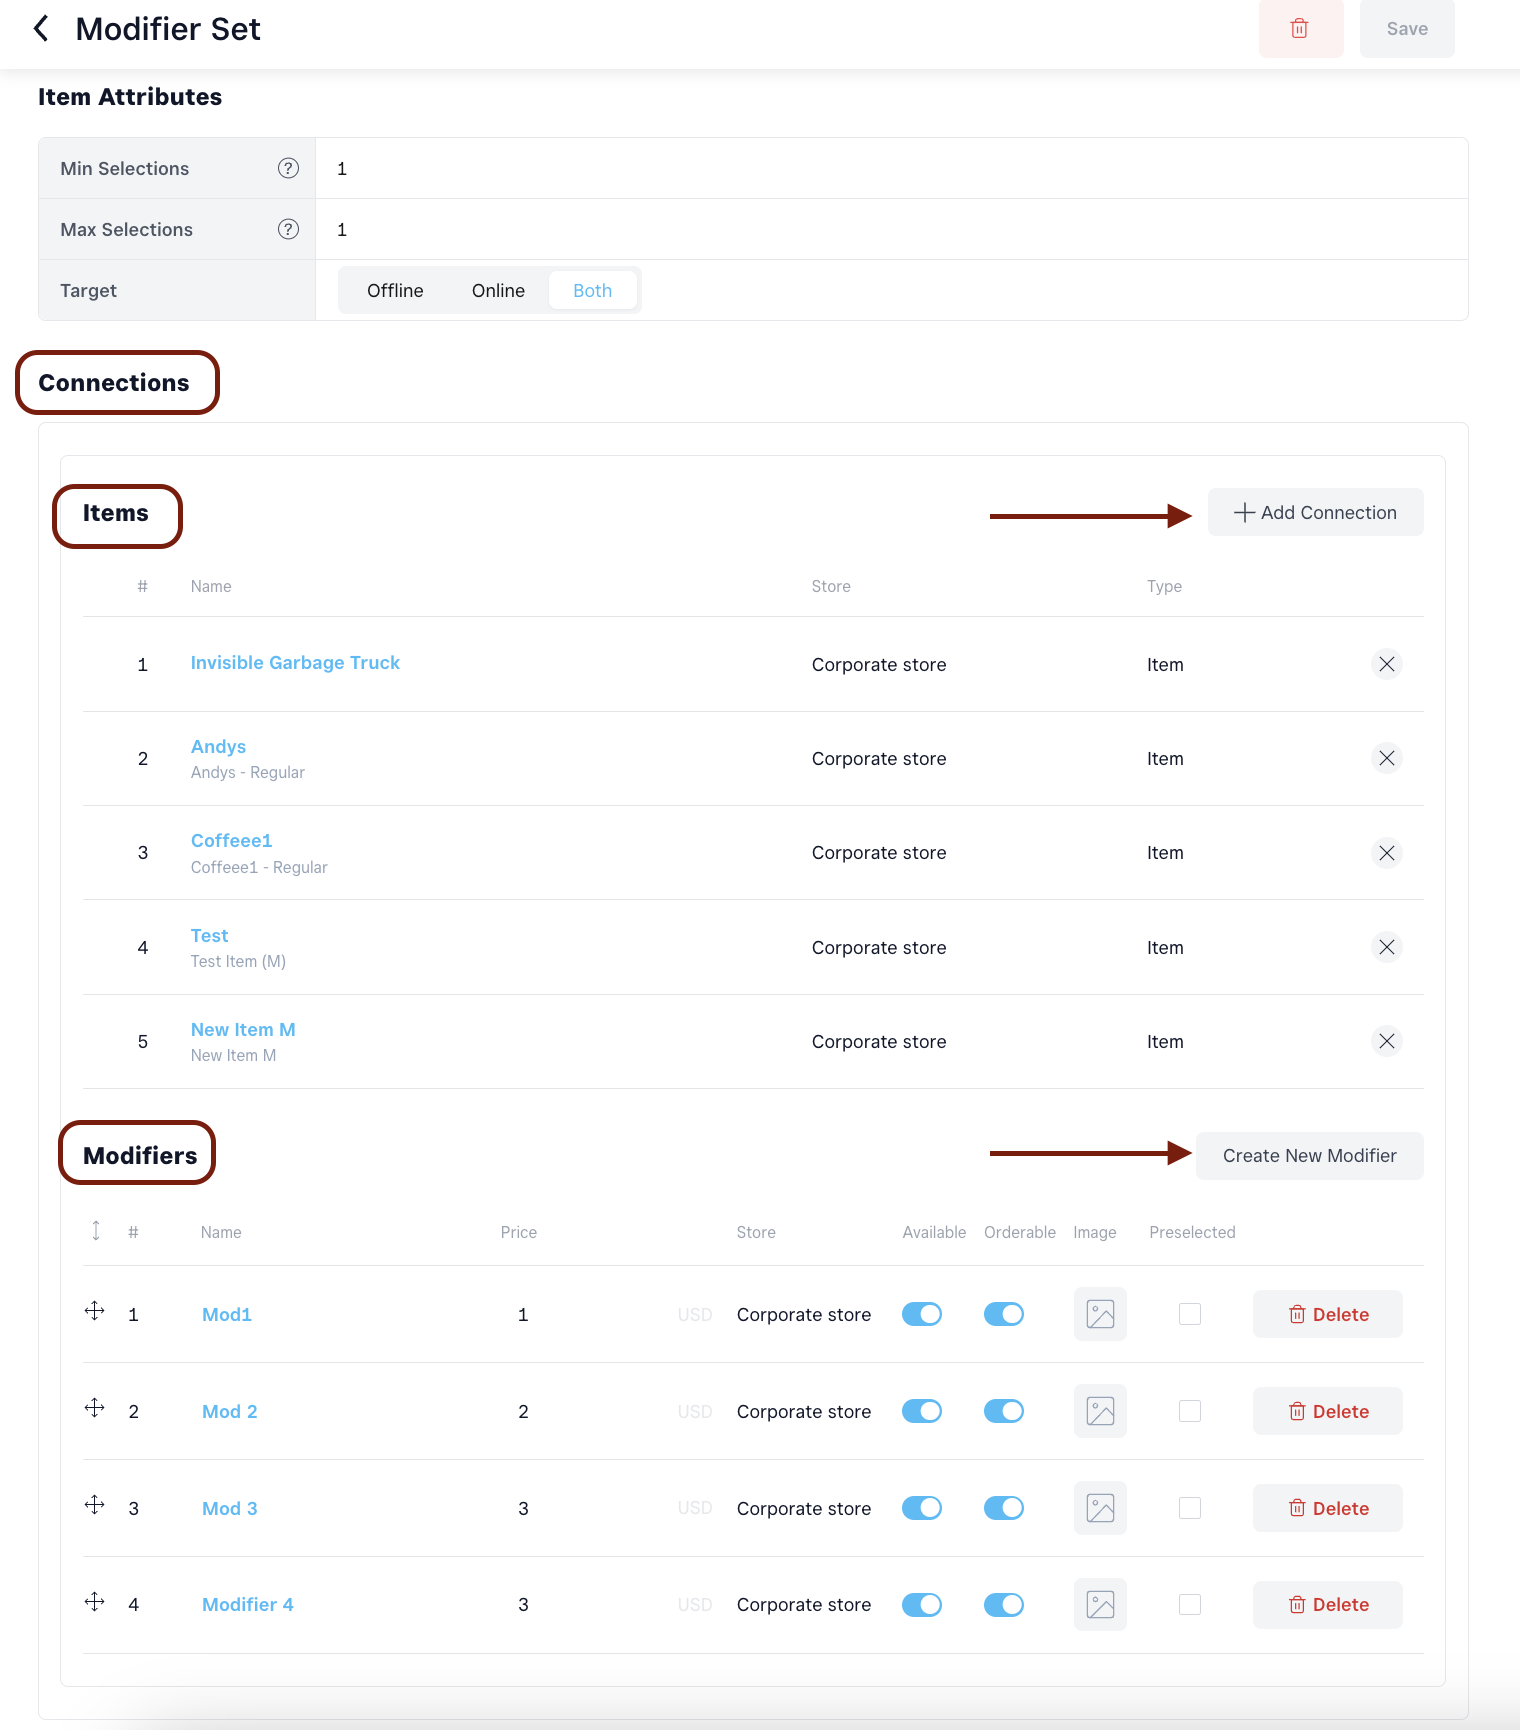
- After being saved, attach the Modifier Group to existing Items and Create Modifiers (selections)
6.2. How to edit/manage modifier groups#
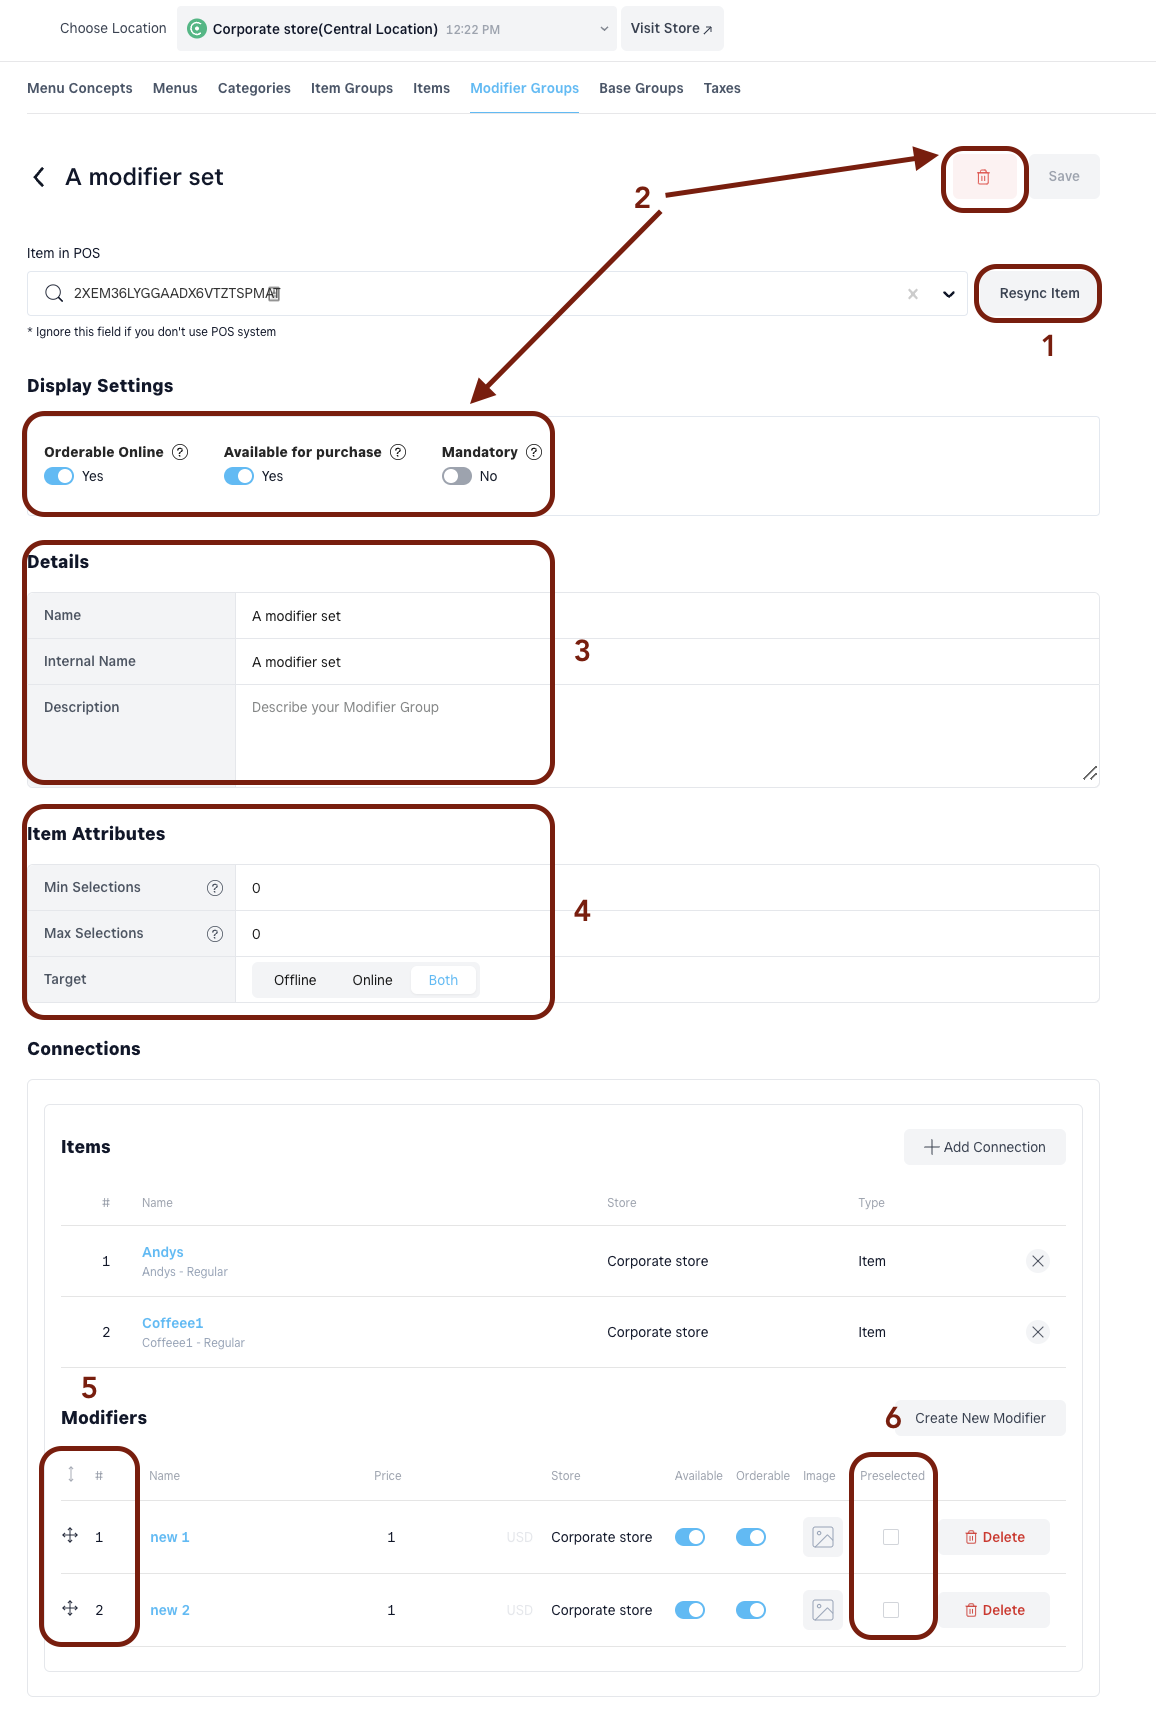
- Sync a modifier group - sync the changes made in POS to the modifier group, including new modifiers, new prices, taxes.
- Availability toggles:
- Orderable online - defines if any modifier group shall be orderable online. By default the toggle is on.
- Available - defines the availability of the modifier group. By default the toggle is on, if switched off - the modifier group will disappear from the online ordering page.
- Archived- removes a modifier group from the online ordering page and the Dashboard. By default the toggle is off. In case you want to retrieve any archived modifier groups, filter them by “Only Archived”.
- Mandatory - is toggled in case this modifier group is required for the order. Set the minimum to be greater than or equal to 1.
- Modifier group show order- defines the show order number of the modifier group.
- Changing titles & descriptions:
- Name - changes the title of the modifier group.
- Description - description of the modifier group that will be displayed under the name.
- Internal name- will be visible only in the Dashboard.
- Min/Max selections - defines the minimum number of modifiers required to be selected and the maximum allowed. The change is performed in GoParrot only, without needing to mirror the min/max selection in the POS.
- Changing modifiers show order - drag & drop and rearrange the modifiers inside the item. Check the changes in real time, on the online ordering page.
- Preselected modifiers - tick the modifiers that need to be preselected on the online ordering page. Preselected modifiers can be unticked and taken off by customers, when ordering.
7. Modifiers#
7.1. How to Add/Create Modifiers#
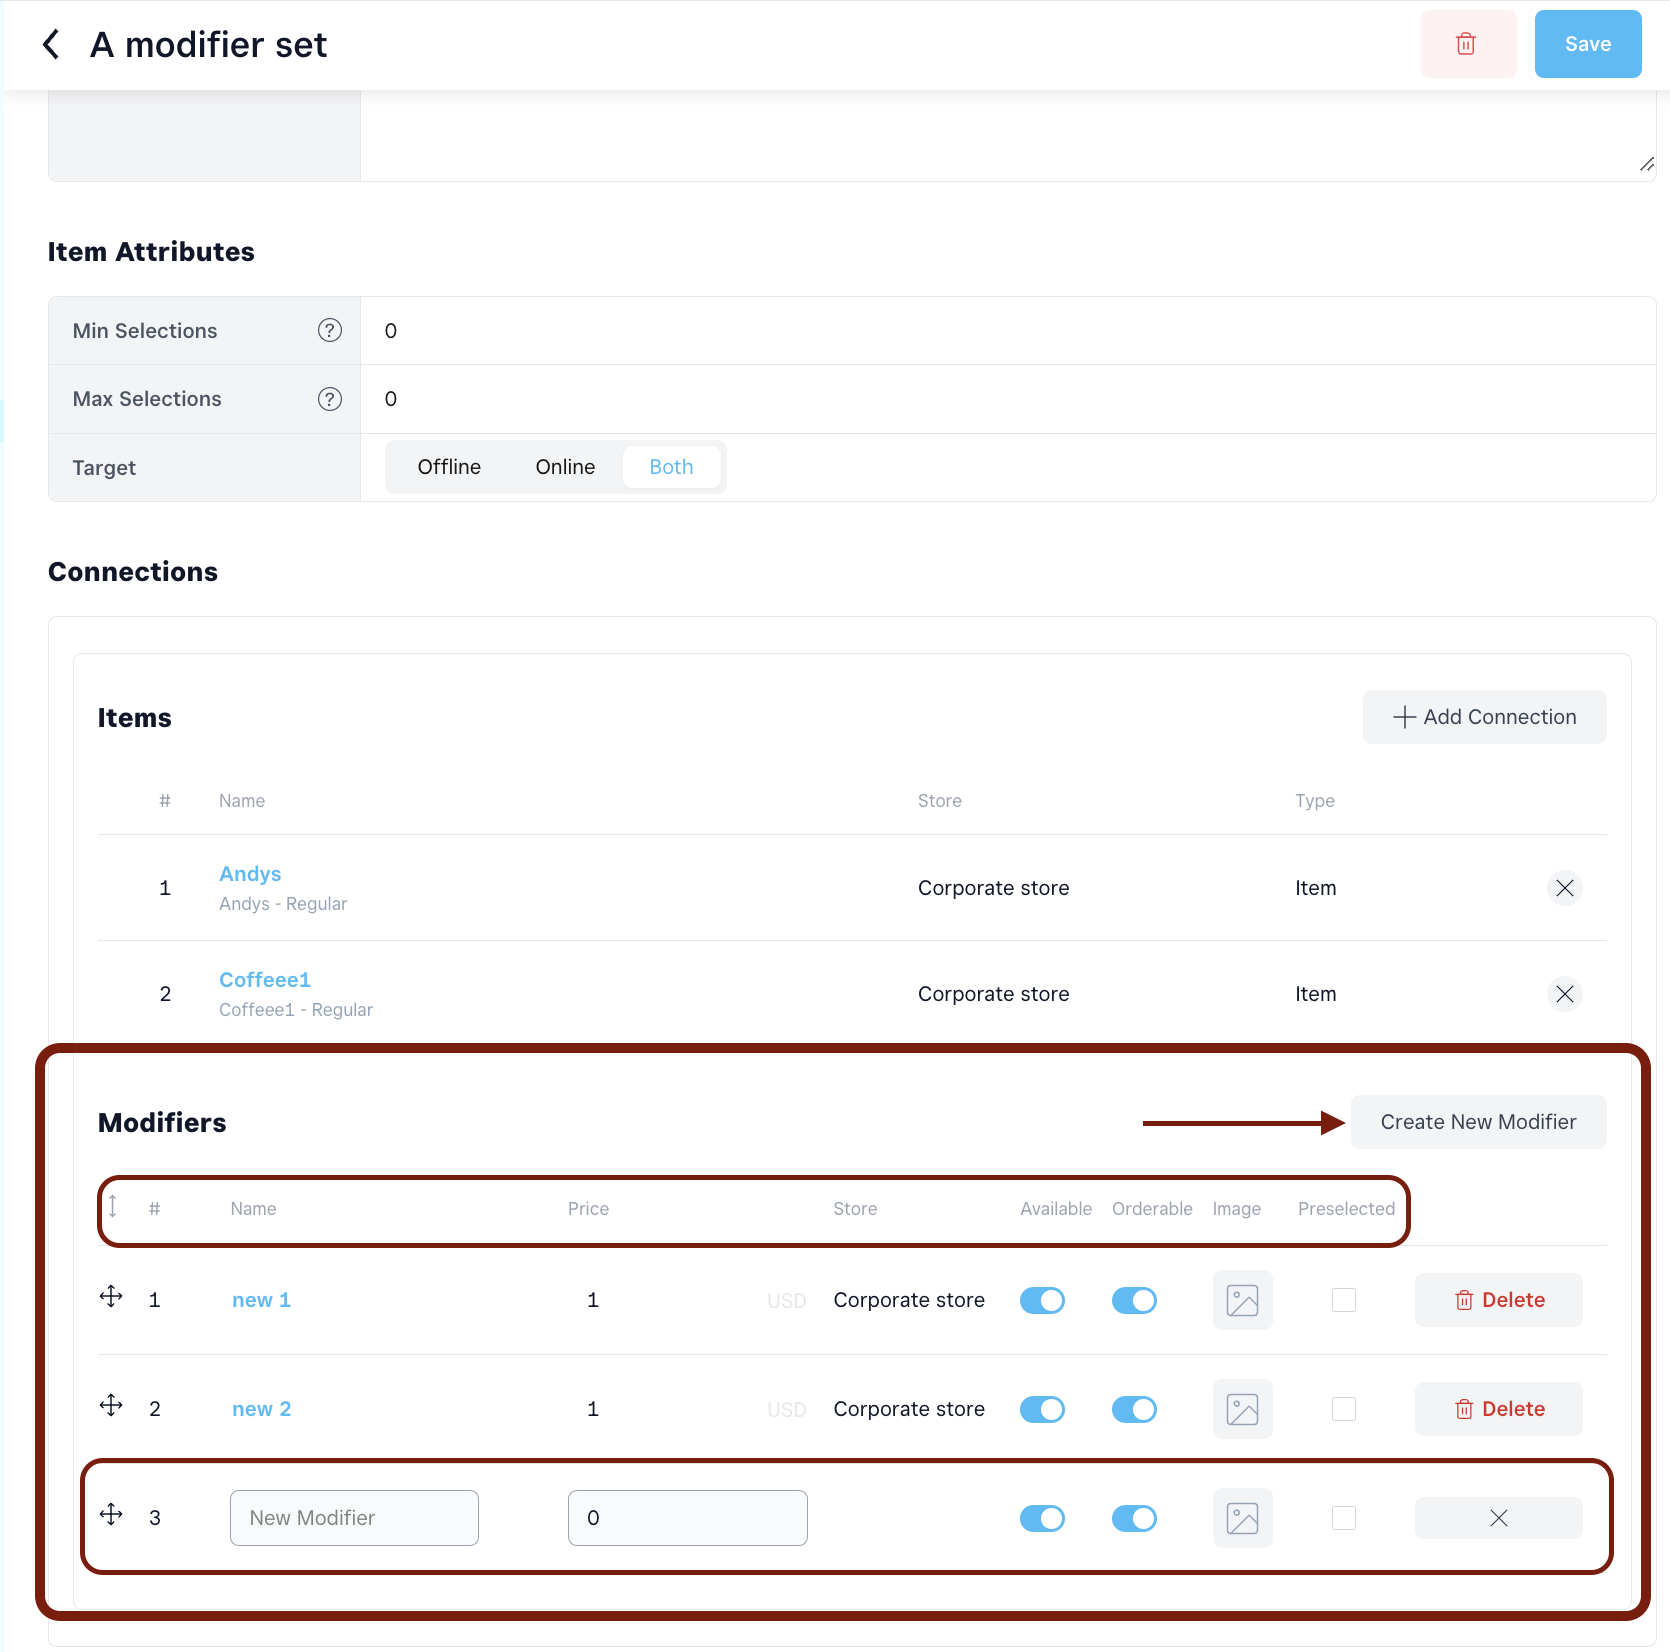
To create a modifier or a list of modifiers follow the steps below:
- Identify the Modifier Group under which you want to create the Modifiers and open it;
- Scroll down to Connections and locate the Modifiers section;
- Click on Create New Modifier and add the required information in the required fields.
7.2. How to edit modifiers:#
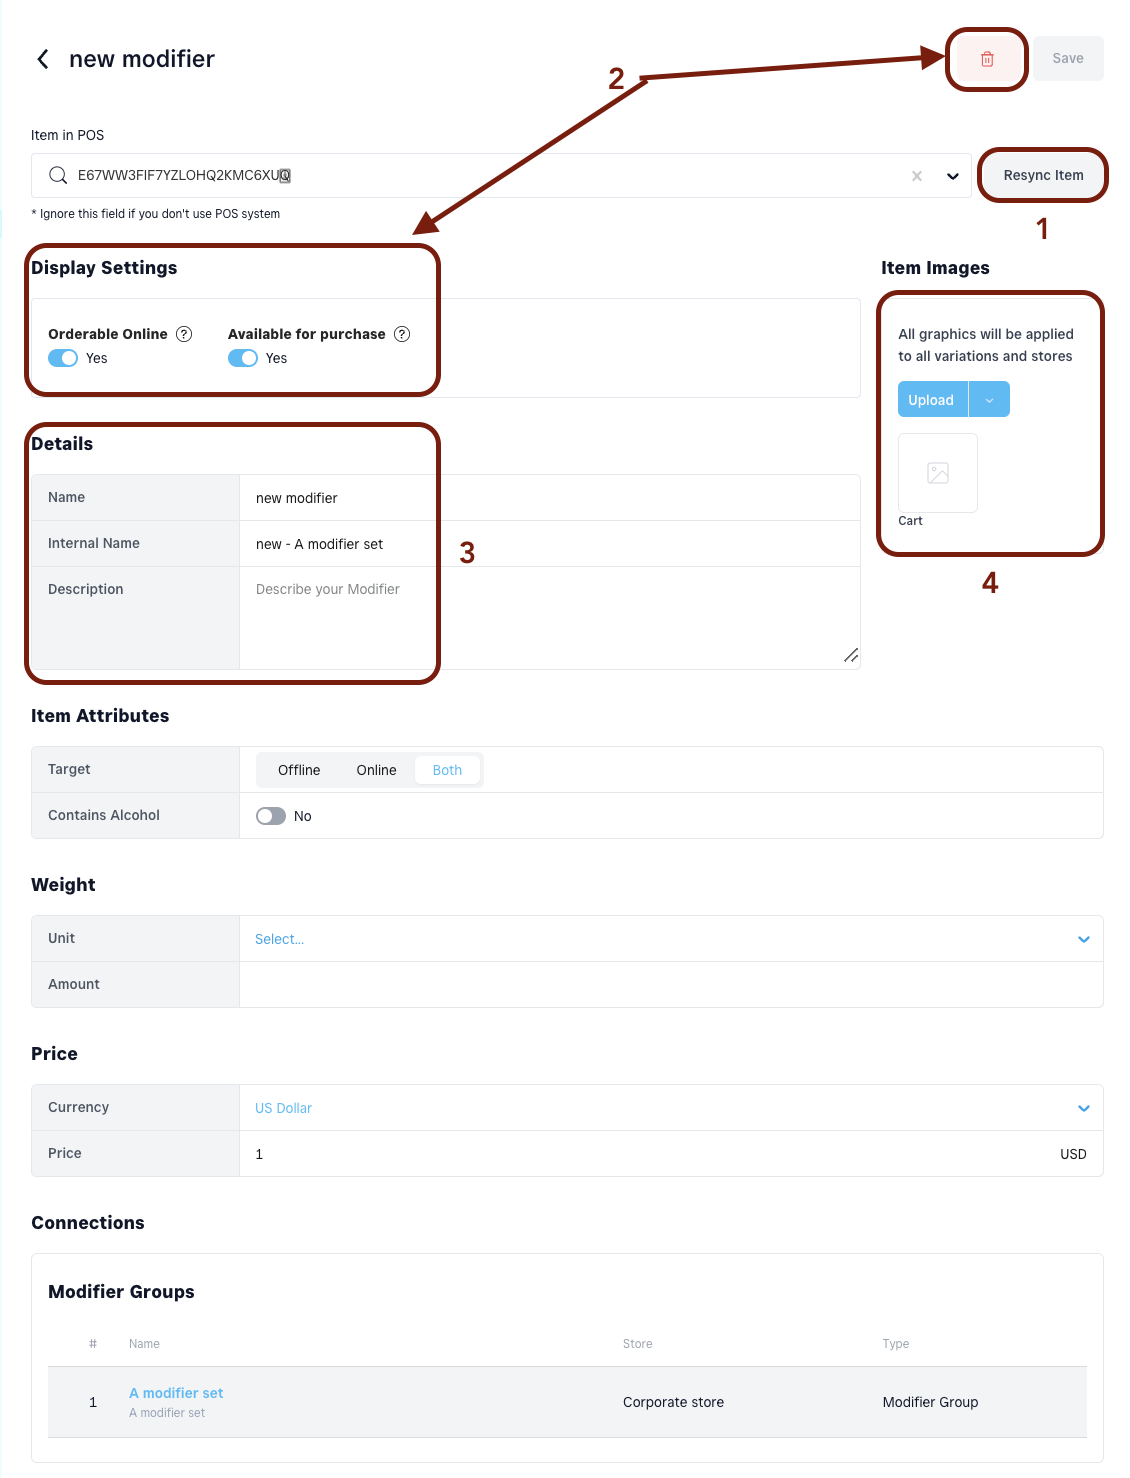
First, locate the modifier by opening the Modifier Group it should be under and click on the title of the modifier under Connections to open it on a separate page.
- Sync - sync the changes made in POS to the modifier.
- Availability toggles:
- Orderable online - defines if the modifier shall be orderable online. By default the toggle is on.
- Available - defines the availability of the modifier. By default the toggle is on, if switched off - the modifier will disappear from the online ordering page.
- Archived- removes a modifier from the online ordering page and the Dashboard. By default the toggle is off. In case you want to retrieve any archived modifiers, filter them by “Only Archived”.
- Modifier show order- defines the show order number of the modifier.
- Changing titles & descriptions:
- Name - changes the title of the modifier.
- Description - description of the modifier that will be displayed under the name.
- Internal name- will be visible only in the Dashboard.
- Upload image for modifier - recommended size 500 x 500 pixels.
Central Menu Management#
Before going over the central menu management, let’s go over again what is the central location and the central menu.
Central Location is a Square location that should be designated as the one with the source menu and will act as the Central Location. Its menu will be pulled from Square to GoParrot and then later pushed to all the Franchisee locations.
Best Case Scenario for a Central Location:
- Is part of your corporate account
- Contains the items that should be visible at all locations/franchises, or at least the most amount of items present at all other franchises.
- Is not an active/functional physical store
- The items have prices set
With the Central menu pulled to the Franchise Suite Dashboard, it is time to establish this store as the Central location:
- In the Franchise Suite dashboard, select the Merchant level from the dropdown at the top (M)
- From the left-hand menu select Franchise Management > Settings;
- Under Central Management select your central Locations from the dropdown menu.
With the store selected as the Central Location, there is a new approach to menu management.
- Any changes made to the menu (new categories/items or availability/visual settings) on the Central Location (GoParrot Dashboard) are automatically applied to every connected Franchisee’s Menu Replica.
- depending on the permissions scenarios which will cover a bit later.
- If changes are made to the Central Menu on the Square Corporate/Central account (pertinent to new categories or items only)- these changes have to be synchronised manually from the Franchise Suite dashboard >> Central Location by clicking on the “Resync Item” button.
- Changes that should be displayed in all Franchisee’s menus have to be made on the Central Location (Square or Franchise Suite);
- Changes that should be reflected only on one Franchisee’s account, have to be made on that location’s Square account or Franchise Suite page, if Permissions allow such changes.
How to create Categories or Items in Franchise Suite?
See the detailed instructions in the “Menu Structure” section above
Updating a Live Central Menu #
When applying changes to the Central Menu in the GP dashboard - such as updating pricing, item titles or descriptions, it is necessary to keep in mind the permissions set on the main page but also on store-specific permission settings.
In the Franchise Suite Dashboard, on the Merchant Level (M) go to Franchise Settings. Here you will find the Permissions/Restrictions settings for Menu Management.
Permission Scenarios#
Scenario 1 - Lockdown Strategy. Corporate has full control over the menus throughout all franchisees Menus. In this case, the franchisees are not allowed to create new items nor to make any changes to the Central Menu replica in their Square.
Updating from the Franchise Suite Dashboard:
Step 1 - Log in to the GP Dashboard. Select the Central Location from the dropdown menu.
Step 2 - Go to Menu Management, click the “Items” tab and select an item from the list.
Step 3 - Make the necessary changes, for example updating the price from $5 to $6.
Step 4 - After clicking on the Save button - the new price will be replicated immediately across all of connected franchisees.
Updating Central Menu from Square:#
Step 1 - Make the necessary updates to the menu attached to the Square location that hosts the Central Menu.
Step 2 - Log in to the Franchise Suite Dashboard. Select the Central Location from the dropdown menu.
Step 3 - Go to Menu Management, click the “Category” tab and select a category from the list.
Step 4 - Click the Resync Item button - the system will pull the new changes to the Franchise Suite Dashboard
Step 5 - After the changes are applied to the Central Menu in Franchise Suite Dashboard - the franchisees menus will update immediately. Repeat the process by selecting each category that underwent updates in Square.
Scenario 2 - Centrally Managed Strategy
The franchisees are allowed to update some of the aspects of the Central Menu replica in their own Square Dashboard.
In the below screenshot of Menu Management Permissions - we see that the Corporate Owner does not allow the franchisees to change Item Names, Descriptions nor to update the menu structure, and does not allow for the franchisee to create any new items/categories.
With these settings, if the Corporate Owner updates on the Central Menu, the following will happen:
Restricted Aspects - When the corporate owner updates a name of an item in the Central Menu - the name will be updated immediately across all franchisees.
Permitted Aspects - When the corporate owner updates for example - an item price in the Central Menu one of the cases might happen:
Case 1. If the price was originally updated by a franchisee - the price change made on the Central Location by the franchisor/corporate, will not be applicable to their adjusted menu items.
Case 2. If the price was never edited/changed by a franchisee, the change made on the Central Location by the franchisor/owner will be applicable to their menu items as well.
We will use an example of an Item with the initial price of $1, to visualise the above cases:
I - Pre-update prices:
Central Menu - $1
Franchise X - $1
Franchise Y - $2
The Franchisee Y has updated their replica of the Item from Price $1 to $2. As it is permitted by the corporate owner. The price for this franchise will remain the same and whatever changes are made by the Franchisor to the Central Menu (concerning this item), will not be applicable to Franchisee Y.
II - Updated price
Central Menu - $1.5
Franchise X - $1.5 (Case 2)
Franchise Y - $2 (Case 1)
The corporate owner has changed the price of the Item in the Central menu from $1 to $1.5. As Franchise X never edited this item's price - the updated price coming from the Central Menu was replicated. While for Franchise Y the price remained the same as it was updated previously by themselves.
These scenarios do not concern only pricing. But all of the aspects that are permitted.
There is a way to bypass Case 1 - in the case the corporate wants to update the price of the Item to $1.5, then we need to follow the following instructions:
Step 1 In the Franchise Suite Dashboard, on the Merchant Level (M) go to Franchise Settings.
Step 2 Deselect “Update item prices” & click Save
Step 3 Now, any updates made to item pricing in the Central Menu in the Franchise Suite dashboard - the replicas of this item across all franchisees will have the new price of $1.5.
Store level menu management#
Store level menu management is accessible to store level users with relevant permissions. In Store level menu management, the franchisee owners/operators will see all of the franchise replica items and the items of it.
The central location replica menus, categories, items, modifier groups and modifiers will be marked with a yellow square with white F inside, and the items without it are not part of the replica will not have this icon in front of the title.
- Central replica item
- A regular item from the POS

How to set Sales Tax#
Franchise suite is aimed to provide seamless experience in menu orchestration and taxes management. Since each franchisee store might be located in different states or cities, the sales tax is being set at store level.
One of the vital steps in setting up your menu is adding the taxes. It can be state, local taxes, sales taxes, or any other taxes that are applied to the items you sell. This is being handled via:
Dashboard > Location Level > Menu Management > Taxes. Search the tax in the "GUID (Tax GUID in POS)" field by inserting keywords. The system will search in your POS and identify all the taxes that contain the keywords you added. Click on the tax you need and add it.
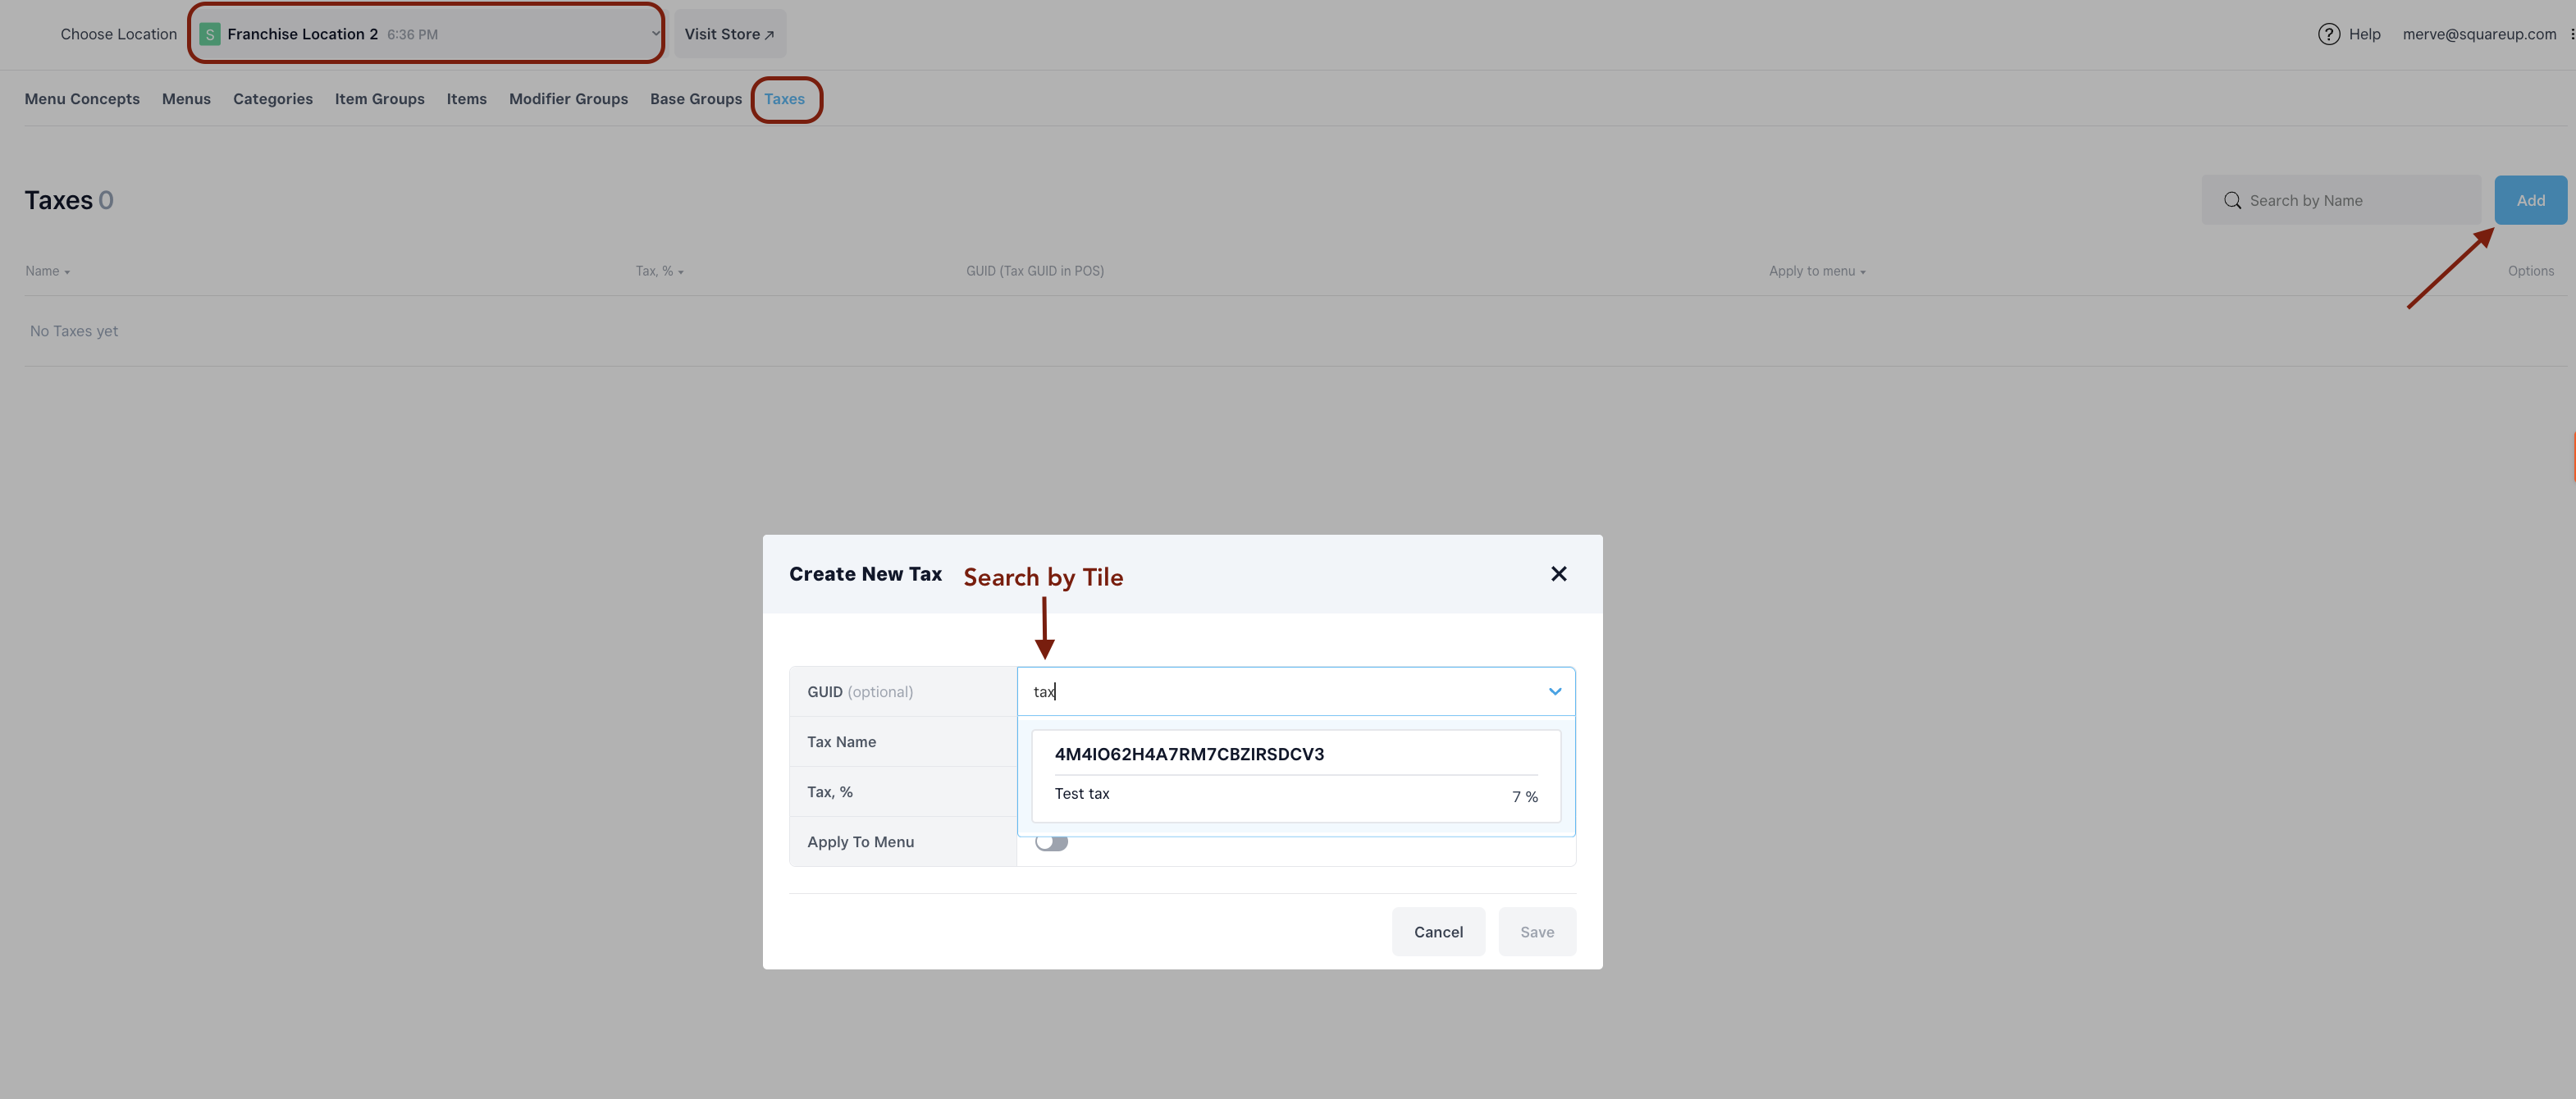
* Note: if the tax ought to be applied to all the items, the default toggle should be on.