Delivery Settings
In order to find the delivery tab, go to the location/store level in your GoParrot Dashboard. From the left side menu, select the "Delivery Settings" tab. From here on you will be able to manage and adjust the delivery settings for your business.
Note: Before proceeding, make sure to add "Delivery" as a Dining Option from the Dining Options tab. Follow the instructions here.
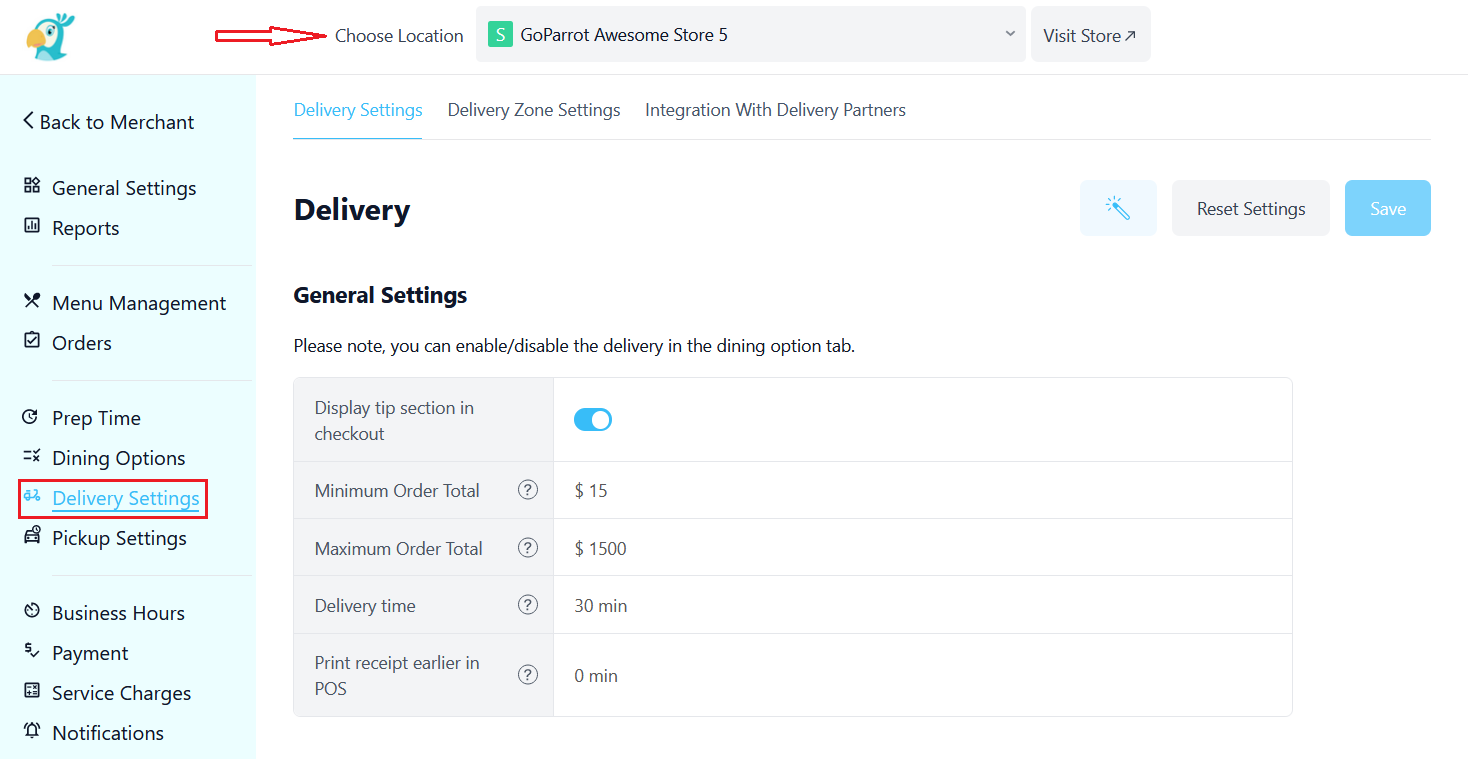
There are three important steps that you want to follow while setting up the "Delivery" feature for your business.
Step 1. Integration with the Delivery Partner#
Choose the 3rd party provider that you want to use for your delivery services. At the moment GoParrot integrates with the following 3rd party providers (other integrations are coming soon):
- DoorDash
- Postmates
- Relay
- Twinjet
In case you want to handle delivery in-store or internal, there is a possibility to choose that when selecting your provider.
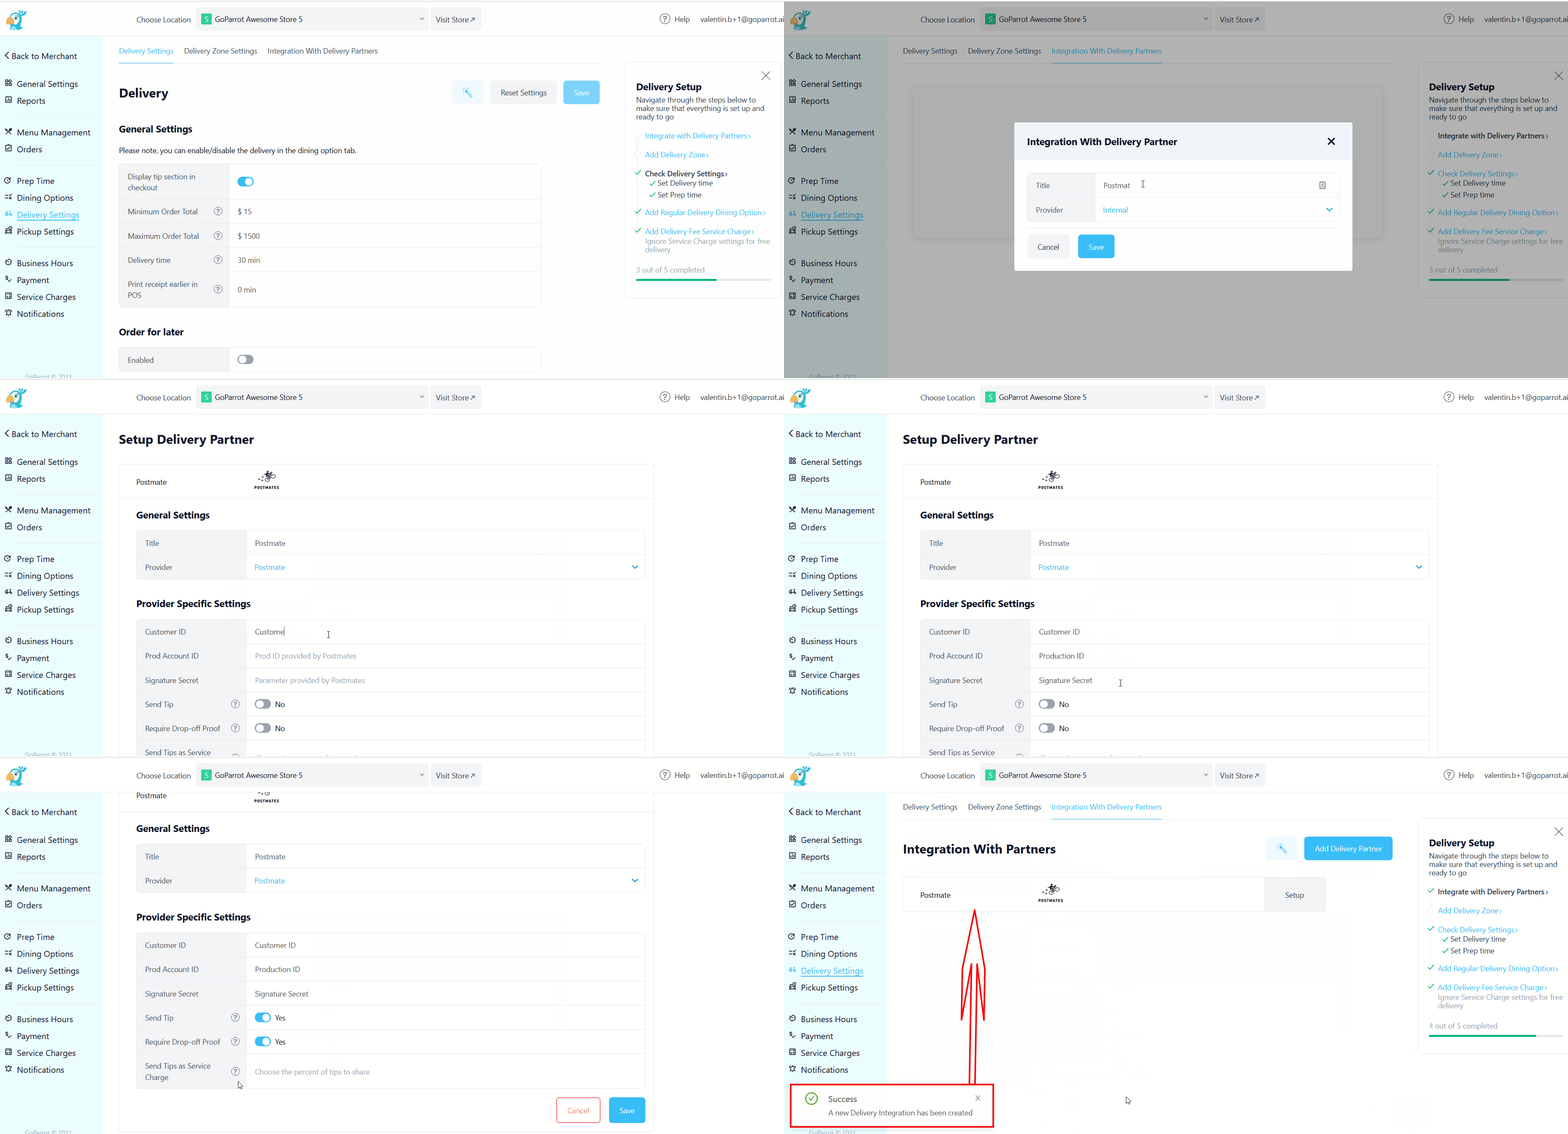
Select the tab "Integration With Delivery Partners" from the top of your screen and click on the blue button "Add Delivery Partner".
Assign a Title to the integration, it could be the provider's name or a word that will help you distinguish them.
From the dropdown below, select the provider. According to the provider that you chose, you will be re-directed to a page where you should fill in the required information in order to complete the Integration.
Depending on the provider, the required information in order to complete the integration can be different and found in the following ways:
- Postmates: In your Postmates account, by clicking on the "Developer" tab. Copy the keys that you see are required in GoParrot and paste them into the respective slot.
- DoorDash: Ask your current GoParrot Account Manager for the "Business Name".
- Relay: Ask your Relay representative or your Account Manager to provide the needed keys.
- Twinjet: Your API Key should be provided by the Twinjet representative.
Complete all other requested slots and click "Save".
Step 2. Delivery Zone Settings#
This view's purpose allows you to control or manage the dynamic fee that your customers are going to see at checkout as well as to define the delivery area or radius agreed upon with your 3rd party delivery provider.
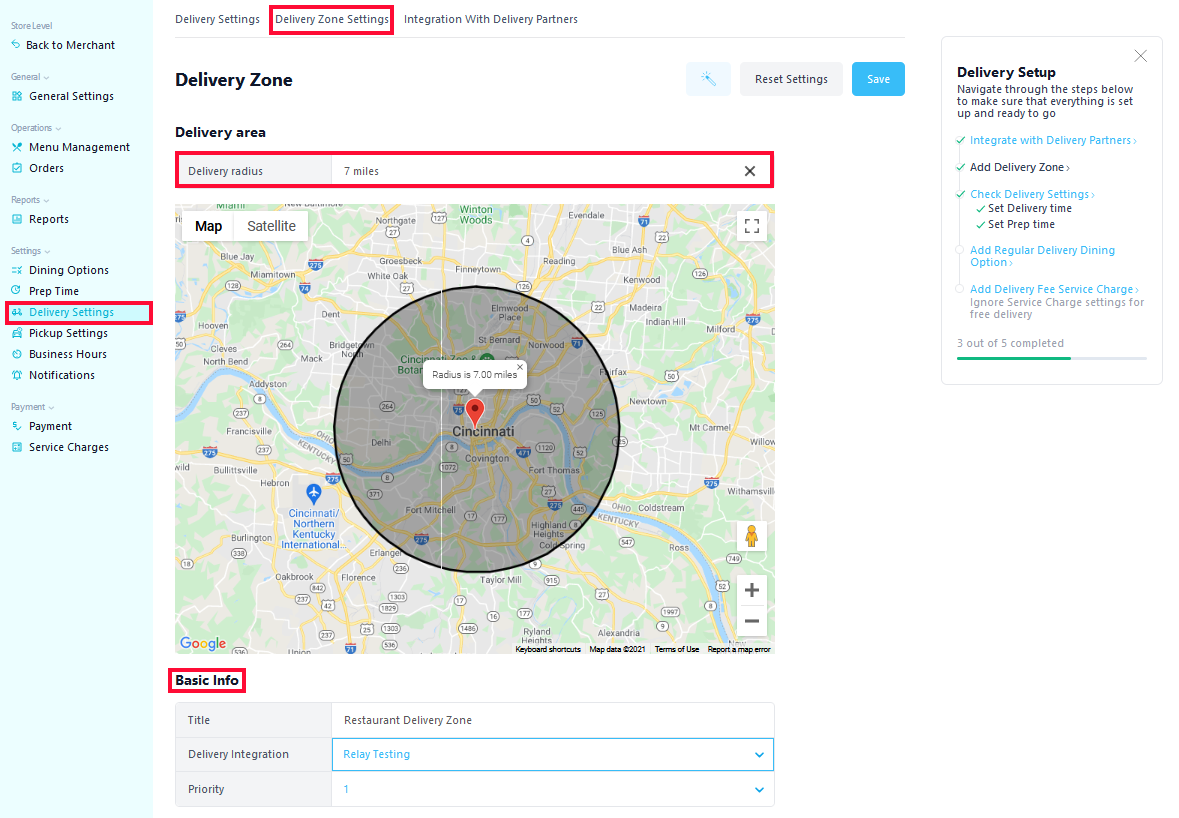
At the top of the map, define the delivery radius agreed upon with your delivery partner (Postmates, DoorDash, Twinjet). For more specific areas (Relay), you can ask your Account Manager to help you with either defining the area manually or uploading the coordinates provided by Relay.
Below the map, you have the tab "Basic Info". Here you can edit:
The delivery area's name.
Select from the dropdown the Integration/Partner that will be assigned to this location/store.
Define priority order - choose a number to show the order of your delivery zones. The bigger is the zone's number, the lower it is positioned for customer view.
Define the Delivery Fee settings:
Include Provider Fee - by enabling this, the fee agreed upon with the 3rd party provider will be included at the checkout when the customers are going to choose the delivery dining option. In case you enable an extra fee as well, it will be added to the total delivery fee calculations.
Extra Fees - if the extra fees are enabled, they will be added to the provider's fee. Possible extra fees:
- Flat Fee - an extra flat fee that will be added to the total delivery fee calculations;
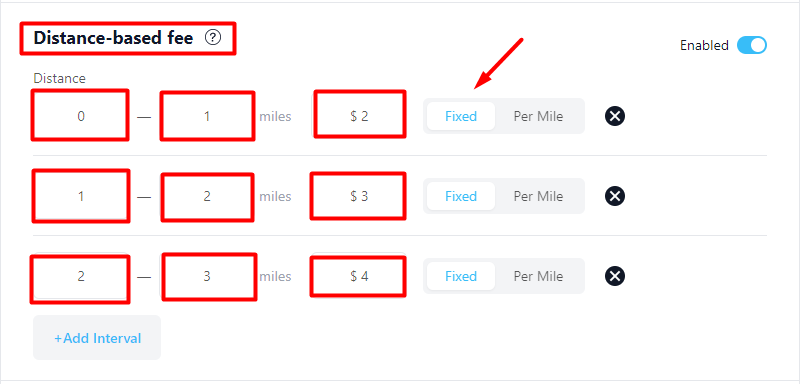
- Distance-based Fee - define the intervals that you need and the extra amount to be charged. You can select for that amount to either be fixed or charged per mile.
Note: To add an interval click on "Add Interval" and to delete an interval click on the "x" at the end of the row.
Cart-based Fee - define the intervals based on cart total and add the extra fee to be charged for this interval. You can define for the fee to be a specific dollar amount or a percentage out of the cart total.
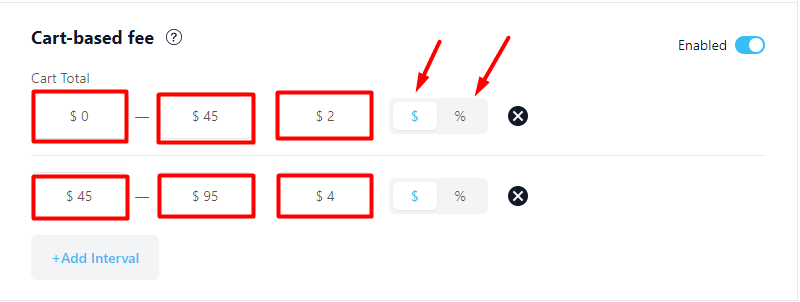
*Note: If the order's distance/cart total exceeds the maximum value indicated in the existing intervals, the last stated interval is considered.
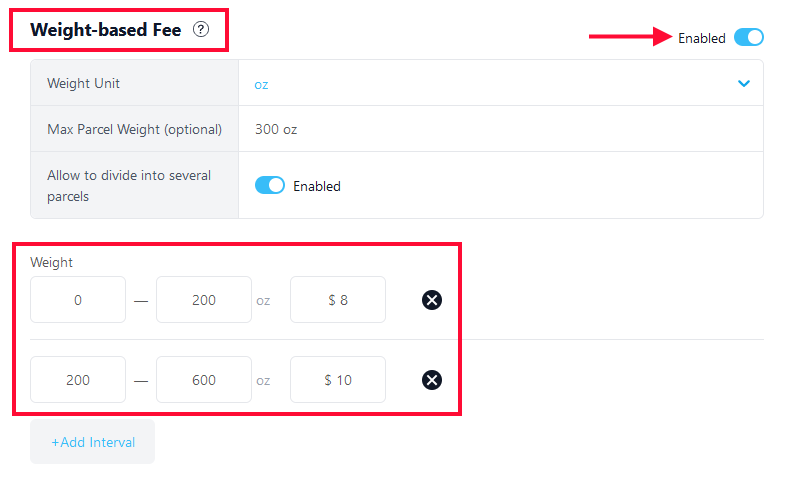
Weight-based Fee - is intended to be automatically calculated on order weight. The Parcel Weight can be optionally limited to a maximum weight (eg. 249 oz) and in case the weight is reached, products can no longer be added to the cart (if 'Allow to divide into several parcels' option is not enabled). In case this option is activated, the price will be calculated related to each interval in which it hits the weight.
Minimum & Maximum Fee
- Minimum extra delivery fee. After all extra fee calculations, it will not be less than the value specified here.
- Maximum extra delivery fee. After all extra fee calculations, it will not be less than the value specified here. Will be ignored if it's equal to 0.

Step 3. General Settings#
This view's purpose allows you to manage and edit General Delivery Settings, including Order for Later, Push Orders to Next Day and Custom Schedule.
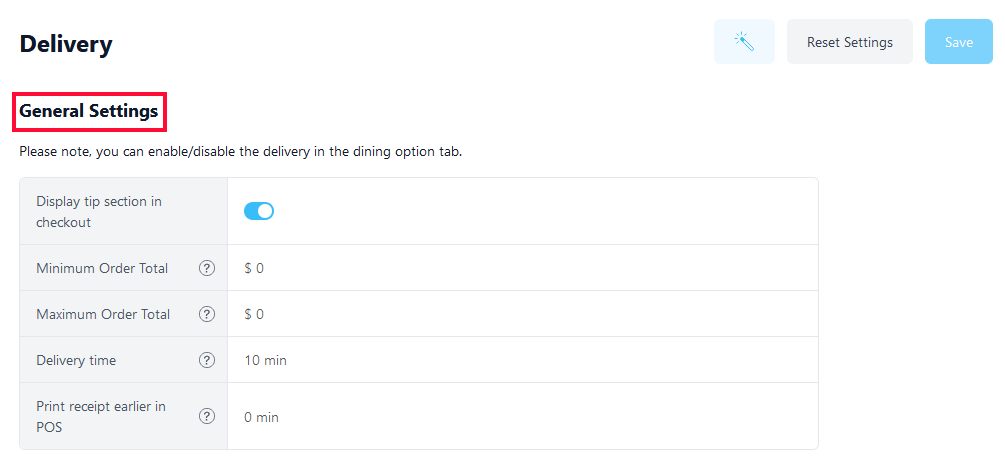
- Display tip section at checkout - if enabled, the customers are going to be presented with tip selections at checkout. (5%, 10%, 25% or "No Tip")
- Minimum order total - you can define the minimum cart total allowed in order to proceed with a delivery order.
- Maximum order total - you can define the maximum cart total allowed in order to proceed with a delivery order.
- Delivery time - the value shown here is the real delivery time from when the order has been placed to when it will get to the customer.
- Print receipt earlier in POS - add extra preparation time to print your tickets earlier than needed in POS.
To see the instructions on how to set Order Ahead (aka Order for Later) and Push Orders to Next Day, please go here.
Custom schedule#
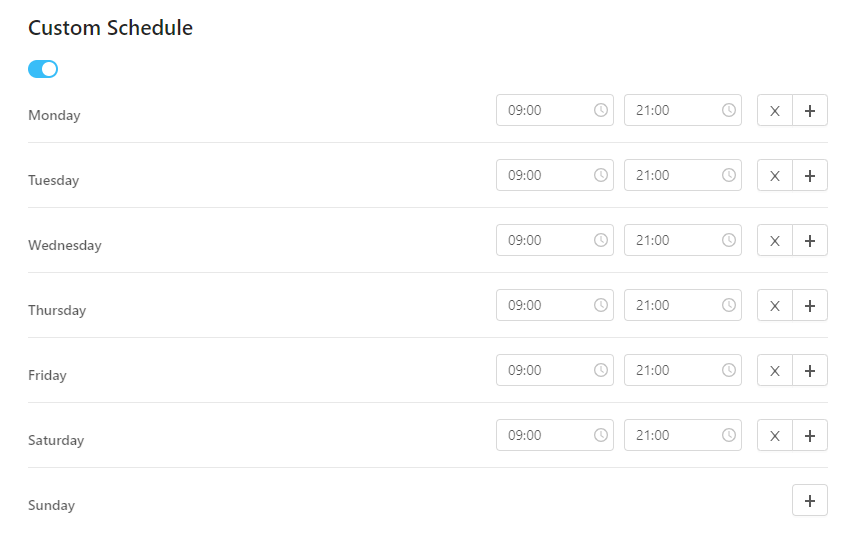
If you have a different delivery schedule, enable it and set the delivery hours accordingly. This schedule will be displayed on the header of the webstore.
Note: After making any changes, make sure to click on the "Save" button.
