What's New
March 2022 Update#
If you can't find something or anything is not clear feel free to contact support at support@goparrot.ai.
[0] Content#
| 1 | Dining Option Specific Menu | Specific dining options for Categories, Items, Item Groups, Combo and Boxes. | Jump |
[1] Dining Option Specific Menu#
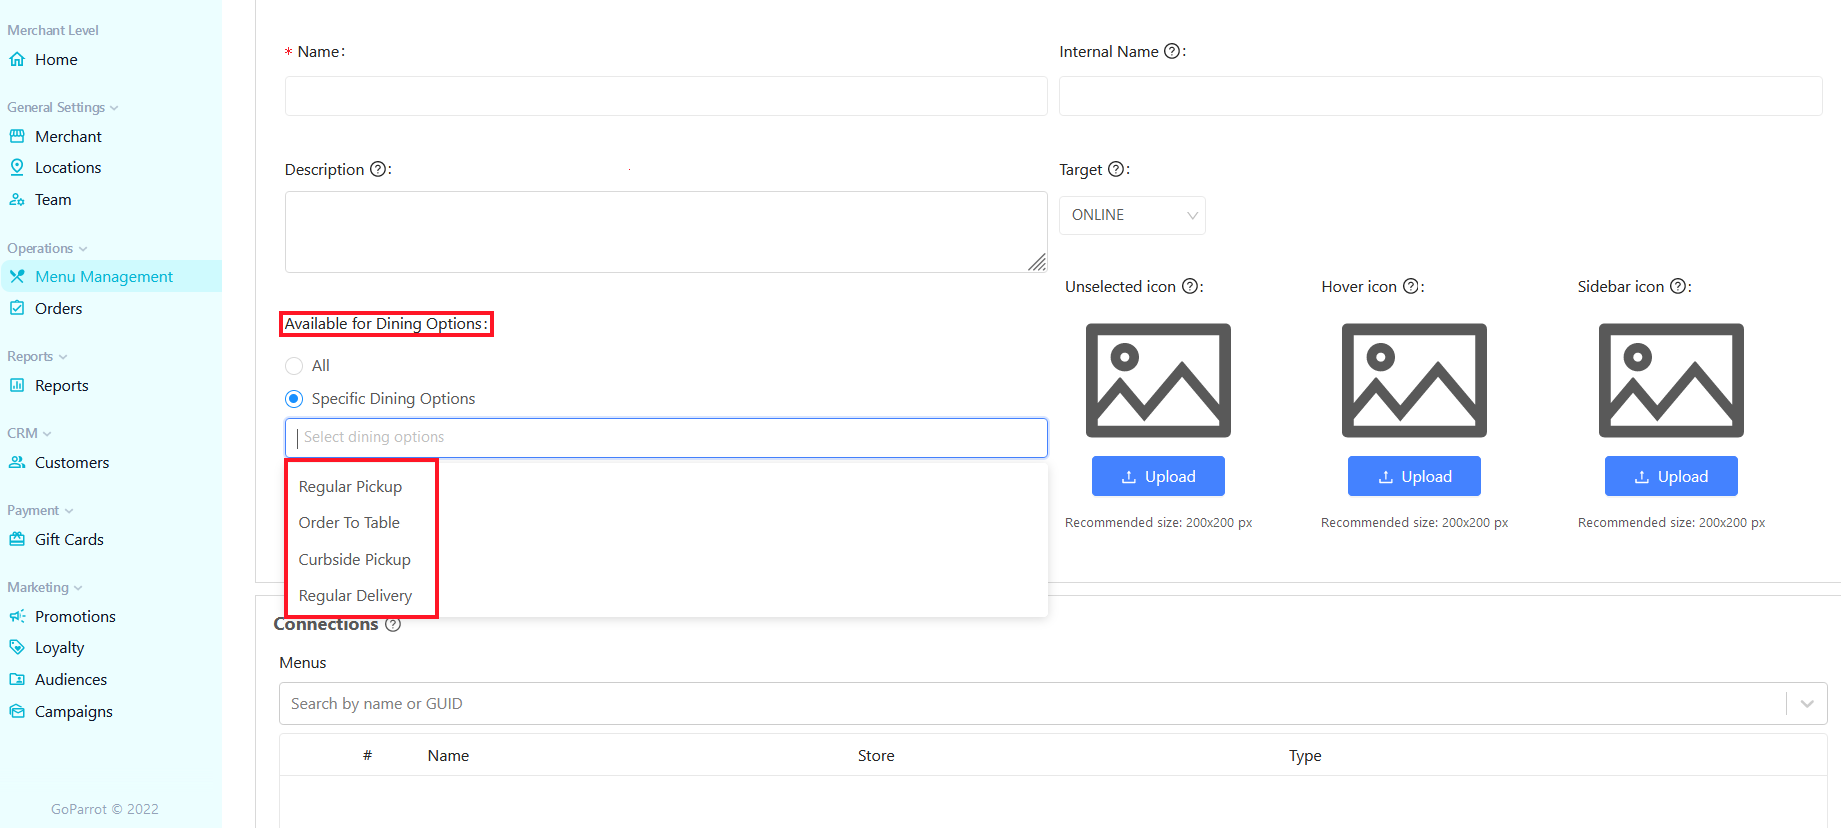
A new feature that will allow you to select specific dining options for Categories, Items, Item Groups, Combo and Boxes through Menu Management Tab.
A new field is displayed: "Available for Dining options", with two available options: All and Specific Dining Options (Regular Pickup, Order to Table, Curbside Pickup, Regular Delivery). Based on the selected dining options, the menus will be displayed on webstore. Every category, item, item group, combo or box can have its own set with one or more dining options available.
Dining option specific menu is not enabled by default. If you want to enable this feature, feel free to contact us at support@goparrot.ai.
February 2022 Update#
If you can't find something or anything is not clear feel free to contact support at support@goparrot.ai.
[0] Content#
| 1 | Add Domain via GoParrot Dashboard | Set and validate a domain name that will be linked to GoParrot service. | Jump |
| 2 | Print Tags on Kitchen Receipts | Define the tagged user groups that will be printed on tickets using GoParrot Dashboard. | Jump |
| 3 | Timed Menu Always on Display | How to display, at any time, time specific menus on the webstore. | Jump |
[1] Add Domain via GoParrot Dashboard#
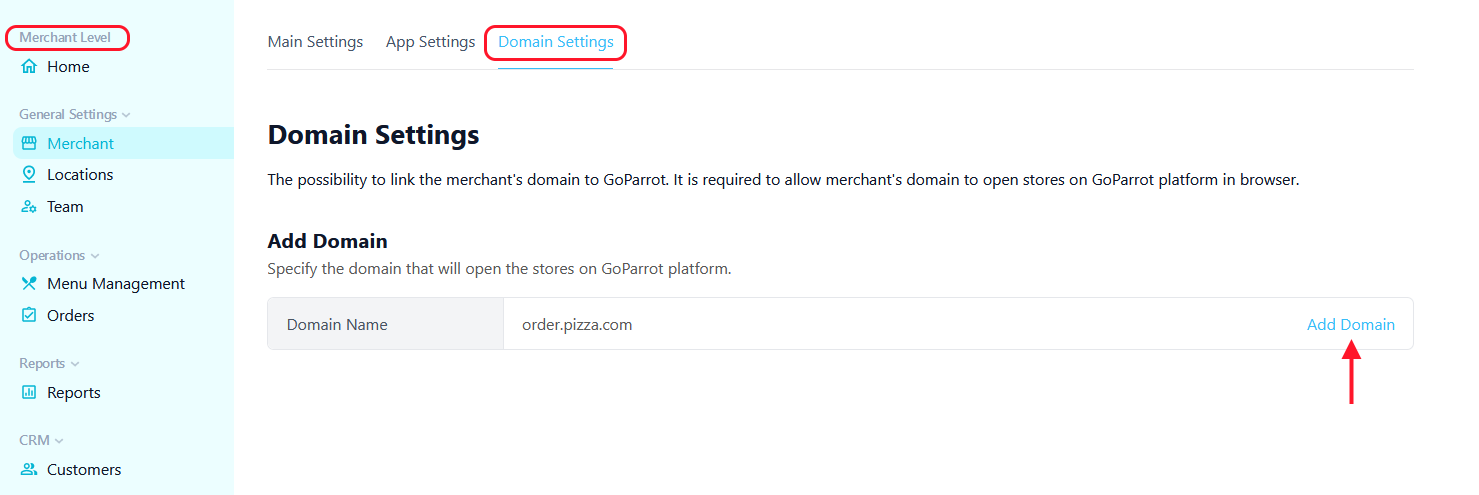
Now you have the possibility to set your domain via GoParrot Dashboard. It will enable you to create a link between your domain and GoParrot service.
On Merchant level, go to ‘General Settings’ tab and select ‘Domain Settings’. You will be able to Add a Domain and set several important parameters related to its validation.
You will also be able to choose domain destination, set location selector slug and set the order confirmation emails that will be sent from your domain.
To learn more, go to our detailed explanation in the dashboard help section.
[2] Print Tags on Kitchen Receipts#
A cool new feature that will allow you to indicate on printed tickets a group of users with predefined tags (i.e VIP Customers, Top Spending Customers, etc.)
This is a store level setting, that can be easily configured via GoParrot Dahsboard. The feature is available for Square and Toast POS only.
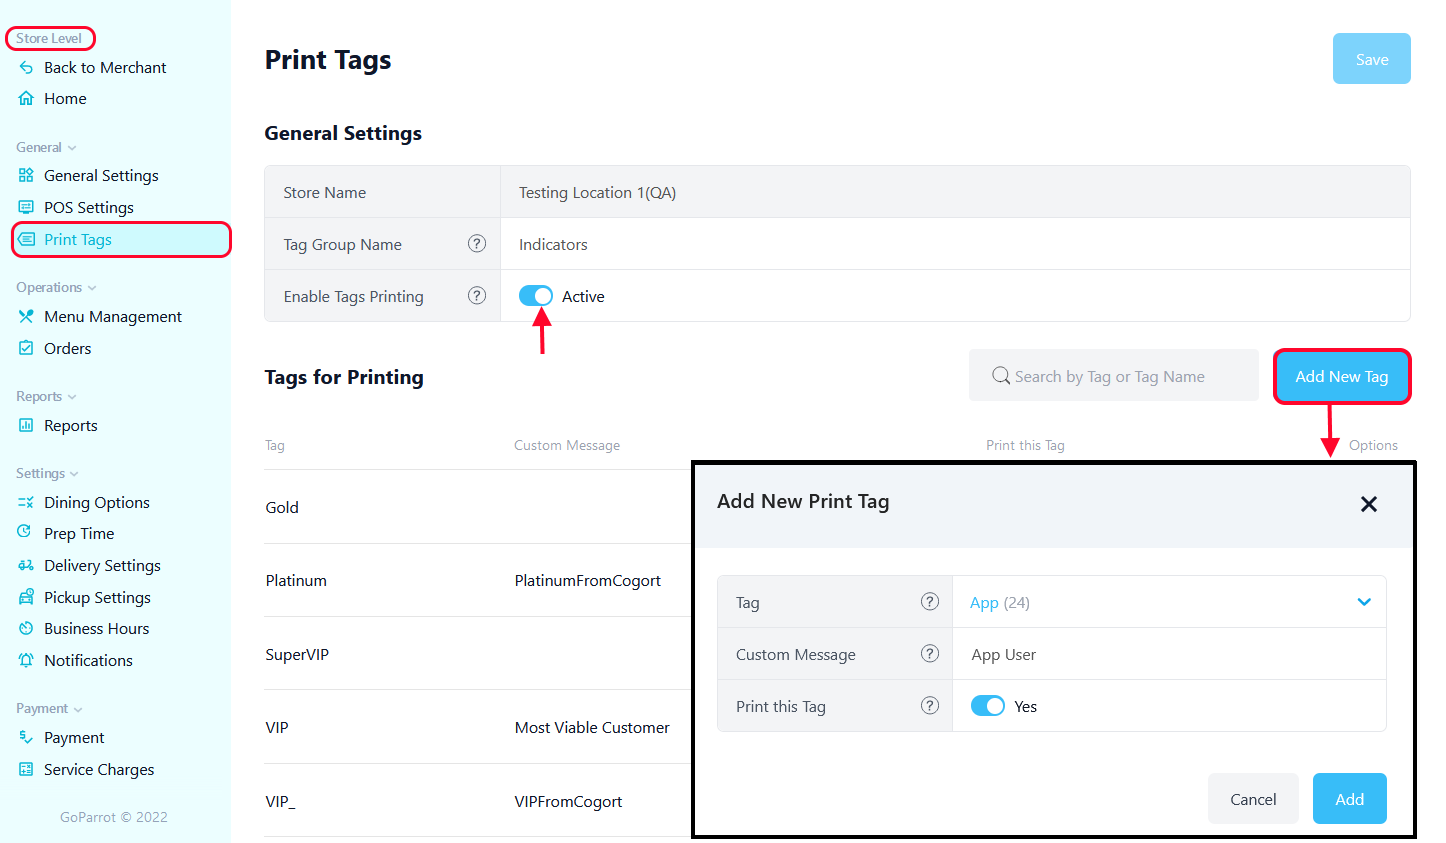
On the printed tickets (kitchen slip) the tagged user list is named by deafult: Indicators.
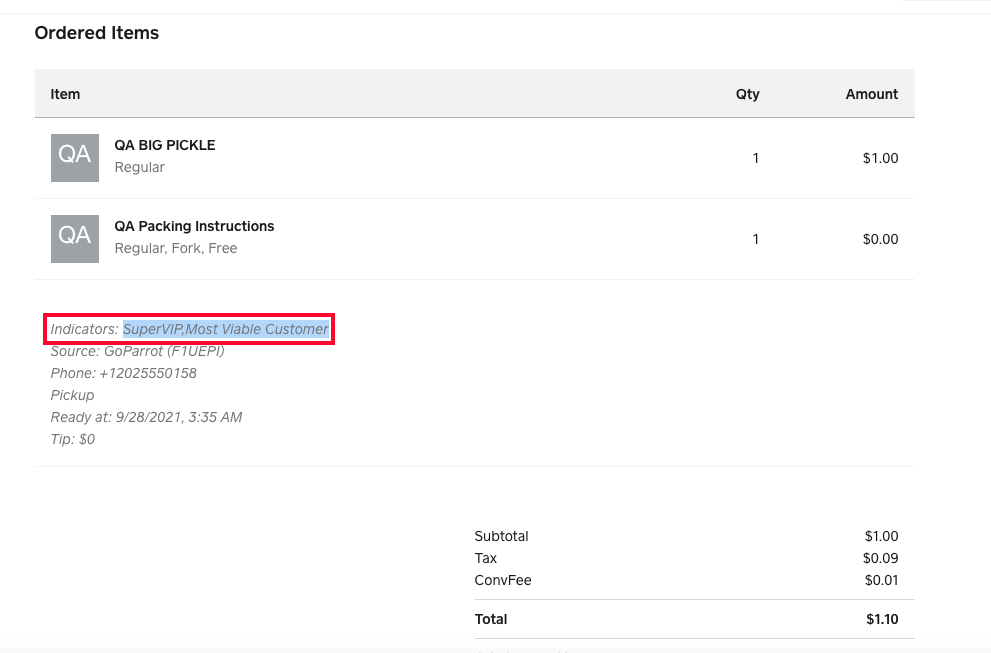
To learn more, go to our detailed explanation in the dashboard help section.
[3] Timed Menu Always on Display#
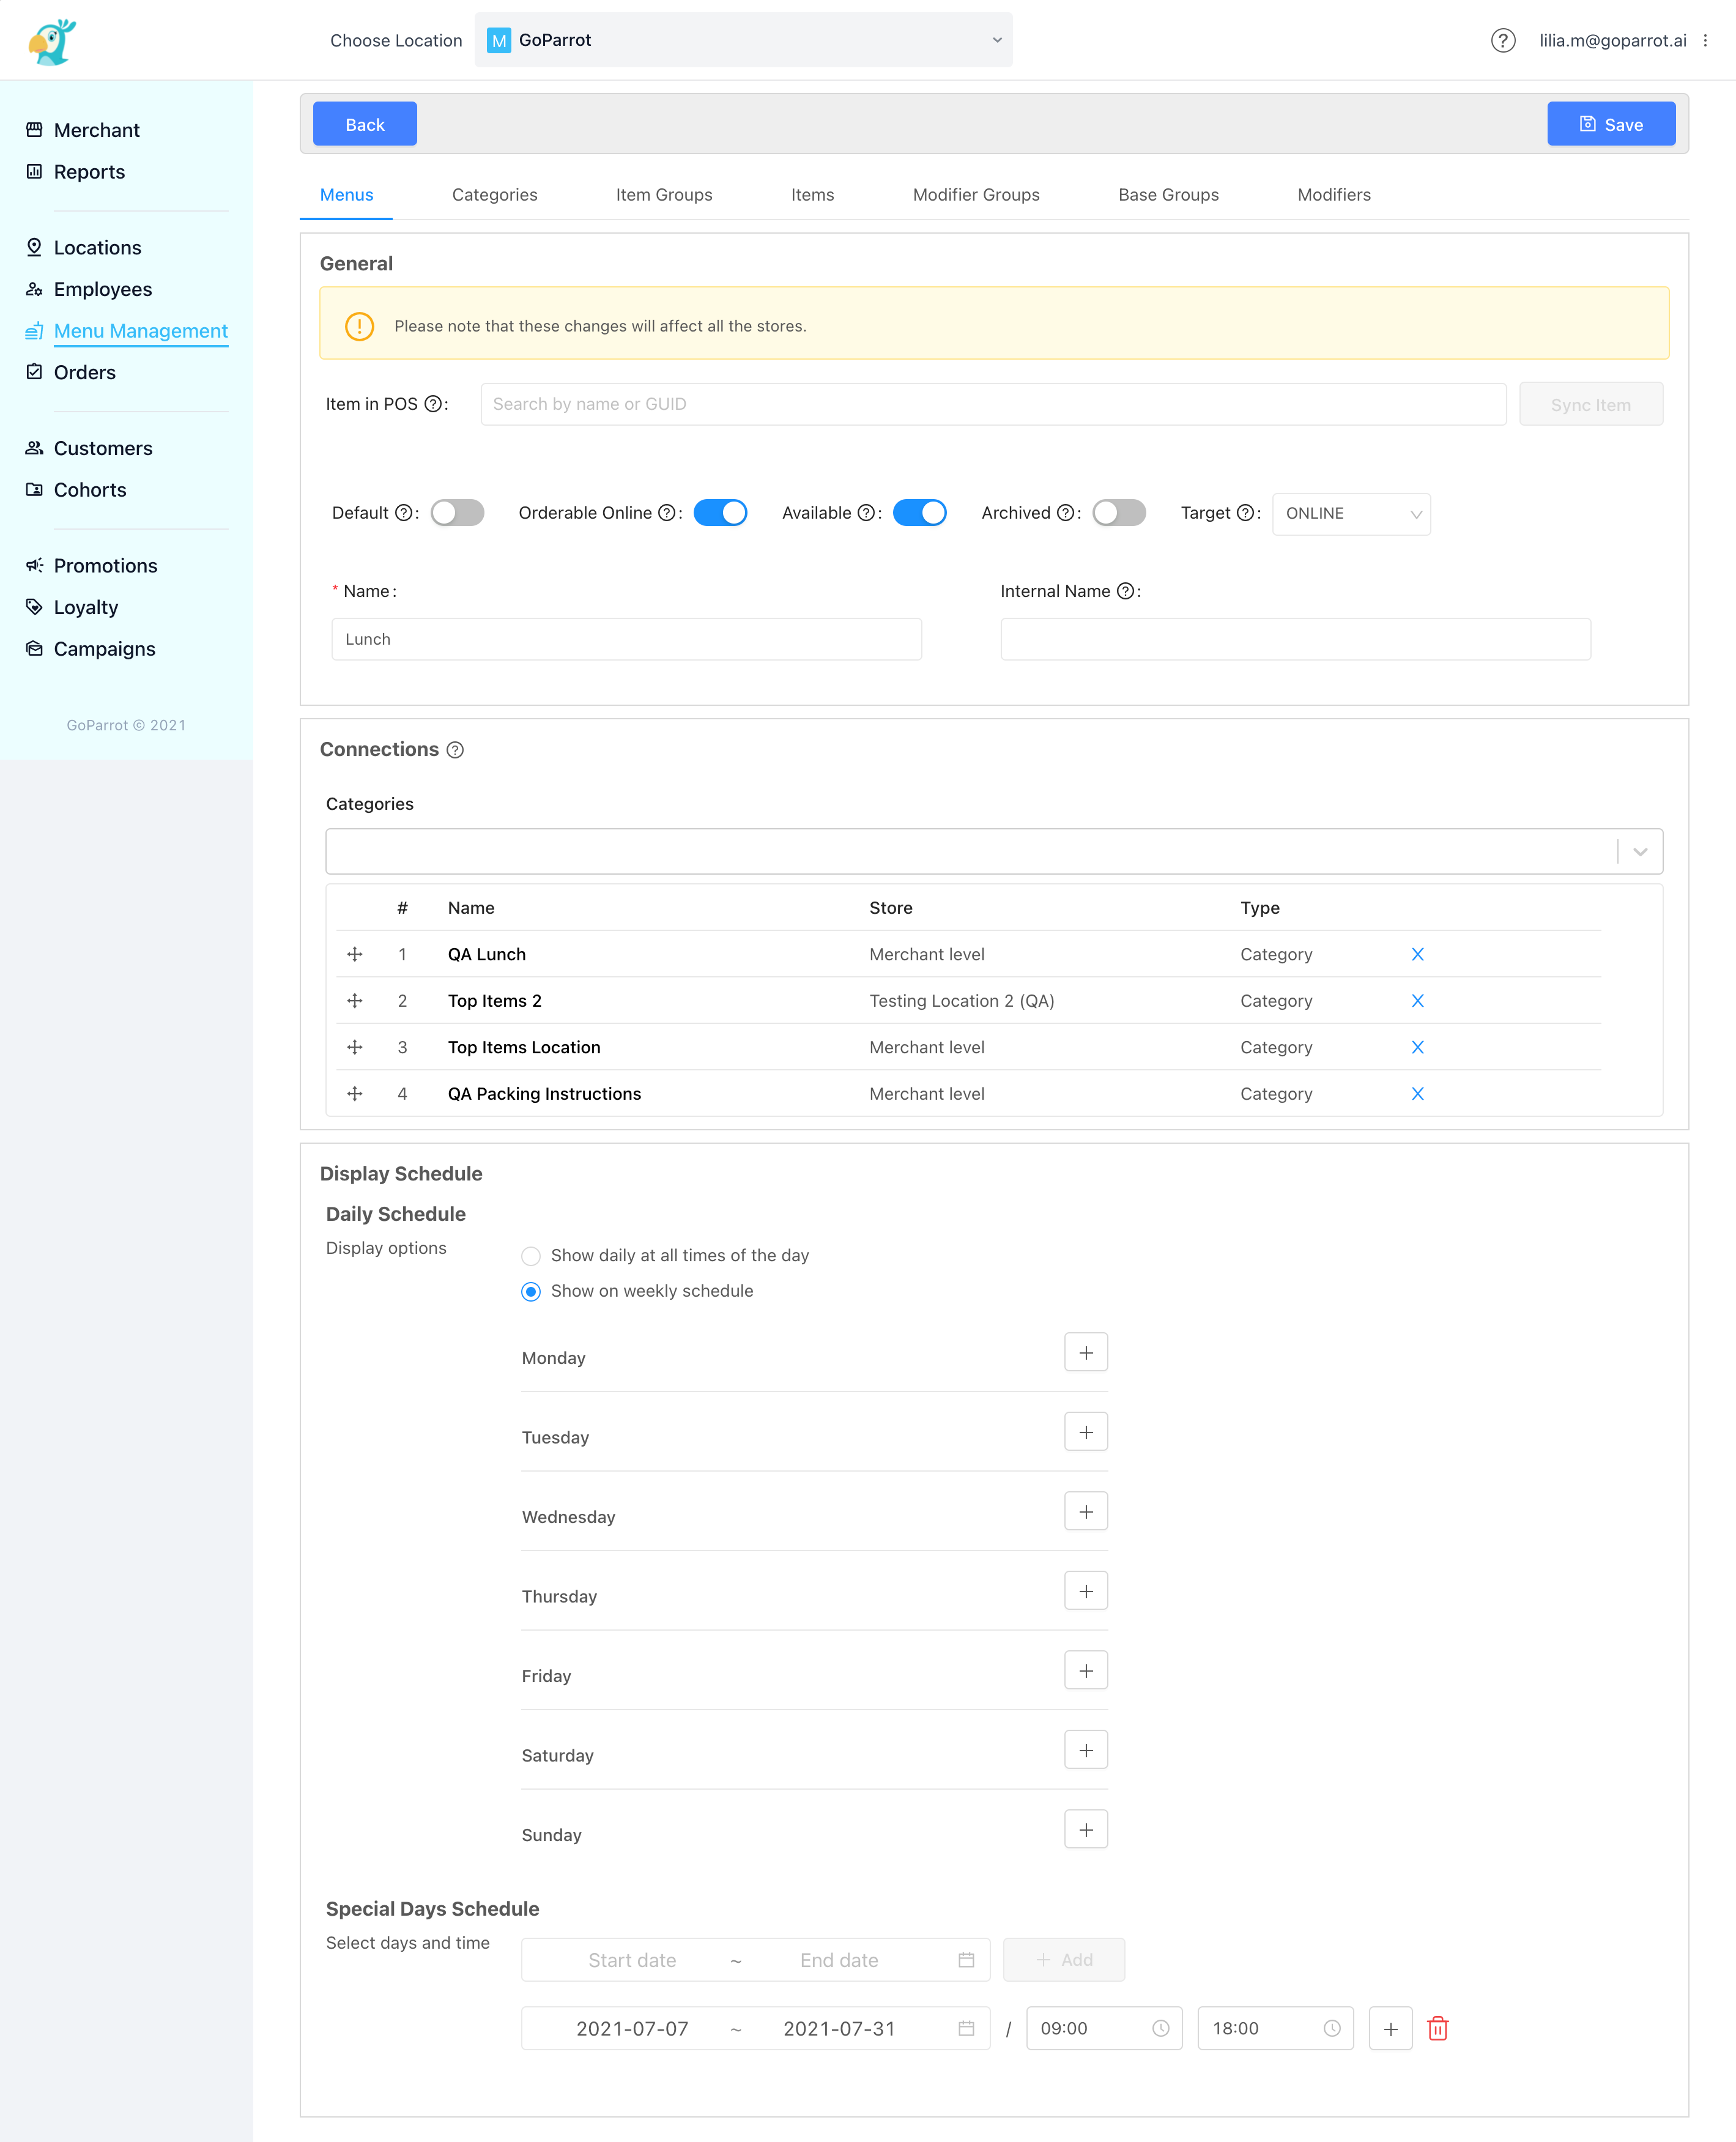
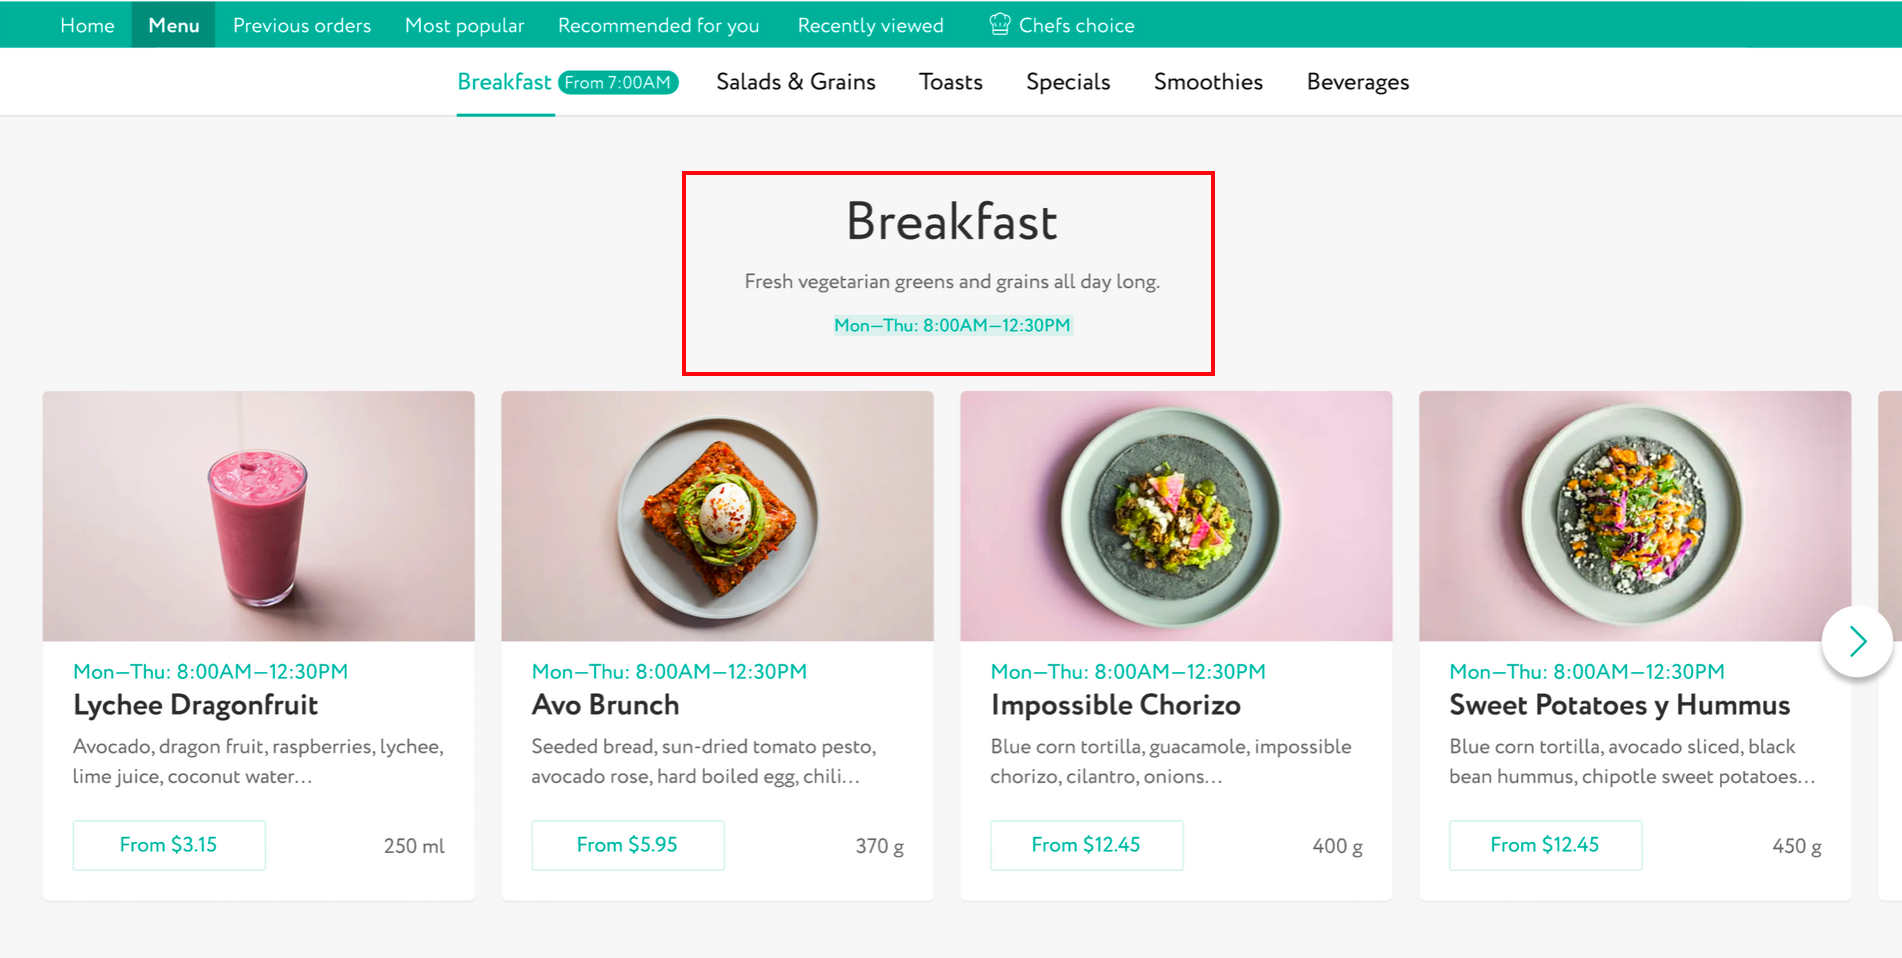
We have a new feature that will help you promote all your existing menus and raise your customers’ awareness about the possibility to order various items at specific times, days, and specific date range. It will allow you to display, at any time, all your existing time specific menus on the webstore.
To enable this feature, please contact our support or onboarding teams (support@goparrot.ai or onboarding@goparrot.ai). Afterwards, you can set everything via GoParrot Dashboard, as described in our help section.
Here is an example of a Breakfast Menu that can be displayed on your webstore. Your customers will be able to order items only between 08:00 AM and 12.30 PM.
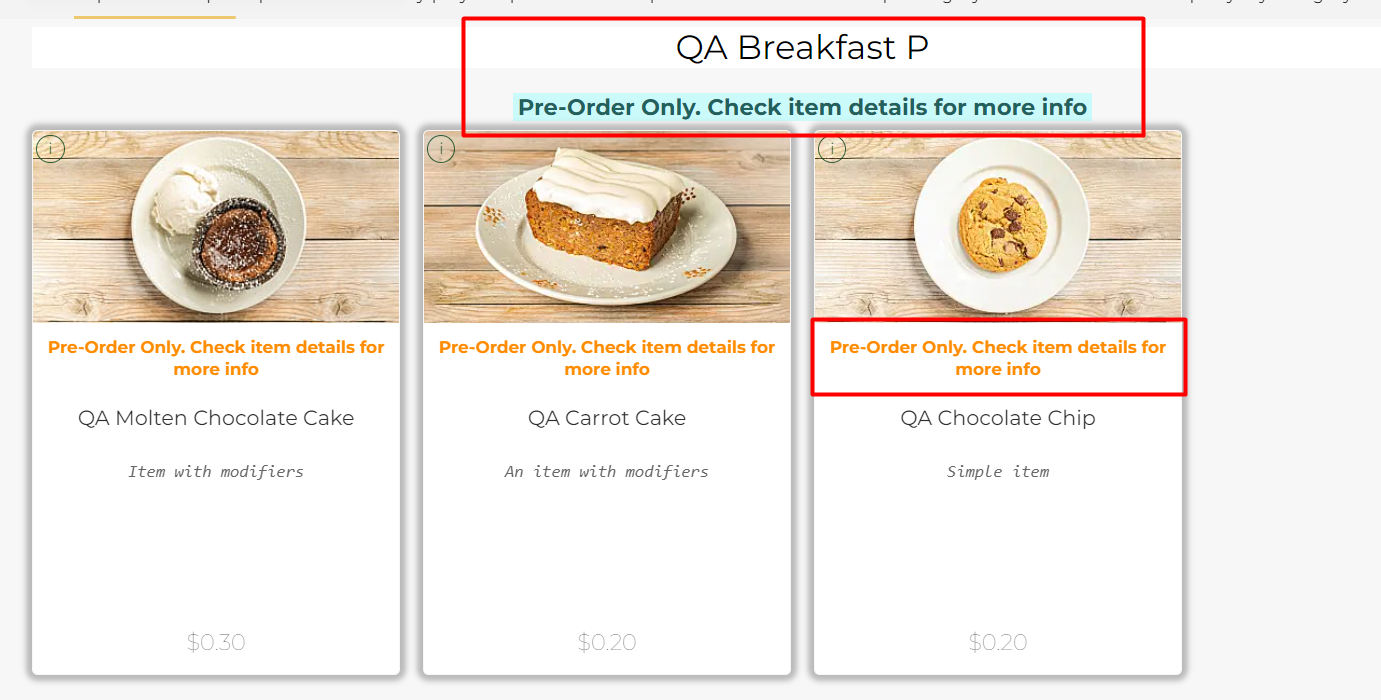
If someone tries to order an item during non-operation hours, the following text will be displayed: Pre-Order Only. Check item details for more info.
January 2022 Update#
If you can't find something or anything is not clear feel free to contact support at support@goparrot.ai.
[0] Content#
| 1 | POS Settings via GoParrot Dashboard | Set up the main parameters to handle operations with the POS you have chosen. | Jump |
| 2 | Select Specific Store Type | The possibility to select your store type was added to GoParrot Dashboard. | Jump |
[1] POS Settings via GoParrot Dashboard#
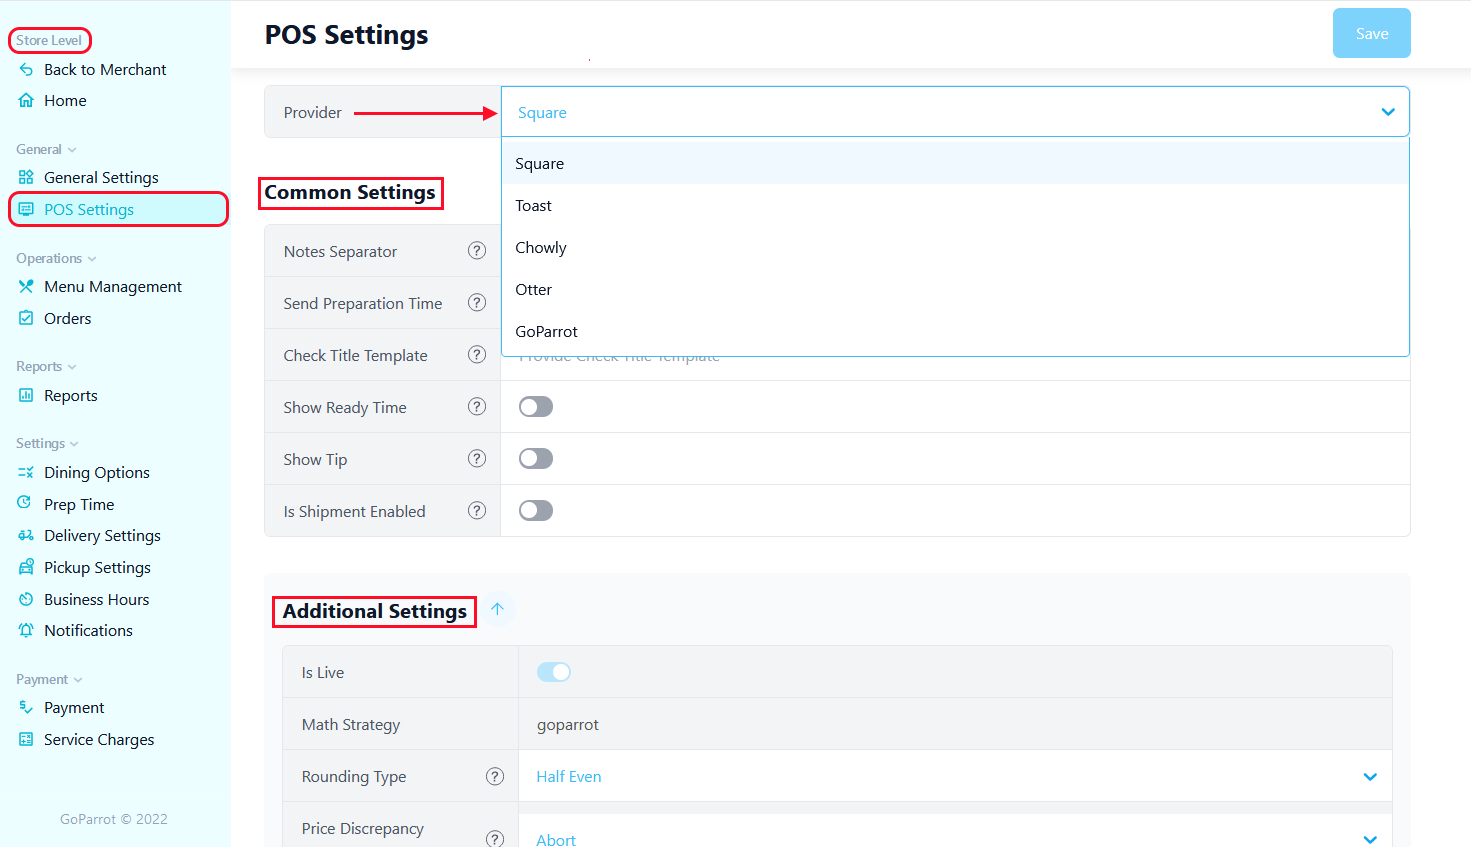
Now you can manage your POS settings via GoParrot dashboard. Some parameters are set by default, some of them required, while others are optional, depending on the provider.
It is a store-level setting that can be configured via POS Settings tab:
- Select from the list the required provider: Square, Toast, Chowly, Otter or GoParrot.
- Depending on your role, set up the parameters specific for the selected POS (i.e information printed on kitchen slip, price discrepancy parameters, etc.).
- After you make any changes, don’t forget to press the ‘Save’ button.
To learn more, go to our detailed explanation in the dashboard help section.
[2] Select Specific Store Type#
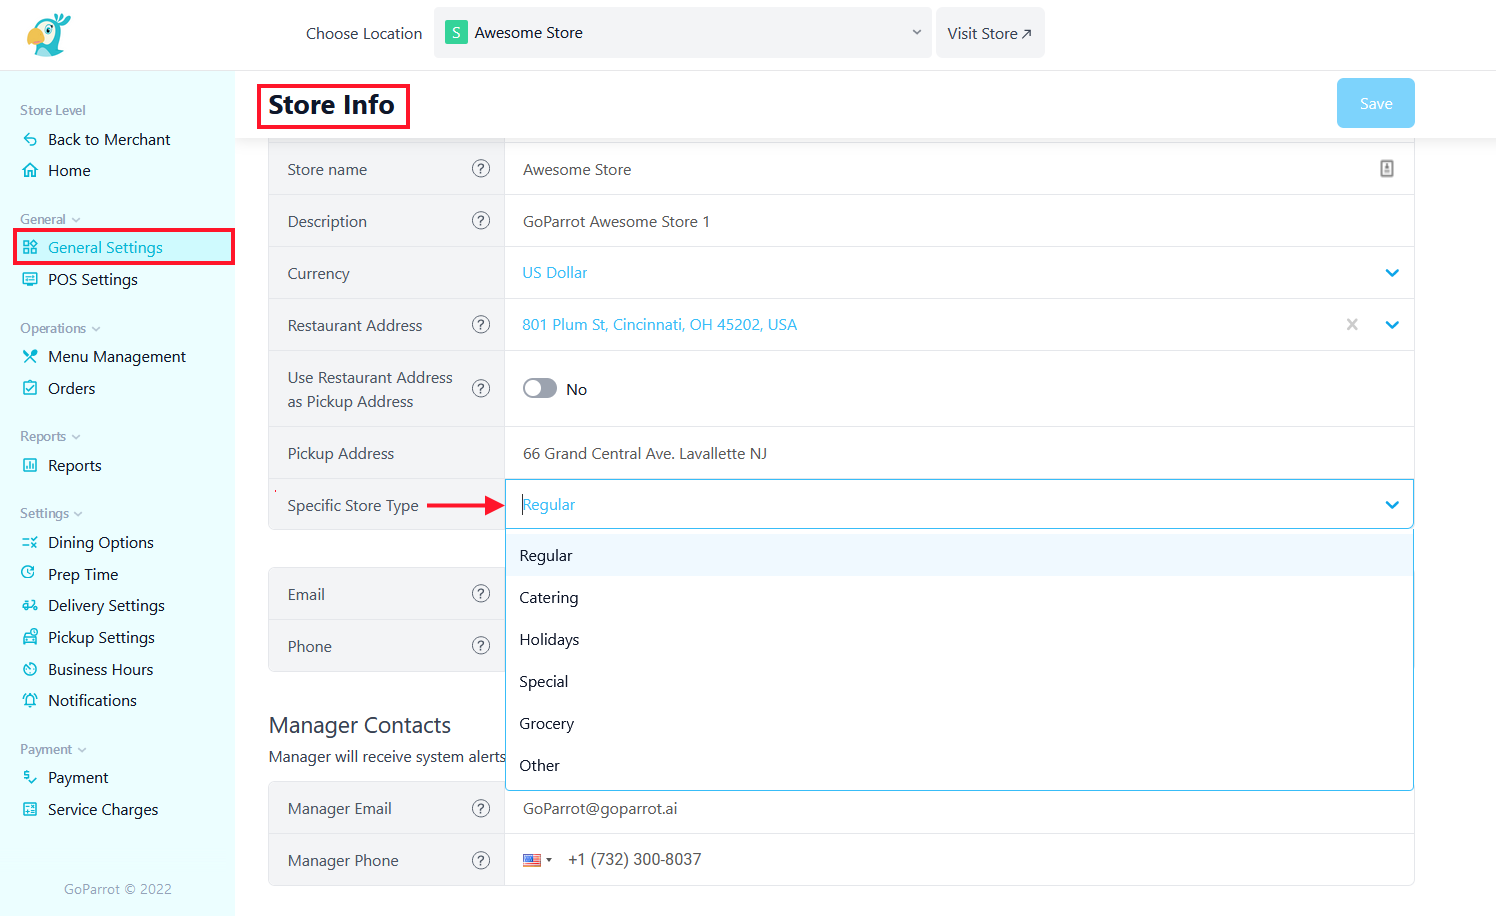
A new 'Specific Store Type' parameter has been added to GoParrot Dashboard.
It can be set at store level, in ‘General Settings’ tab, ‘Store Info’ section.
From the drop-down list, select the store type: Regular, Catering, Holidays, Special, Grocery or Other. If Other is selected then a new 'Custom Specific Store Type' field is displayed bellow.
By default, all stores are displayed as 'Regular'.
December 2021 Update#
If you can't find something or anything is not clear feel free to contact support at support@goparrot.ai.
[0] Content#
| 1 | Dashboard Homepage | A ‘Home’ tab that display various data and analytics was added to GoParrot Dashboard. | Jump |
| 2 | Migration to New Square Payment Form | Our payment form migrated to new Square SDK and has a new look. | Jump |
| 3 | Payment Card Security Measures | Implementation of 3D Secure authentication protocol for online payments. | Jump |
| 4 | Combo and Boxes | Items or groups of items sold at a specific discounted price. | Jump |
| 5 | Share Your Birthday Date Campaign | Reach out to customers who didn't share their birth dates yet. | Jump |
[1] Dashboard Homepage#
The new Home page on GoParrot dashboard can be accessed on Merchant and Store level. It allows our partner restaurants easy visualization, monitoring and use of relevant data and analytics in one place.
The Metabase data is displayed in the form of several UI components:
- Yesterday's data: gross sales, number of orders, average order amount and number of customers;
- Yesterday’s stores performance & top 10 selling items (UI table can be extended);
- Last 30 days stats: total sales, new customers, total orders and average order amount;
- Disable All Stores/ Disable Store button, in case of emergency;
- Shortcuts to other Dashboard tabs, such as: Menu Management, Marketing, Payment, Orders, Reports, etc.
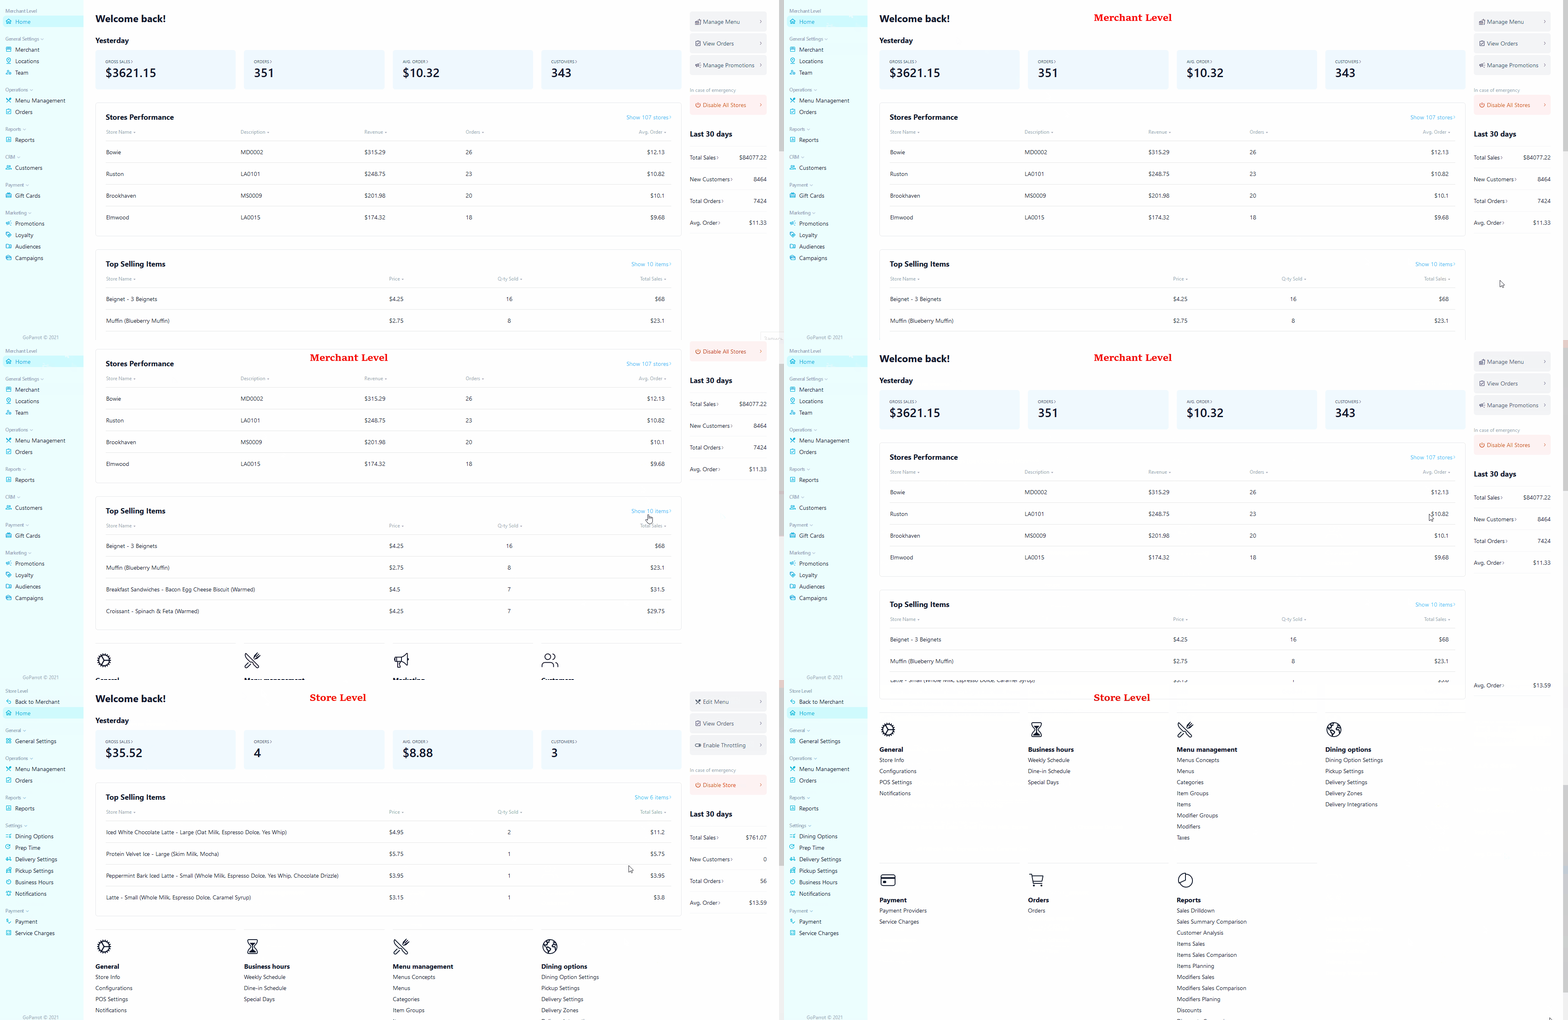
To learn more about the homepage structure, go to our detailed explanation in the help section.
[2] Migration to New Square Payment Form#
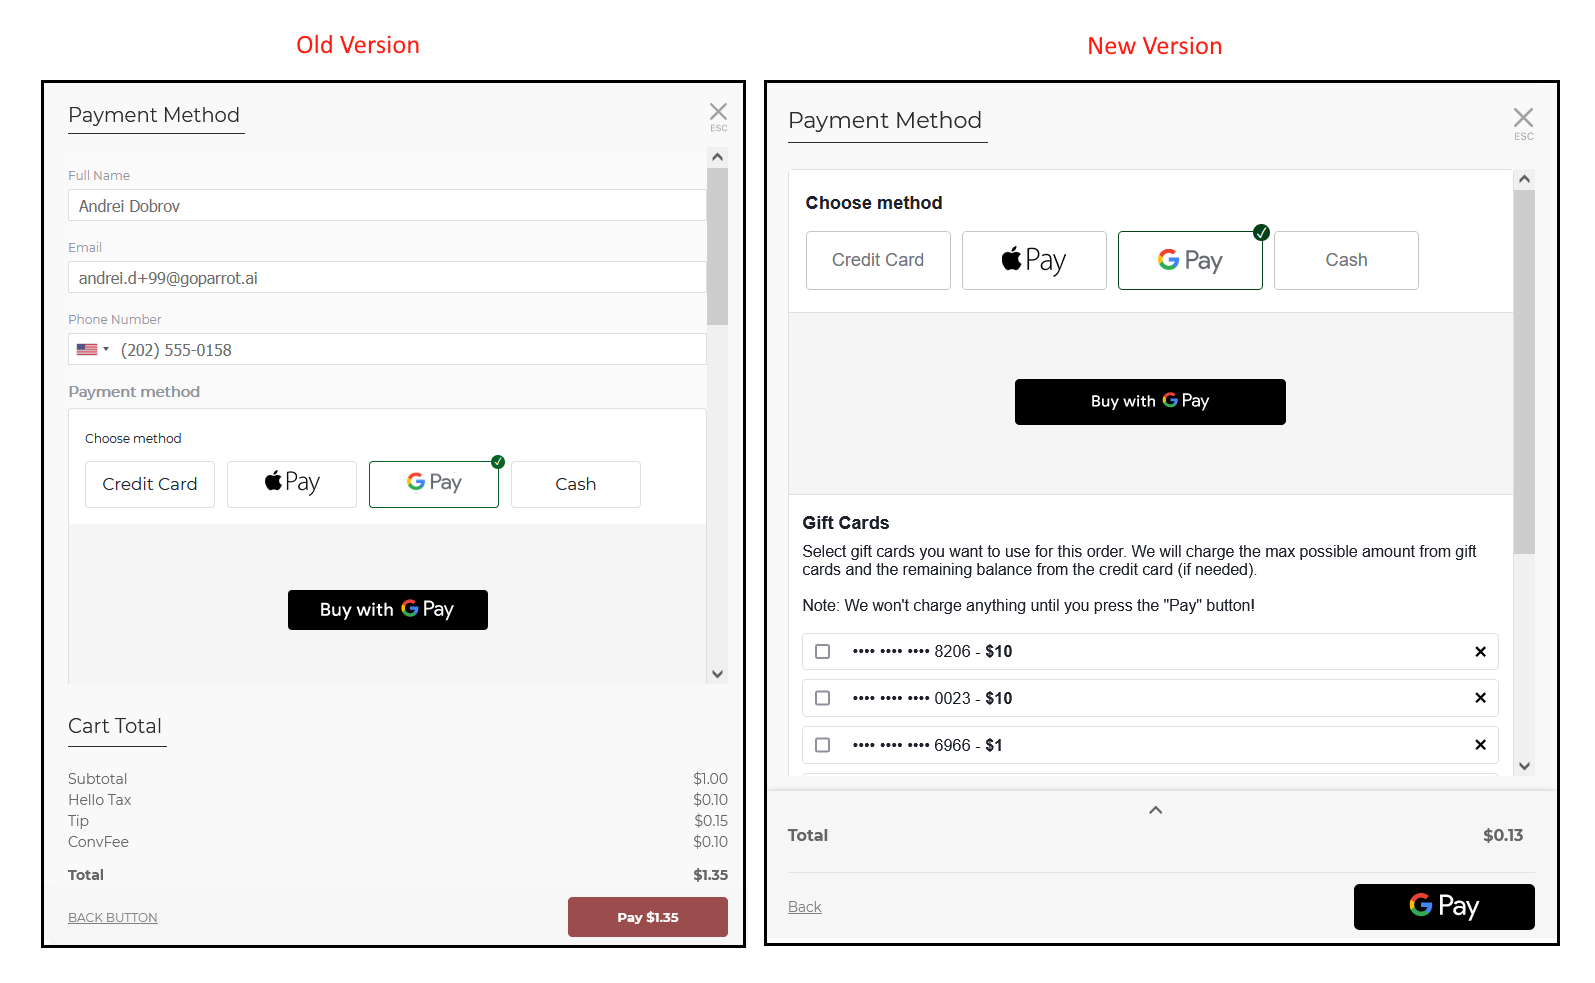
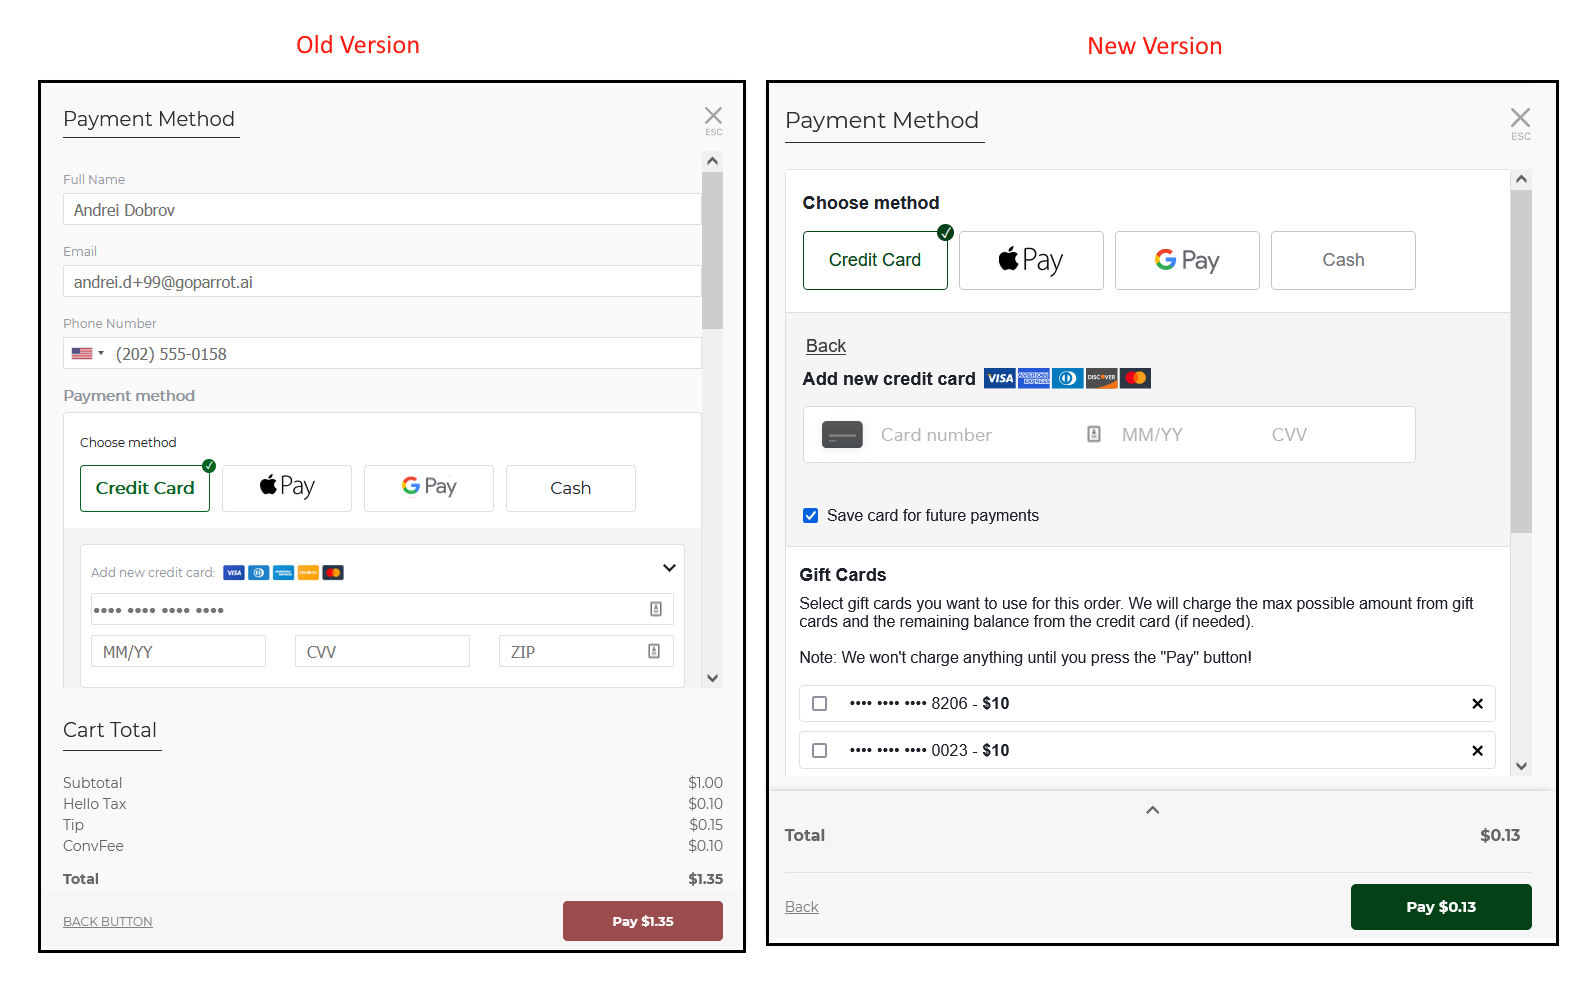
To improve your customers’ online experience and to make the payment process more convenient, fast and secure, the Square payment form has now a new look:
- Fields required for user data (full name, email, phone number) were removed.
- Improvements were made when choosing Google Pay or Apple Pay methods. The button is now in the right bottom corner of the page, and it will redirect you instantly to Google and Apple Pay to perform the payment without clicking ‘Pay’ button twice, as it was in previous version.
- the section Add New Card has a new look and a new option: check the box if you want to save card for future payments.
- depending on the country, it can show/hide the zip code input.
[3] Payment Card Security Measures#
Good news! Now you can activate 3D Secure - a protocol that requires your customers to complete an additional verification step with the card issuer when paying. Customers may be redirected to an authentication page on their bank’s website where they enter a password associated with the card or a code sent to their phone. 3D secure is available only for merchants that enabled Risk Manager tool in Square.
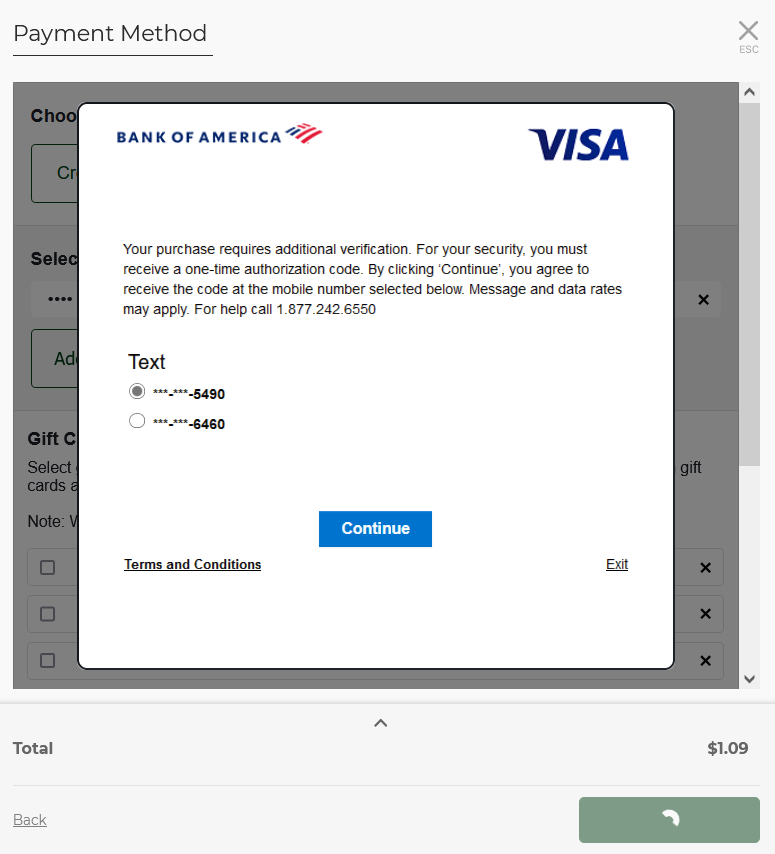
If you want to activate 3D Secure, feel free to contact us at sales@goparrot.ai or support@goparrot.ai.
[4] Combo and Boxes#
Great news! Now you can offer your guests the possibility to order combo meals and boxes (items or groups of items at a specific discounted price).
Combo is a meal containing a combination of items (e.g. main dish with side dish and a drink), while boxes contain two or more complementary products added to the cart from the product page or checkout (e.g. a box of 10 doughnuts).
The combo group setting can be made both at merchant and store level. To learn how to configure Combos and Boxes, go to our detailed explanation in the dashboard help section.
Combos and boxes are shown on the menu as if they are items in a category (either in a separate category or spread around in other categories).
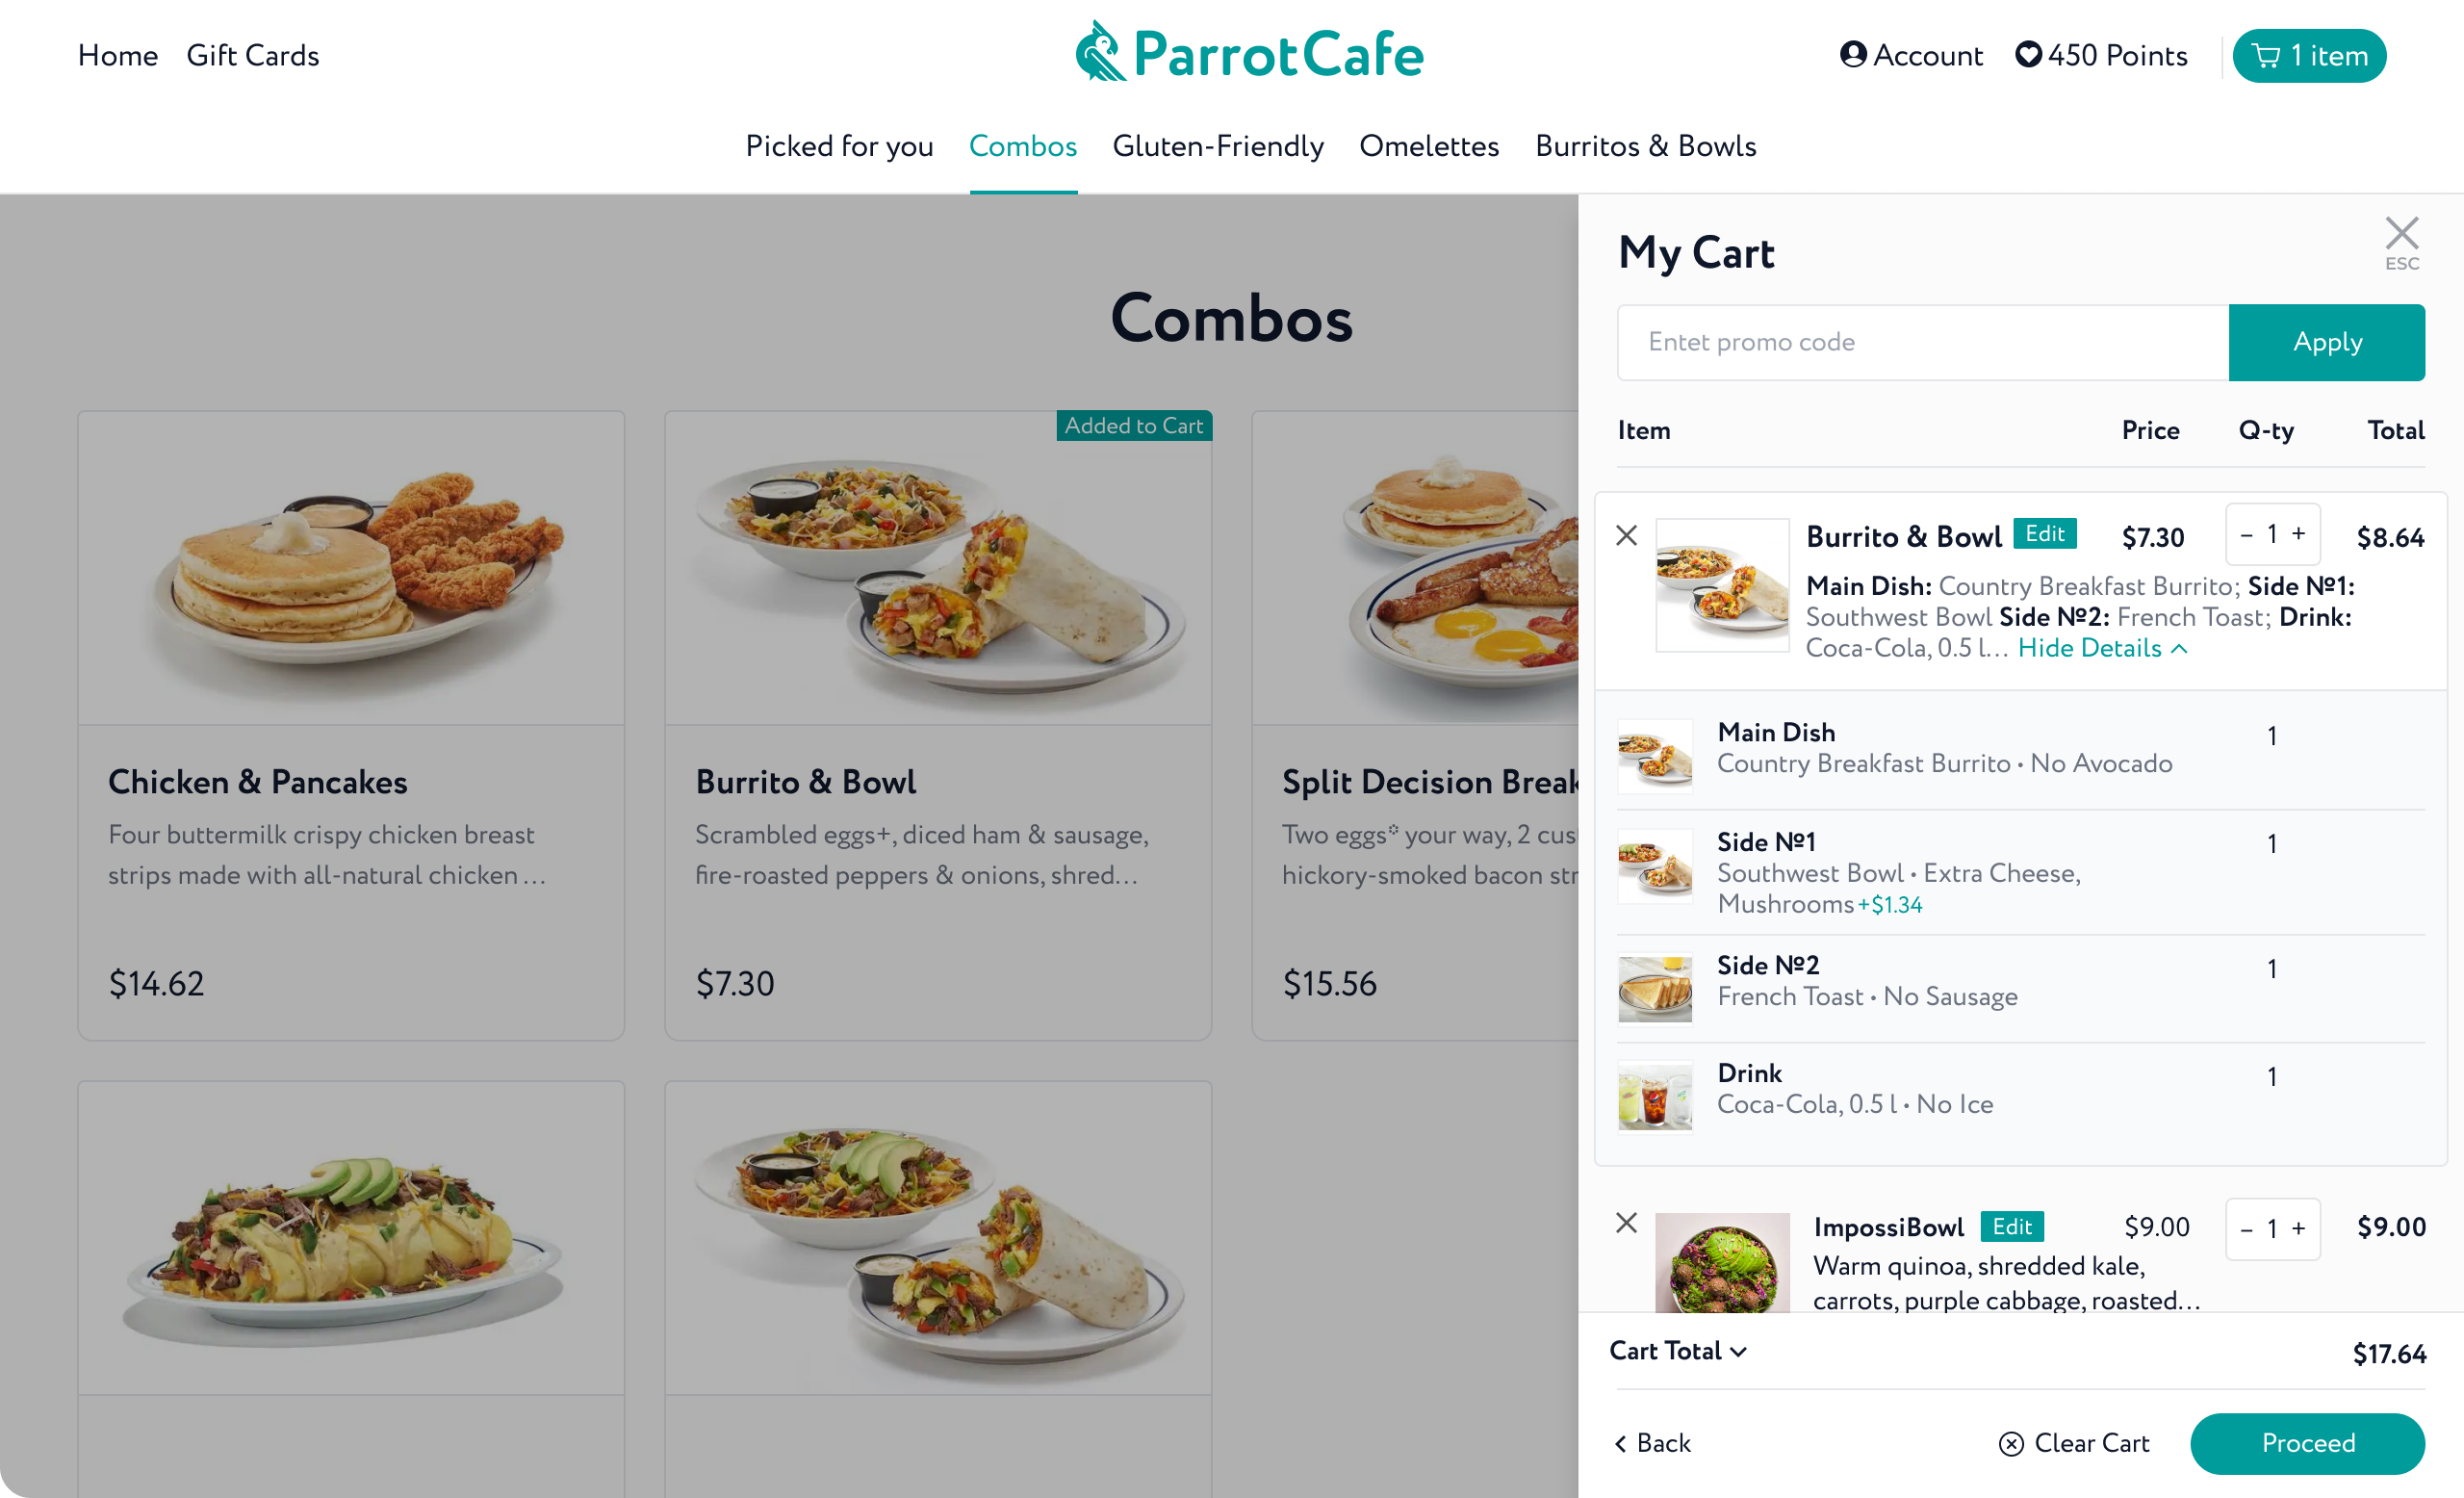
Combo and boxes are not enabled by default. If you want to enable this option, feel free to contact us at support@goparrot.ai.
[5] Share Your Birthday Date Campaign#
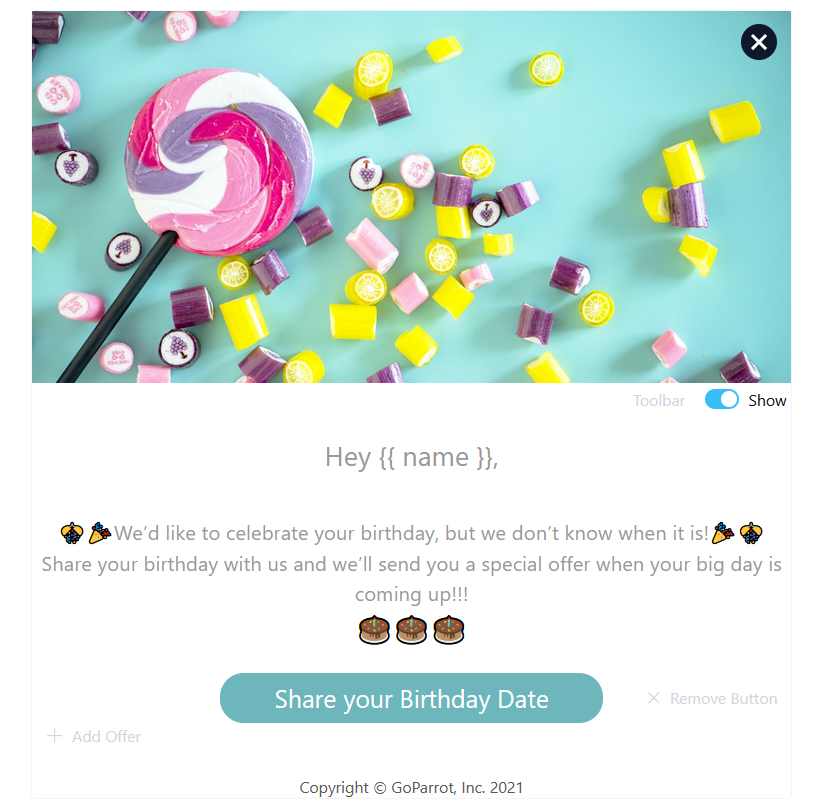
We added a new automated drip campaign template that will send an email to users who did not set their birthday date yet.
The email contains a Share your Birthday Date button that will redirect users to store edit profile page where last order was made. If the user didn't place any orders, he will be redirected to the first shop of the merchant.
- Go to the "Campiagns" page in GoParrot Dashboard.
- Create a new campaign.
- Click on Automated campaign.
- Select "Share your Birthday Date".
November 2021 Update#
If you can't find something or anything is not clear feel free to contact support at support@goparrot.ai.
[0] Content#
| 1 | GoParrot Dashboard Redesign | The left side bar on GoParrot dashboard has a brand new look | Jump |
| 2 | Configure your App via Dashboard | Configure or change mobile application settings via GoParrot Dashboard (starting with version 2.5.0). | Jump |
| 3 | Service Charges Toast Autosync | Service charges set on Toast POS system are automatically synchronized with GoParrot Dashboard. | Jump |
| 4 | Display Items in the Cart by Brands | Items ordered from a multibrand location, are now divided by brands in the shopping cart. | Jump |
| 5 | New Version of Mobile APP | Our Mobile App got an upgrade. Try it out to see the changes we made! | Jump |
[1] GoParrot Dashboard Redesign (Left Side Bar)#
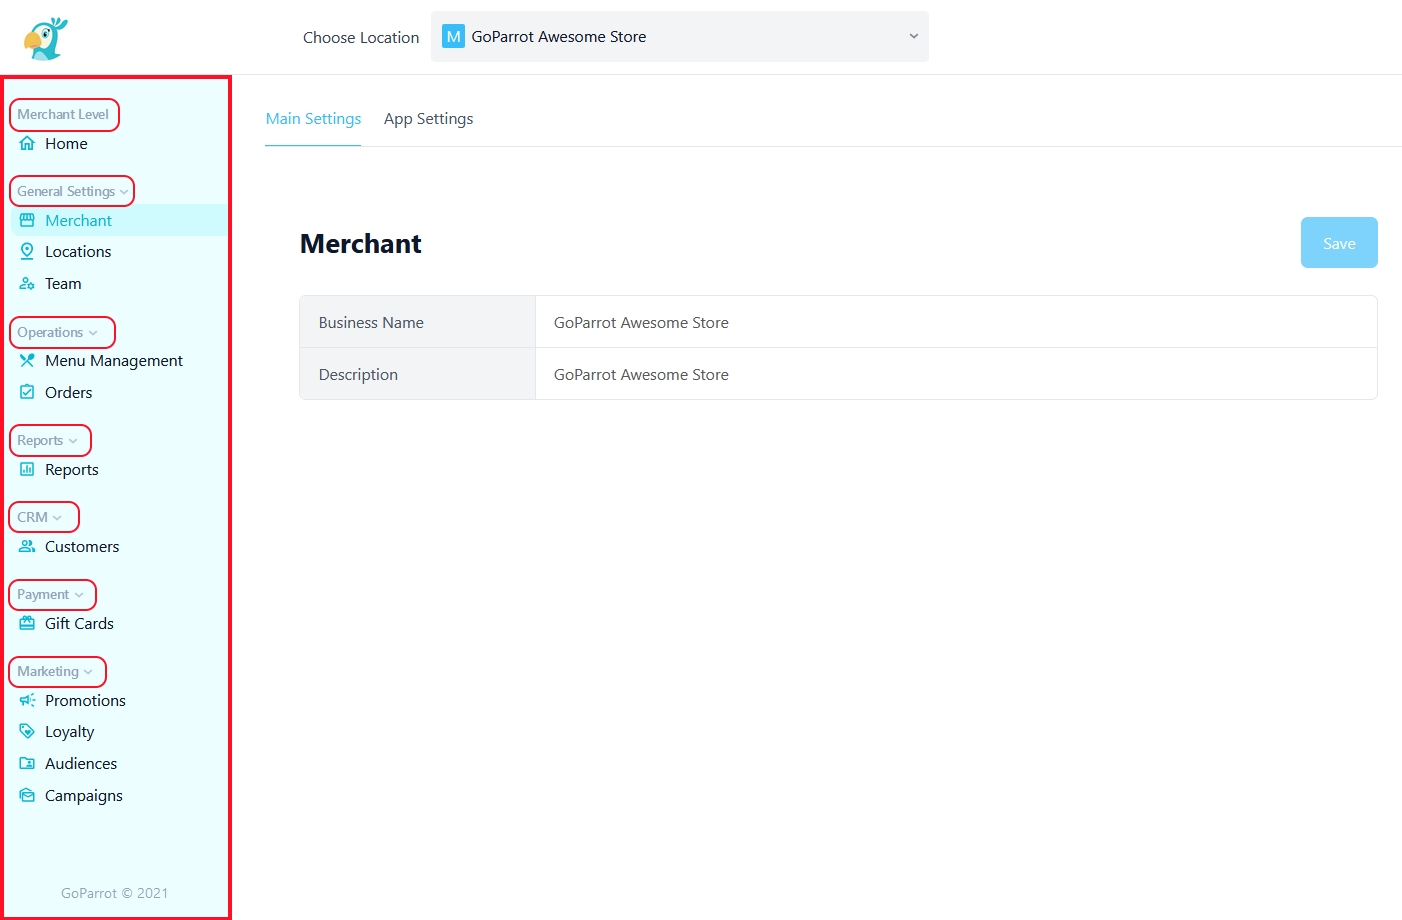
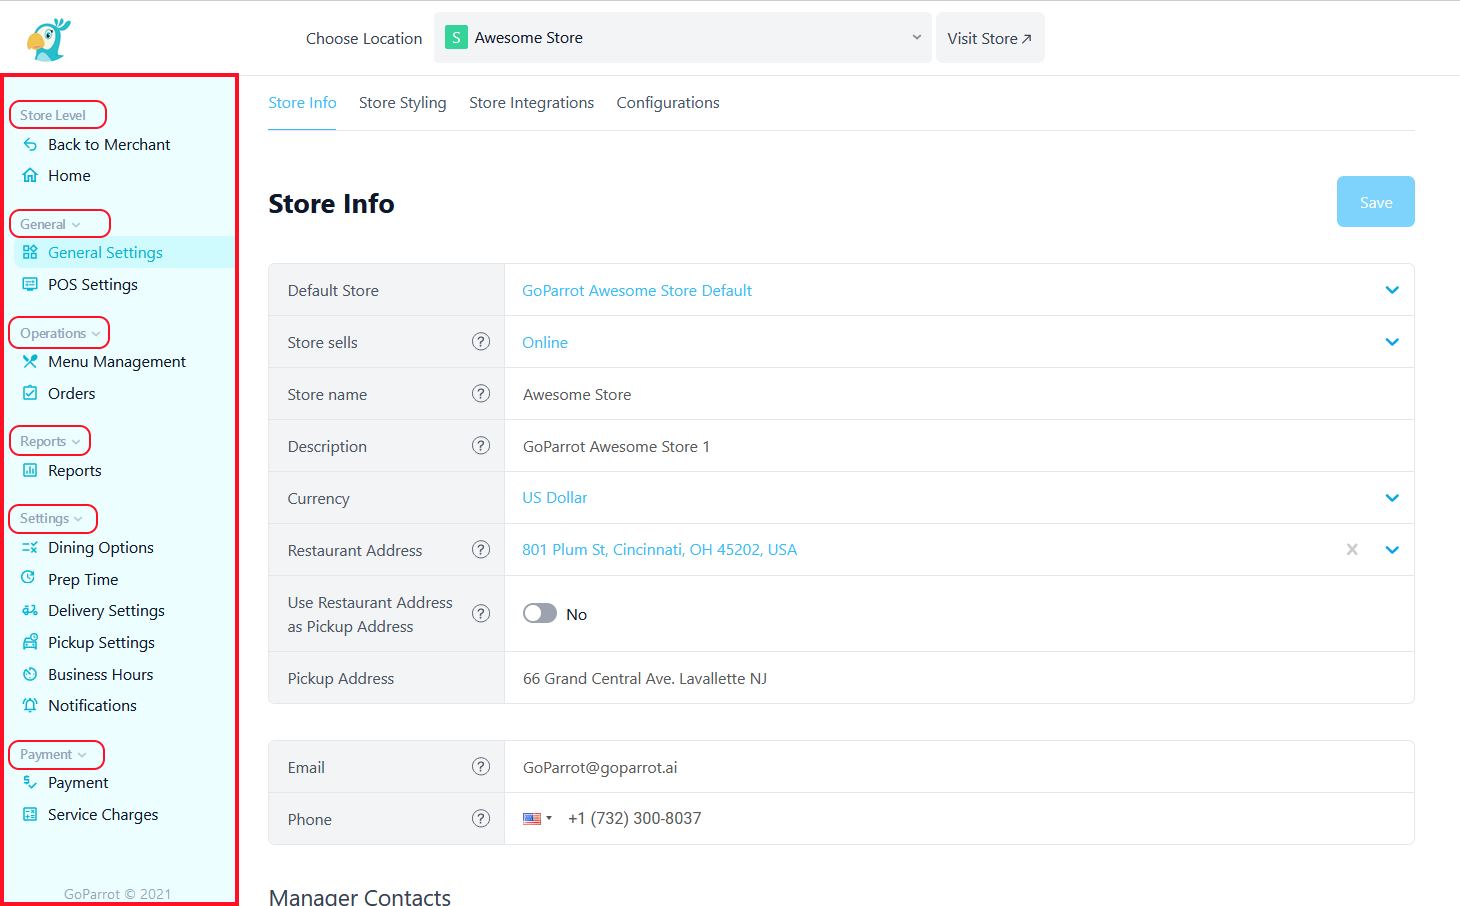
We are permanently working to make the GoParrot dashboard experience more beautiful and seamless for you, our partner restaurants. For new rich experience and easy navigation, we have modified the left side bar. For your convenience we grouped the tabs into categories and added several exciting new features. See the new structure of our dashboard in the screens below:
Merchant Level
Store/Location Level
[2] Configure your App via Dashboard#
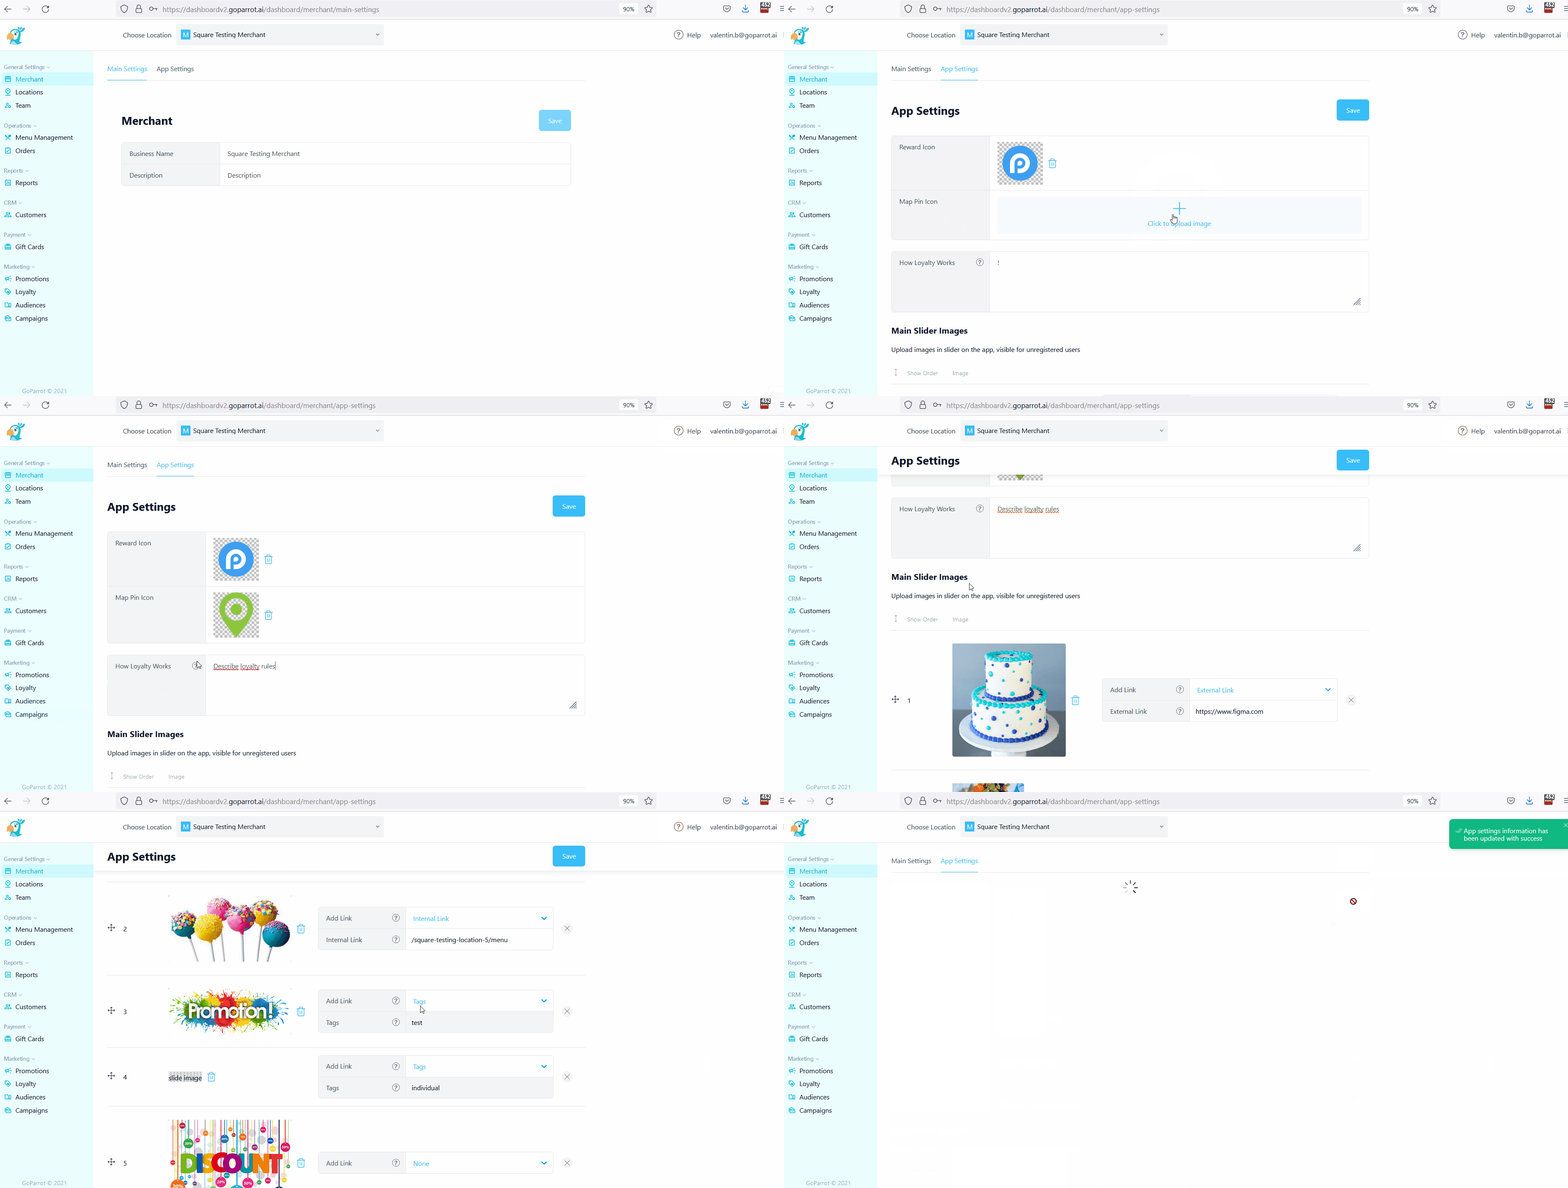
Now you have the possibility to configure your mobile app settings via GoParrot dashboard – a quick and easy way to control, change and customize your app.
Go to ‘App Settings’ page, in the ’Merchant’ tab, where you will have the possibility to:
- Add/delete images for Reward icon, Map Pin Icon.
- Describe How Loyalty Works (explain to users how to earn point or use other rewards related to your loyalty program)
- Upload images for sliders and change their order: Main Slider Images (visible for unregistered users) and Slider Widget Images (visible only for registered users).
- Add Internal/External links for images from sliders.
- View the configured Tags for images.
The order of images can be changed manually. You can drag and drop any of them into the order you wish to have them displayed on the app.
After you make any changes, don’t forget to press the ‘Save’ button.
Examples on the app:
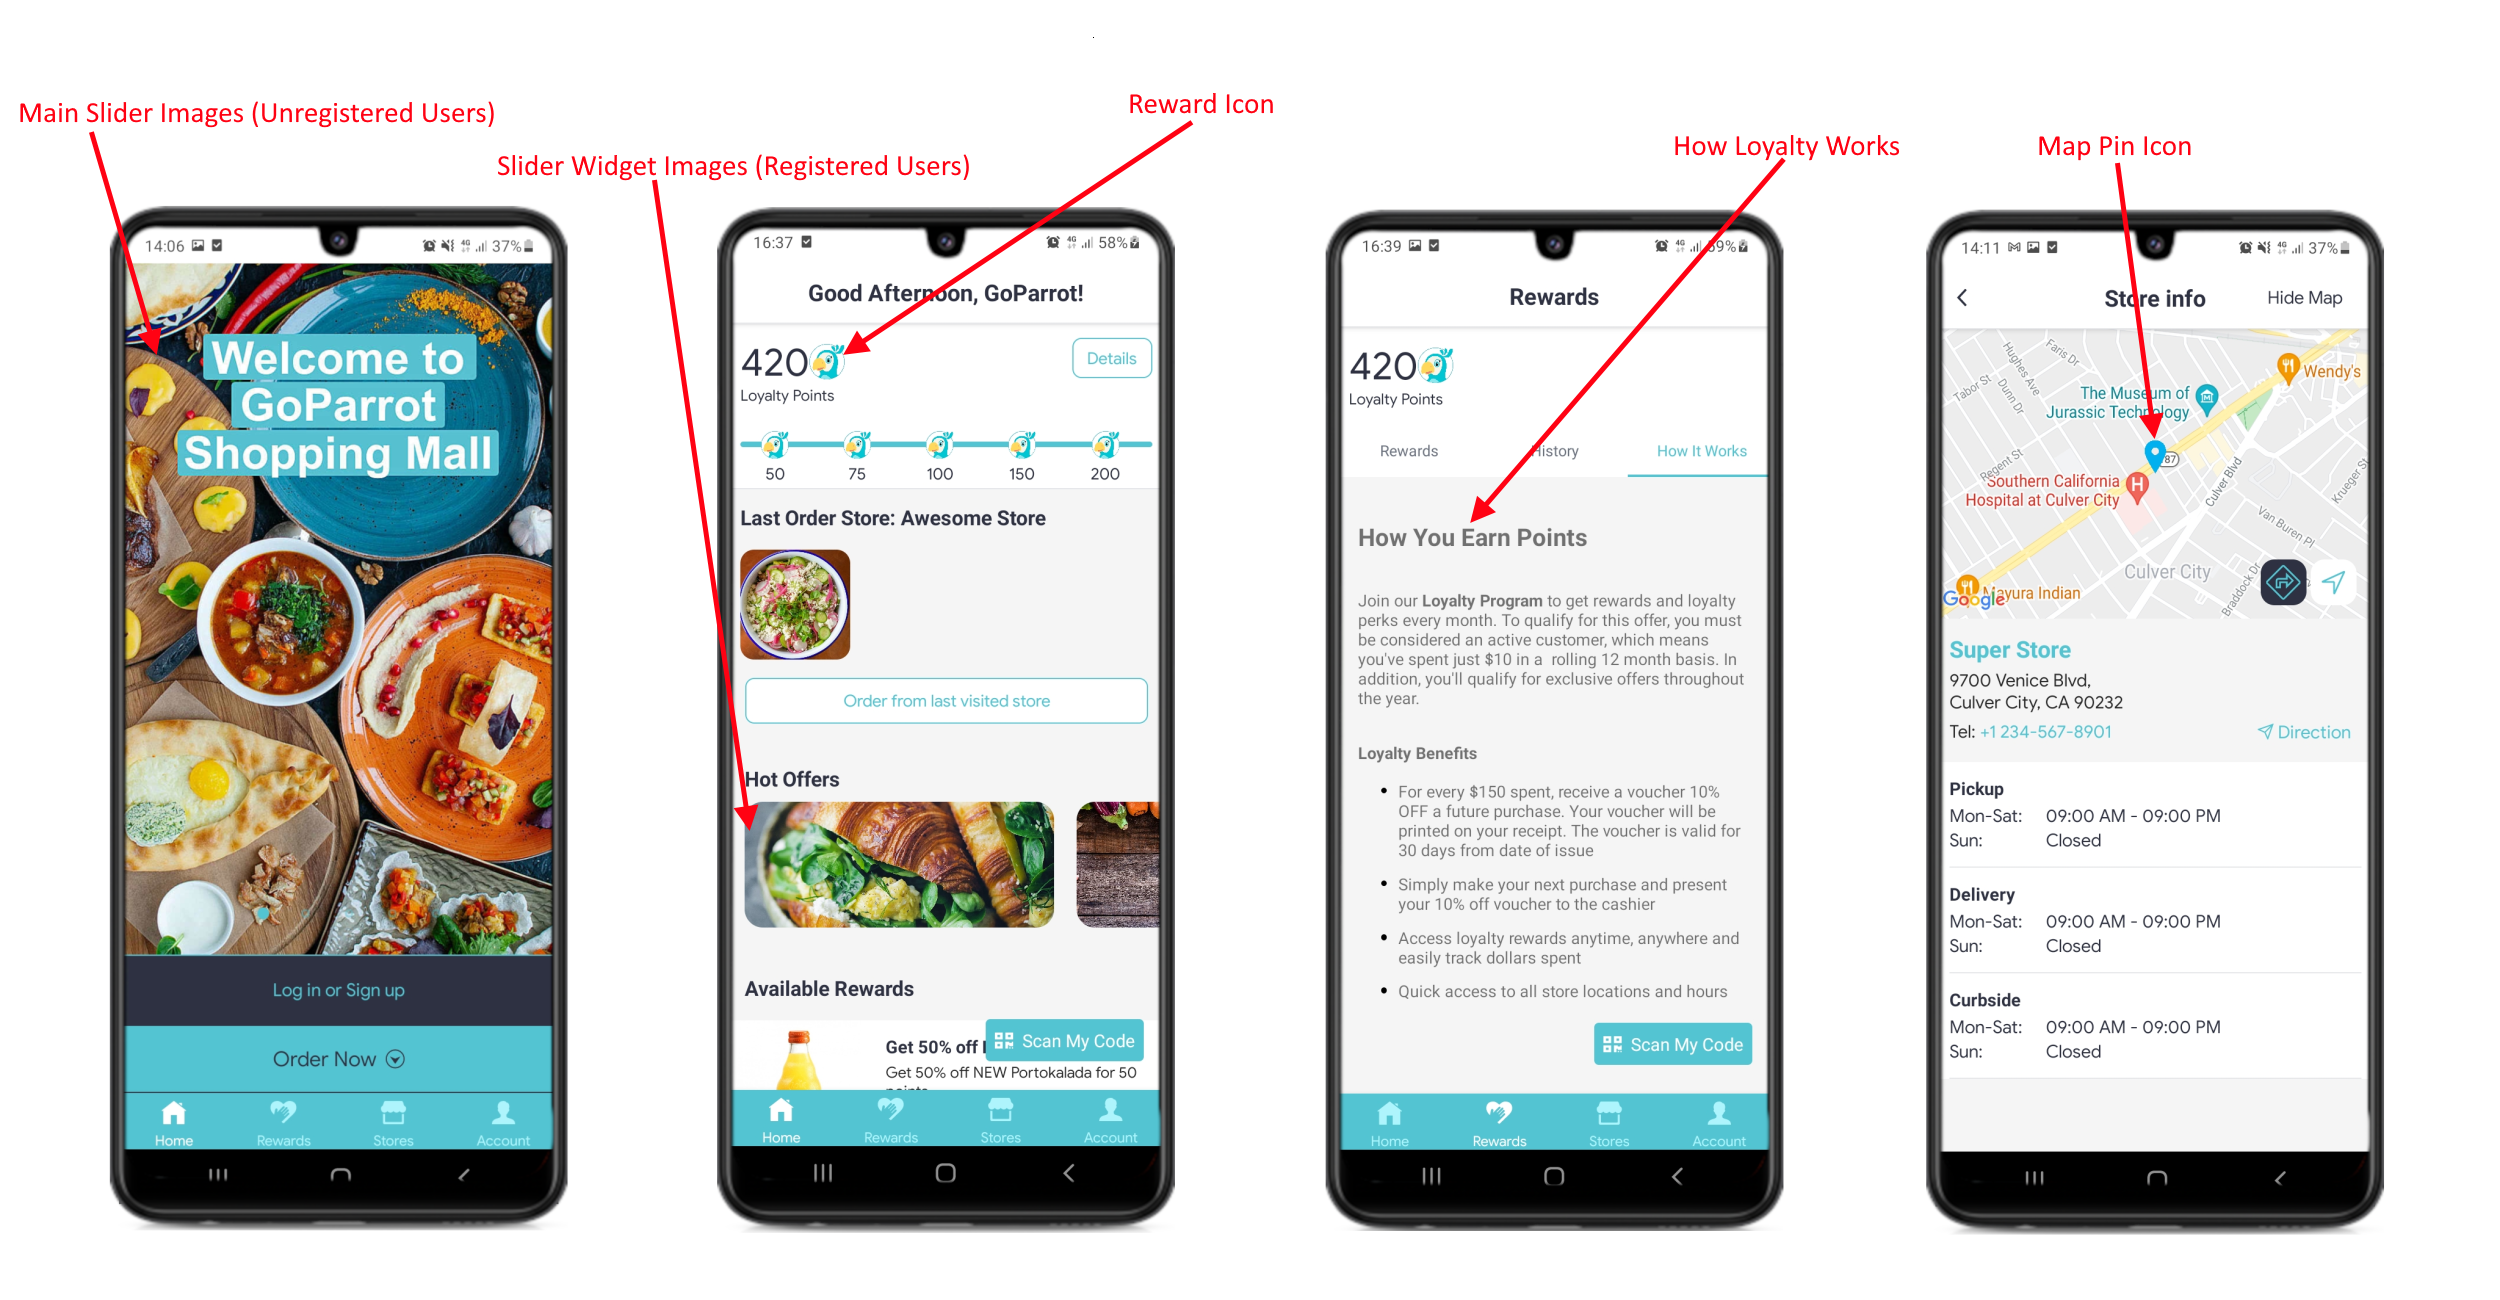
Note: this option is available for the apps with the new structure (starting with version 2.5.0).
If you have questions, feel free to contact us at support@goparrot.ai.
[3] Service Charges Toast Autosync#
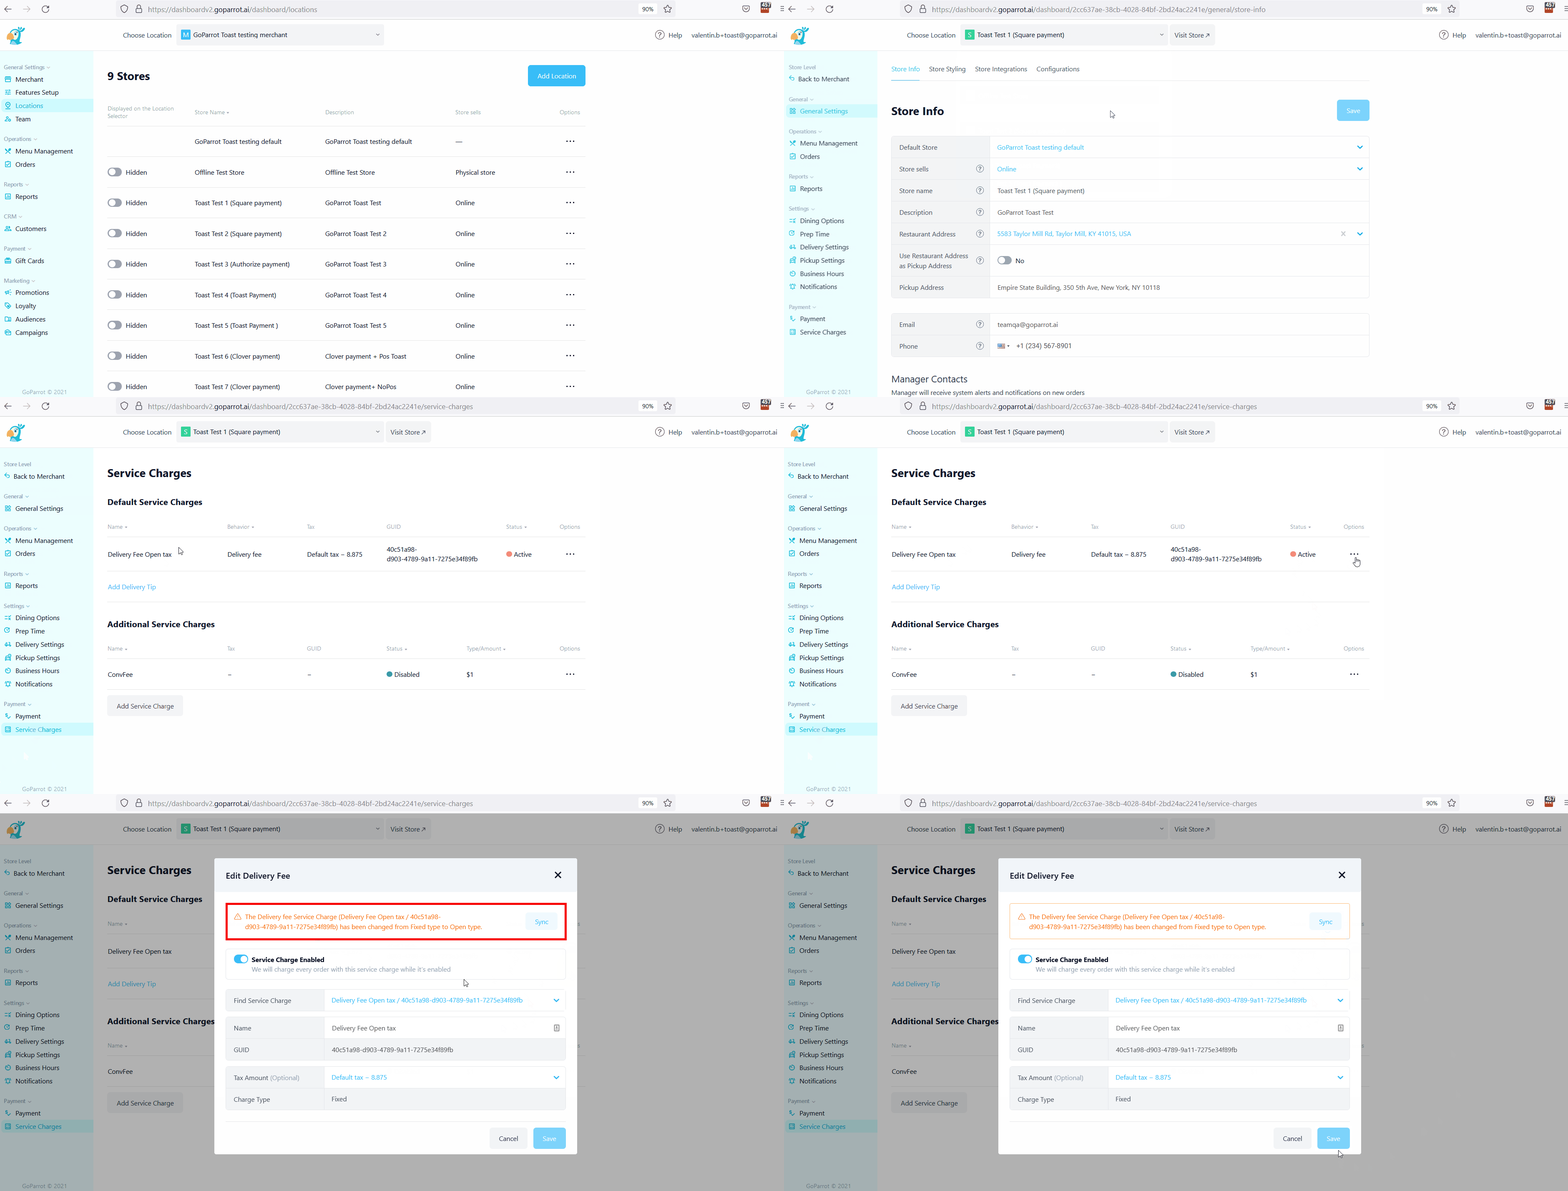
All service charges that were set on Toast are now synced with GoParrot Dashboard. You will be able to edit only the name of charge, amount (only for open amount type) and tax amount. All other fields will be auto-synced.
If you want to add a new service charge via GoParrot Dashboard, select the relevant store, press Service Charges, click Add Service Charge and choose one from the list). GUID and the amount will be auto-filled (only for fixed charge type), while for open amount you must add the amount you want and Save all the changes.
If some changes were made on Toast, you should go to Service Charges and check if the status of the edited charge changed its color to Red. In this case, click Edit and you will see a message “Service Charge (Charge Name) has been changed from Open type to Fixed type". Click on the Sync button to execute sync process and correct all discrepancies. Don't forget to Save the changes you made.
[4] Display Items in the Cart Divided by Brands#
For online stores that use multiple menu concepts/brands, users now have the possibility to see the items they ordered divided by brands in their shopping cart.
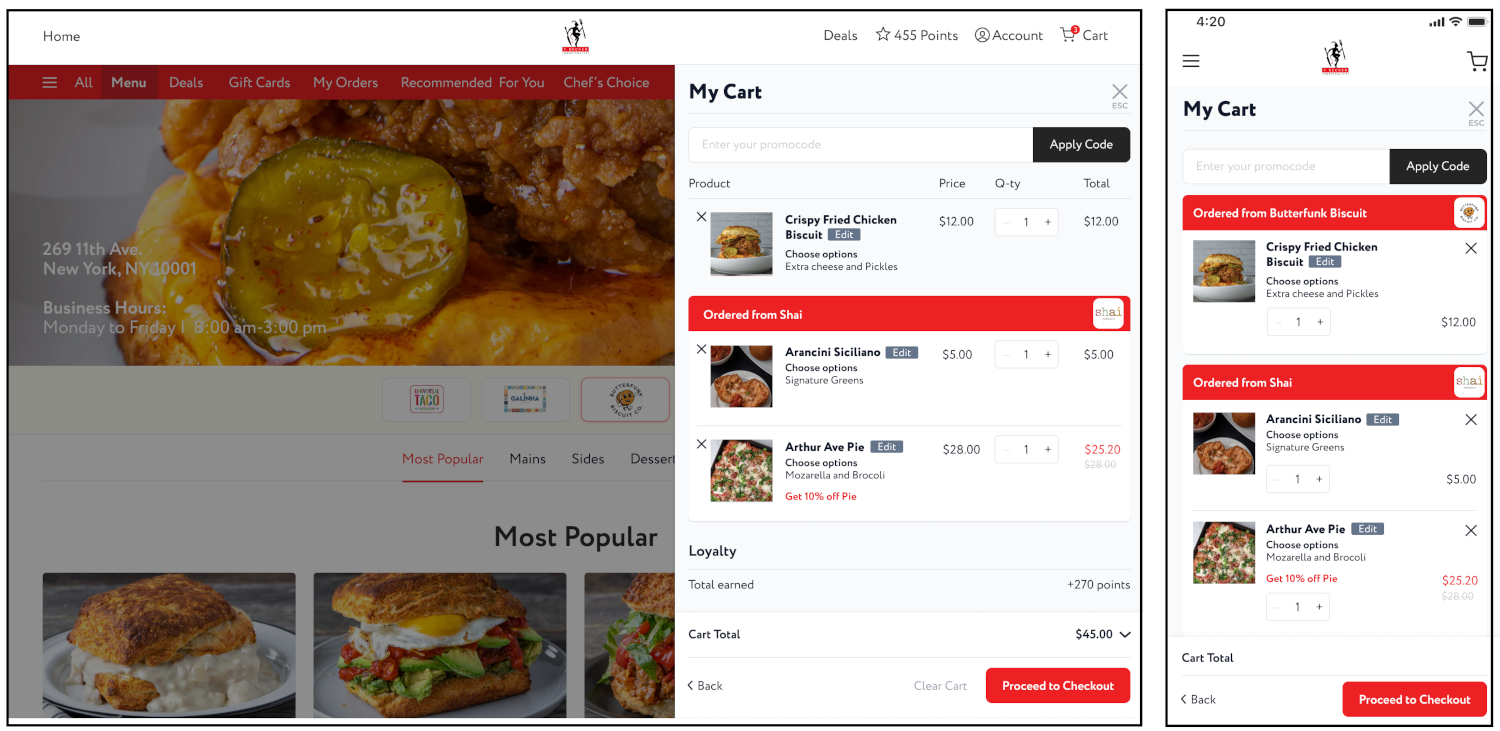
To learn more about Menu Concepts, go to our detailed explanation in the dashboard help section.
[5] Release Mobile APP Version 2.6.0#
Dear customers, we are happy to announce the release of version 2.6.0 of the GoParrot branded Mobile App. It contains several improvements and some new features:
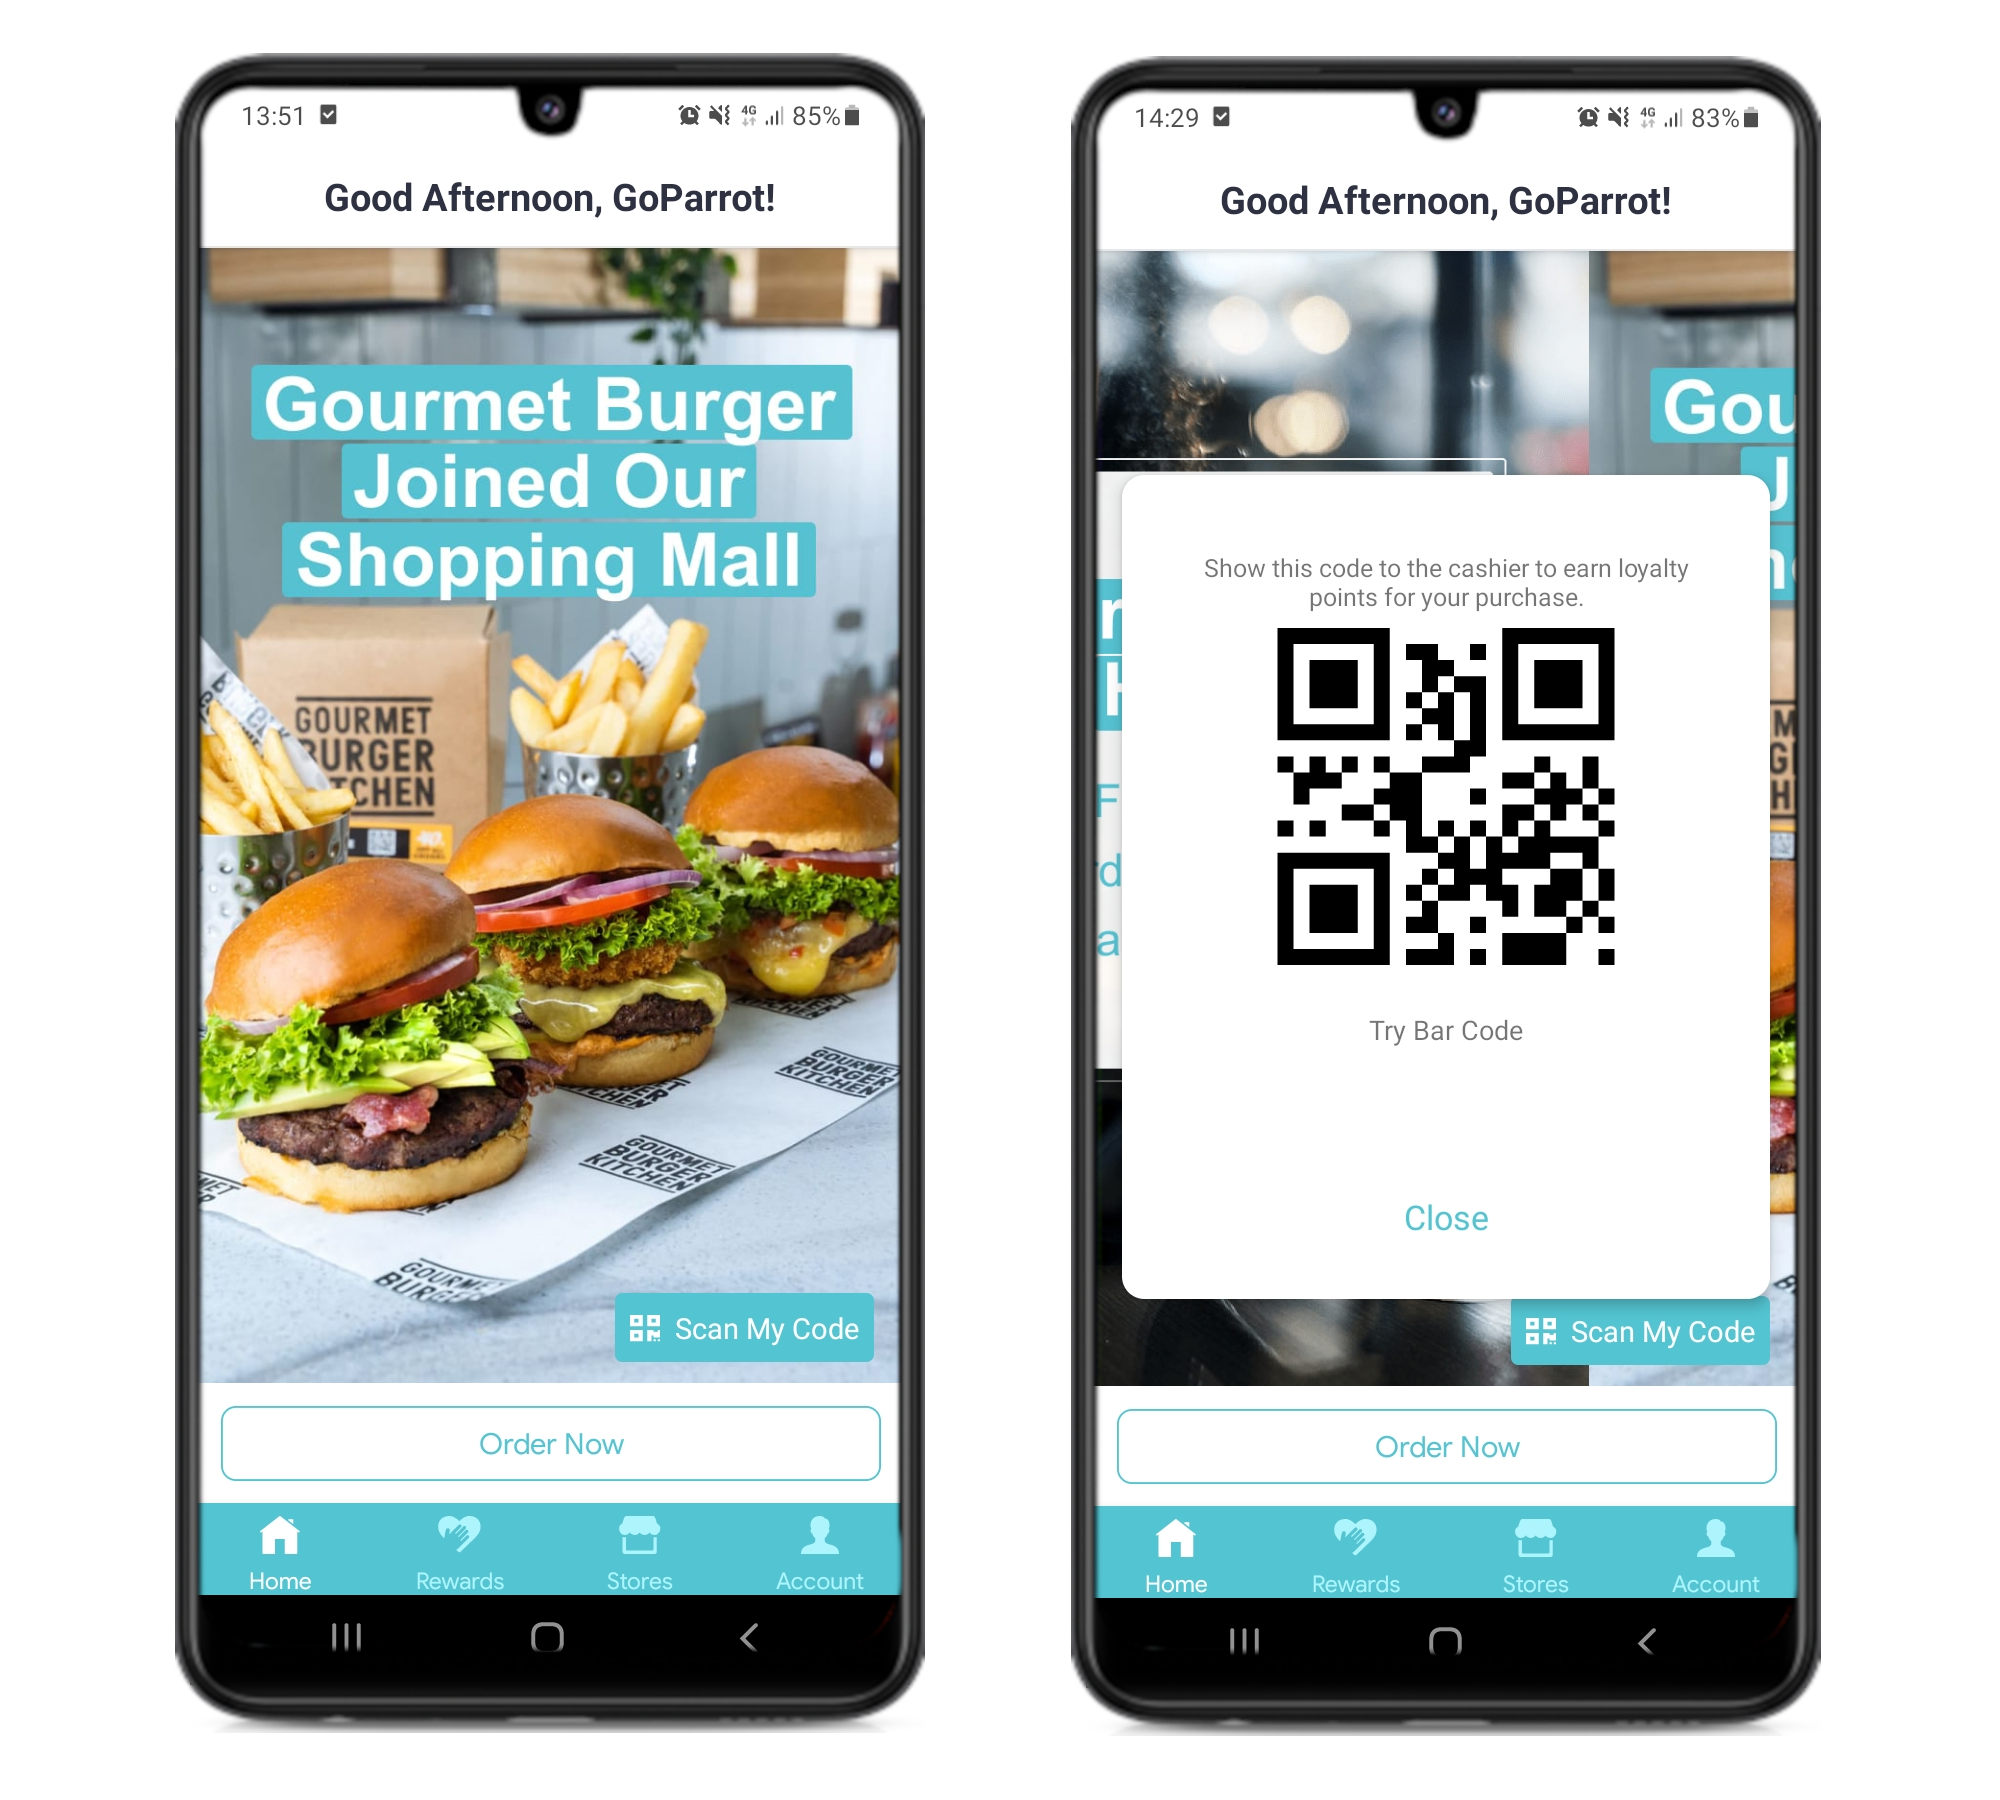
- Full screen slider widget for logged-in users - logged-in guests now have a beautiful home screen, showing them in one view interesting and useful information regarding your business. They can click on any of the widgets to jump directly to more detailed info.
- Order Now widget for logged-in users – a new widget was added on the home screen for logged-in users - “Order Now”. This widget opens the store list when the merchant has multiple stores or the webstore page when there is a single store.
- Scan my Code feature will show first the QR Code, then the Bar Code. The feature is designed to quickly identify a customer in-store.
- Deep Links (first phase) - Now, users can open the app through deep links. In the first phase, the deep links will open only the app if it is installed on the device, without opening the webstore.
October 2021 Update#
If you can't find something or anything is not clear feel free to contact support at support@goparrot.ai.
[0] Content#
| 1 | Delivery Canceled Notification | Email and SMS notification on delivery order canceled by third party delivery provider. | Jump |
| 2 | Delivery Tracking URL | SMS sent to customers to track driver's location. | Jump |
| 3 | Merchant Wizard | Set up your merchant account and first store. | Jump |
| 4 | New Schema for Dining Options | Set Properties and Property Groups for each Dining Option. | Jump |
| 5 | Items that should be Ordered in Advance | Handle items with advance notice, that require a specific prep-time. | Jump |
| 6 | Handle Square Location Sold Out Flag | Item can be marked as sold out from Square without using stock. | Jump |
[1] Delivery Canceled Notification#
Delivery orders can be canceled by third - party delivery providers: Uber (Postmates), DoorDash, Relay or Twinjet. When an order is canceled by the delivery provider, GoParrot will send an Email and SMS to the restaurant manager informing about the cancelation. Notifier action for delivery cancelation is enabled in the store by default.
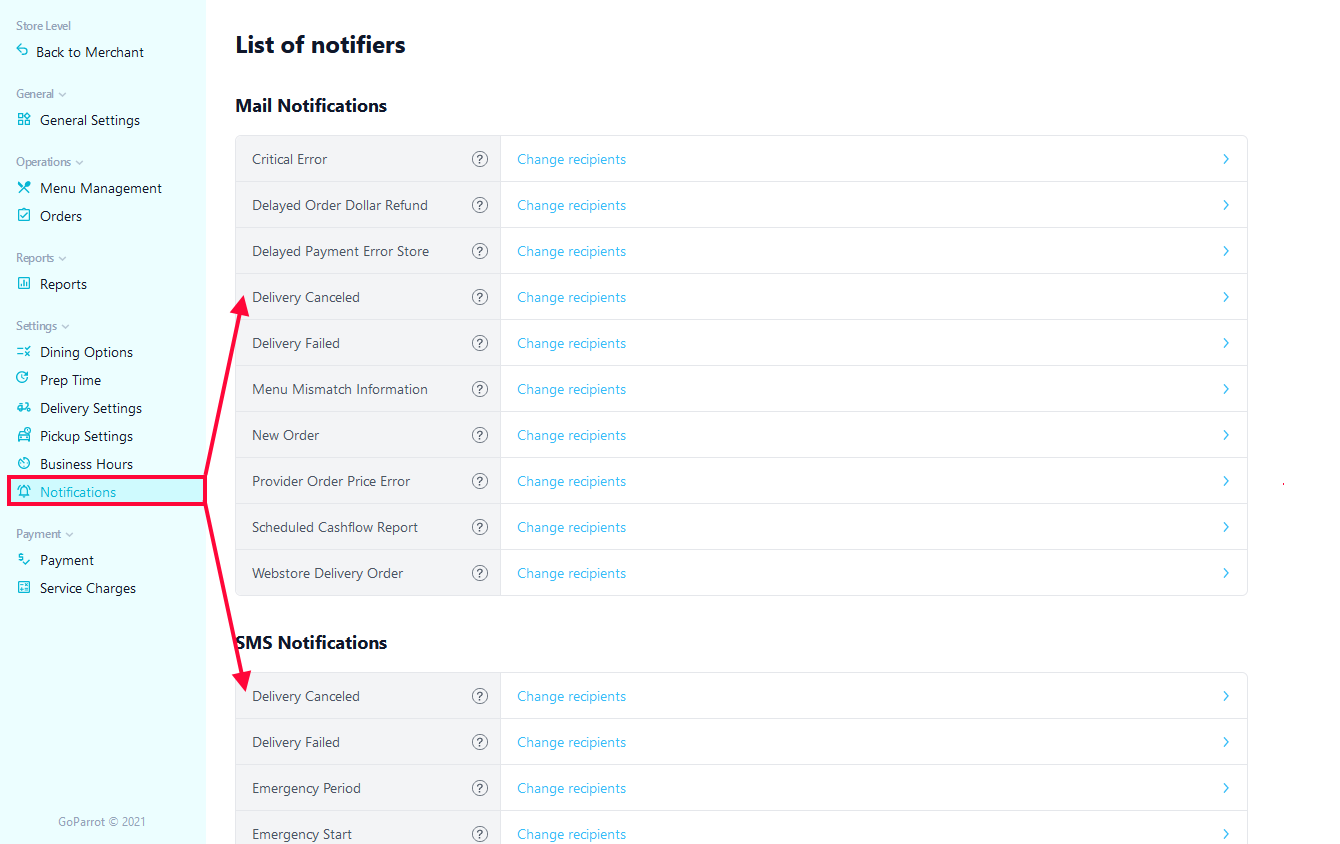
Attention! The orders are not canceled for the customer. Please, adjust the delivery arrangements or cancel orders manually from the GoParrot Dashboard.
[2] Delivery Tracking URL#
If the delivery order has been picked up by the delivery provider, the following SMS will be sent to the customer:
Hi! Your order 'orderNumber' is on its way. To track driver's location open: 'trackingUrl'.
Your customers will be redirected to a link when they can see the current driver's location.
[3] Merchant Wizard#
Great news! We implemented a merchant wizard that will guide users how to set up the merchant and first store. Here is how you can configure it in a few simple steps:
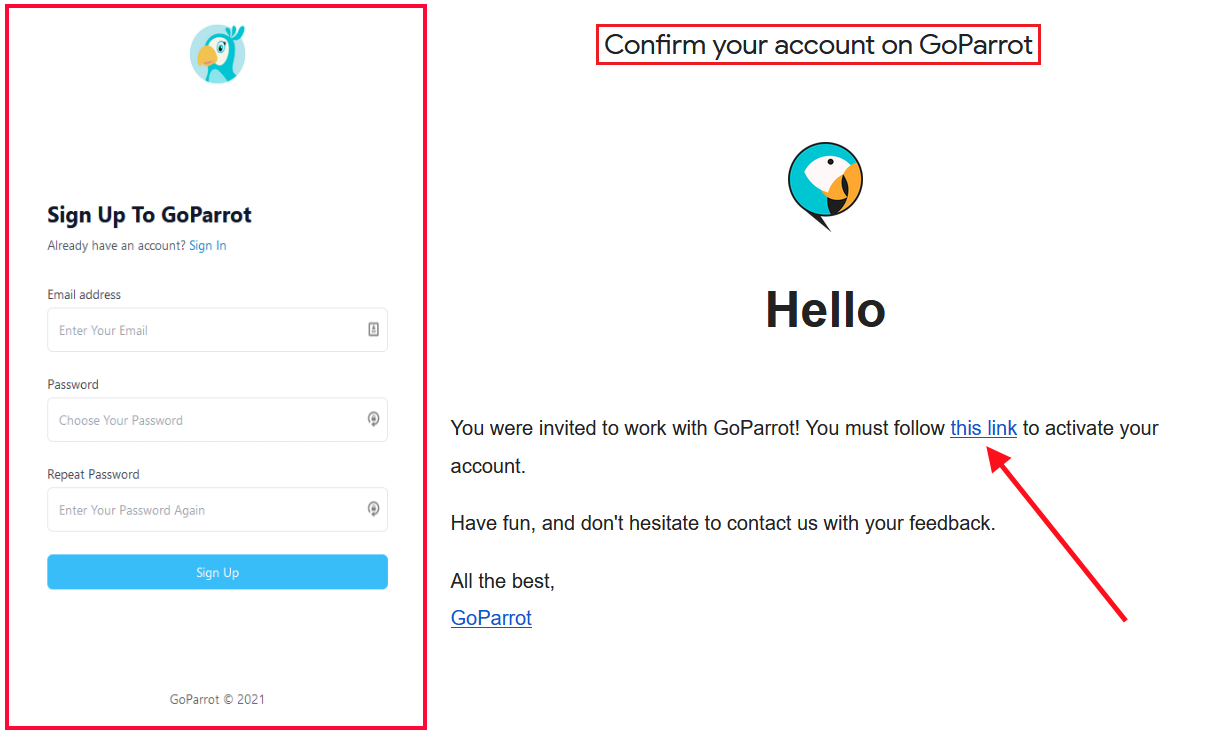
Step 1. Create an account to log into GoParrot Dashboard: enter Email Address, enter Password and repeat Password. You will receive an email that contains a link to activate you account. Sign-in to access the dashboard.
Step 2. Add Merchant (the high-level name of your restaurant Group). Add the name of your restaurant group and a short description (for internal use only), then click 'Proceed' button on the top right corner.
Step 3. Add Location (your first store/restaurant). Enter Store Name, Description, Address, Email, Phone, POS system, Manager Contacts, then click 'Proceed' button on the top right corner.
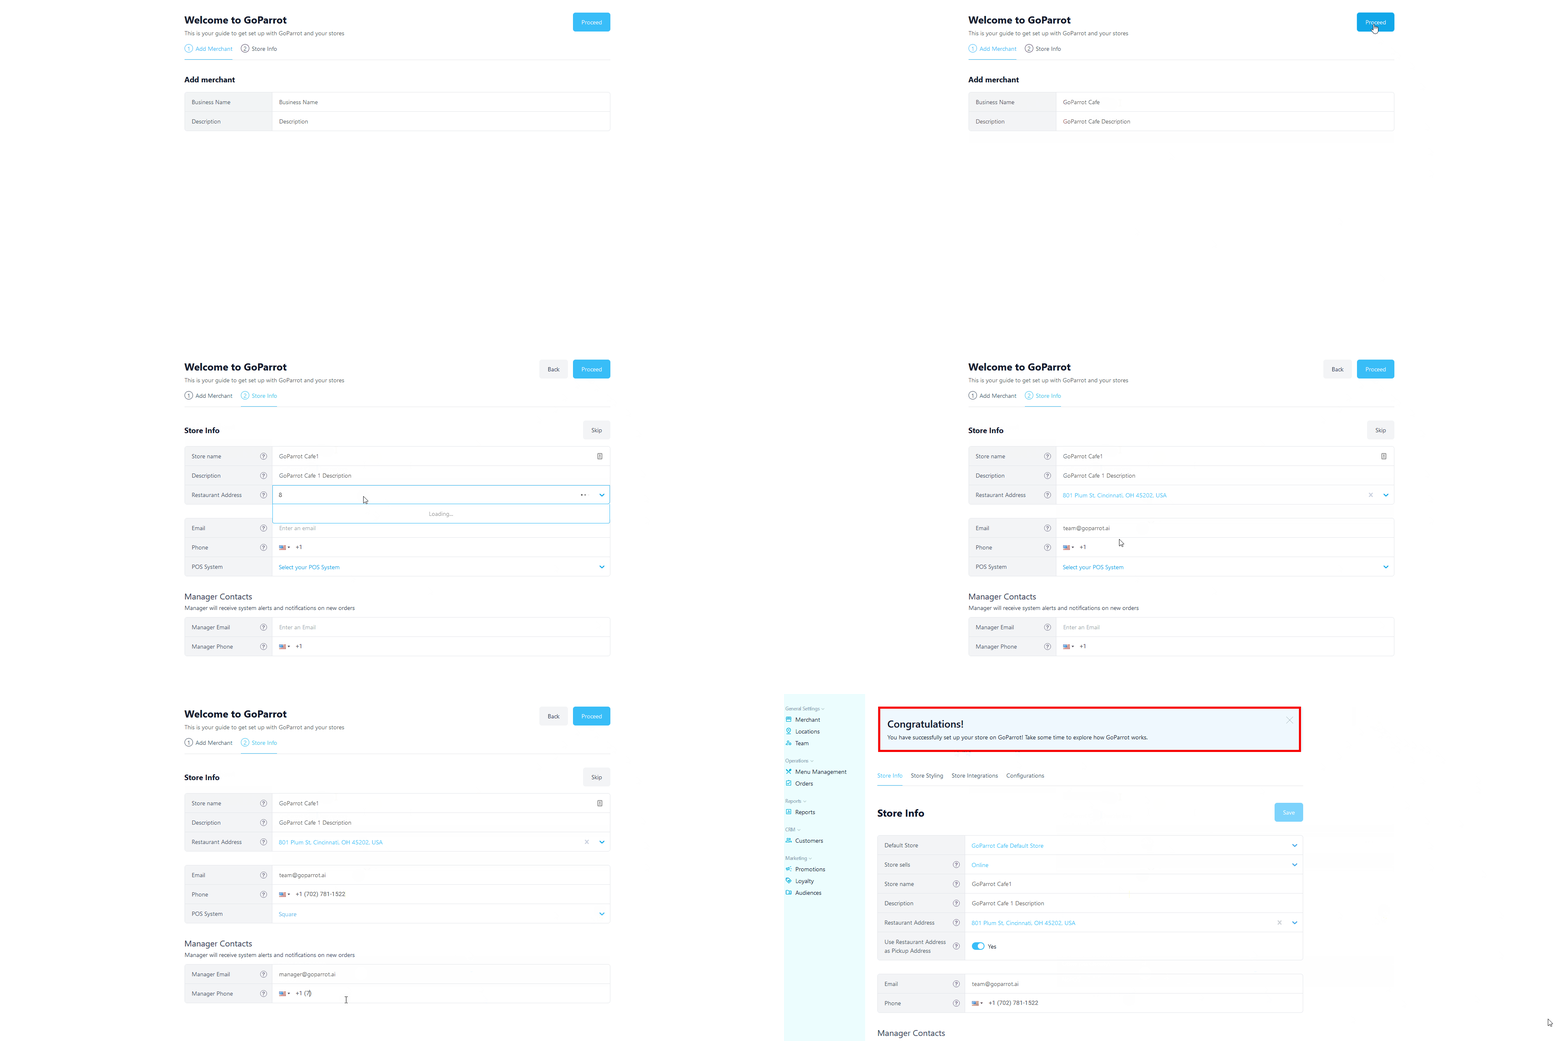
You have successfully set up your store on GoParrot, now you can continue with further configurations.
[4] New Schema for Dining Options#
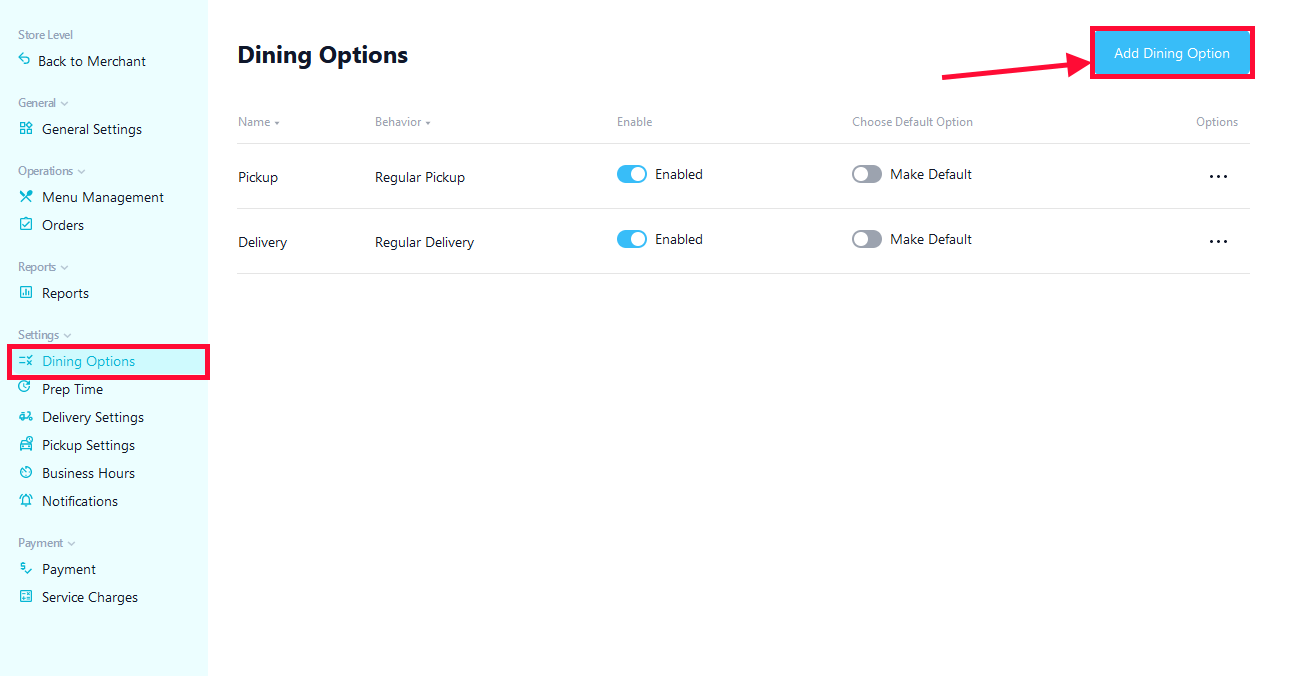
A new schema for Dining Options has been launched. It can be set from Dashboard (store level), by accessing each dining option on a new separate page (not just a window pop-up).
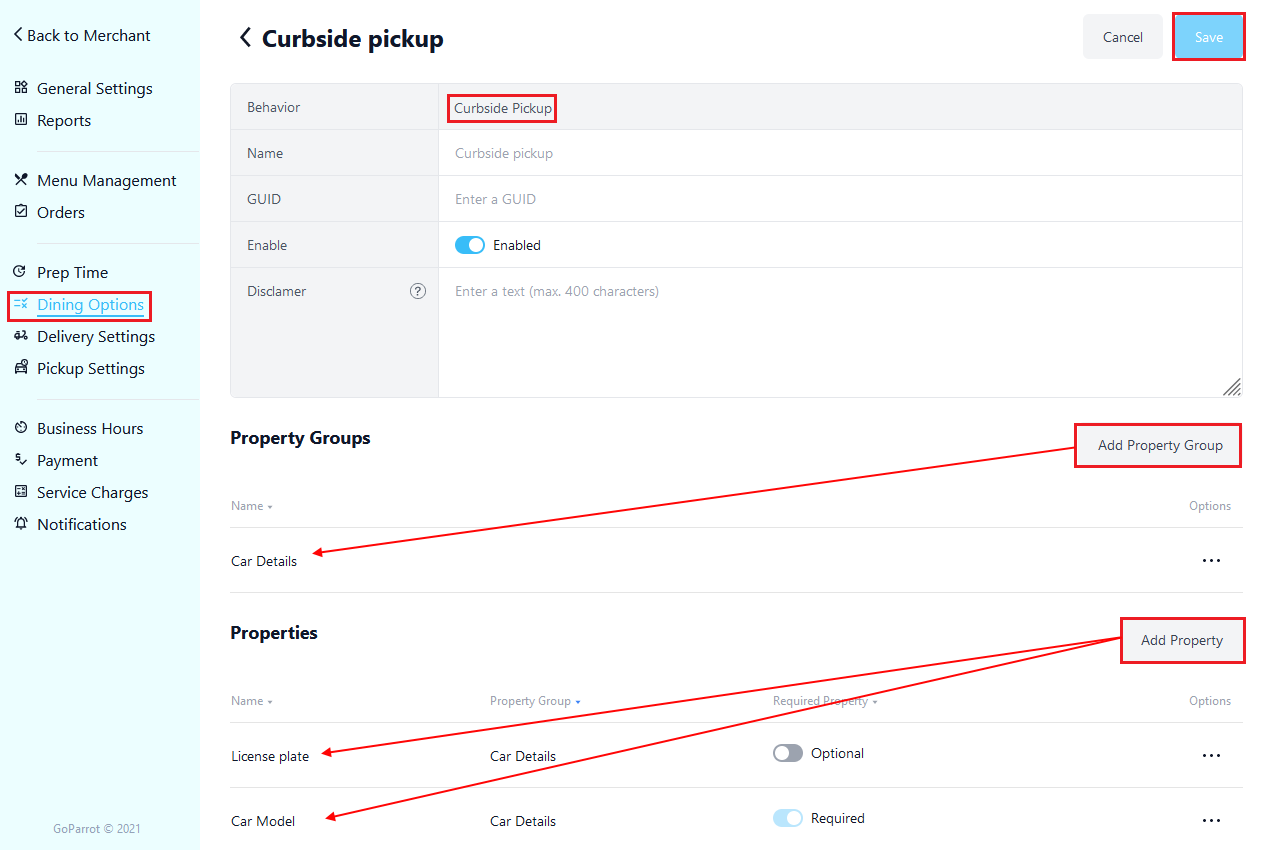
In the new window, select the Dining Option (Behaviour) you want to add (e.g Curbside Pickup), define the Name, enter a GUID, enable it if required and optionally, add a Disclaimer (the disclaimer text will be shown on the dining option selection page).
If required, add Property Groups and Properties. Properties imply adding additional (optional or required) parameters to be completed on webstore for each selected Dining Option, while Property Group is only responsible for displaying these Properties as grouped when customers place an order.
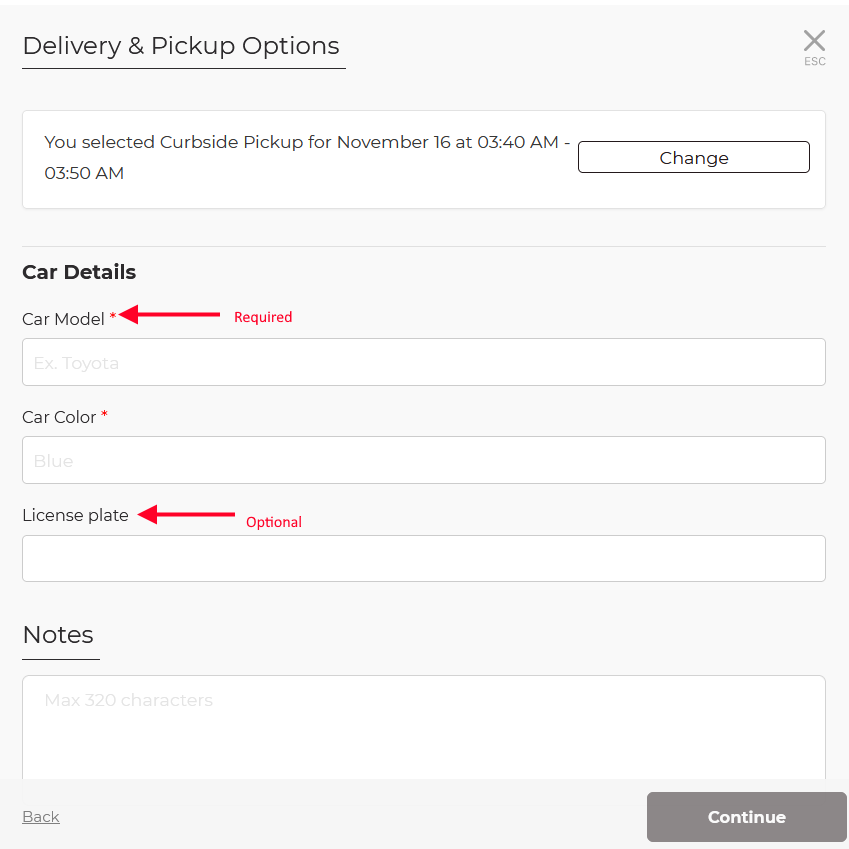
For example, for Curbside Pickup you can add a Property Group - Car Details and then add several properties such as Car Model, License Plate, etc., or for Order to Table you can set Table Number, etc. Toggle if the properties are optional or required.
After choosing the items and proceeding to checkout, your guests will fill the required propreties, in this example, Car Details:
[5] Items that should be Ordered in Advance#
There may be cases when some items in your store, may take longer to be prepared (or are prepared on specific ingredients, that aren't always available in the store). This means that your customers can order this item only in x (minutes, hours, days in advance).
To set a specific prep-time for your items, go to Menu Management Tab and select Items. You will be able to edit or add items and set their prep-time in days, hours or minutes.
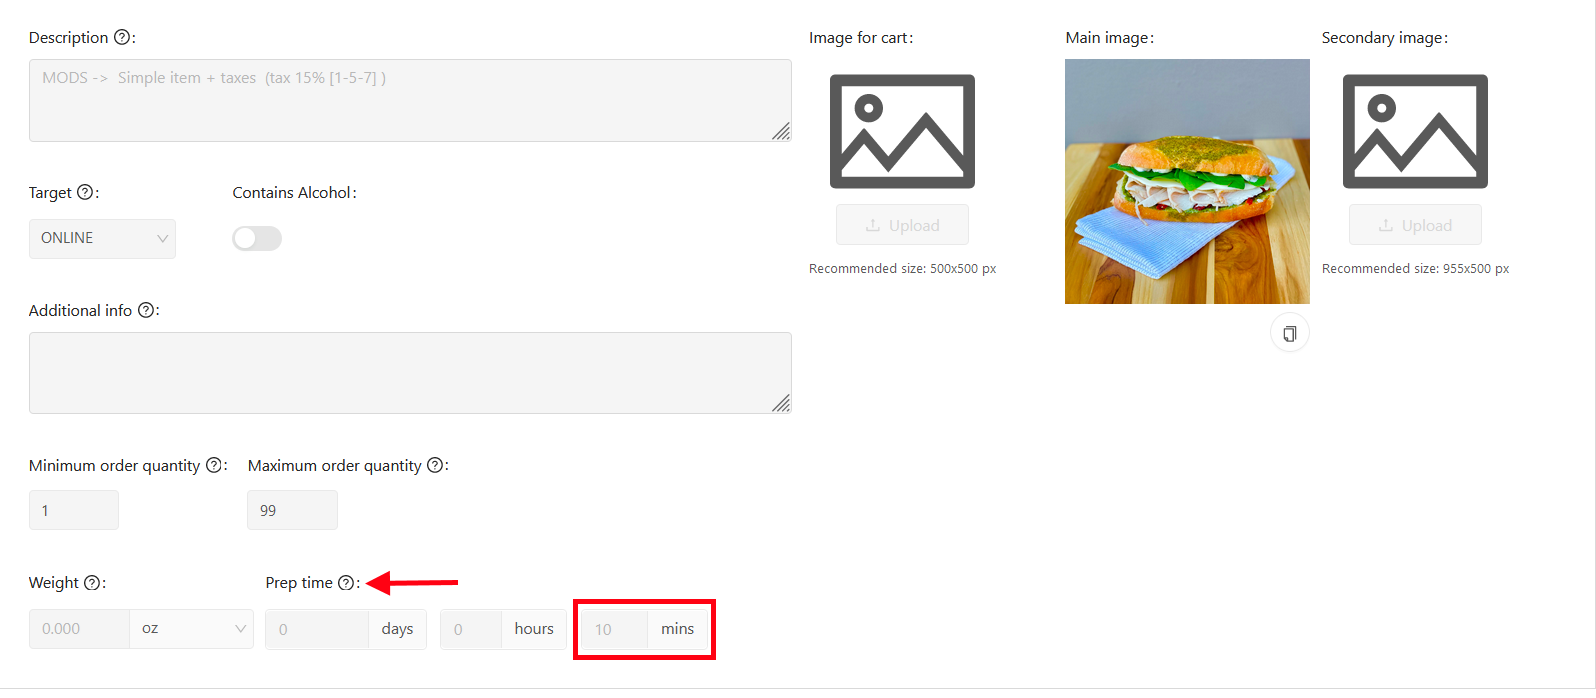
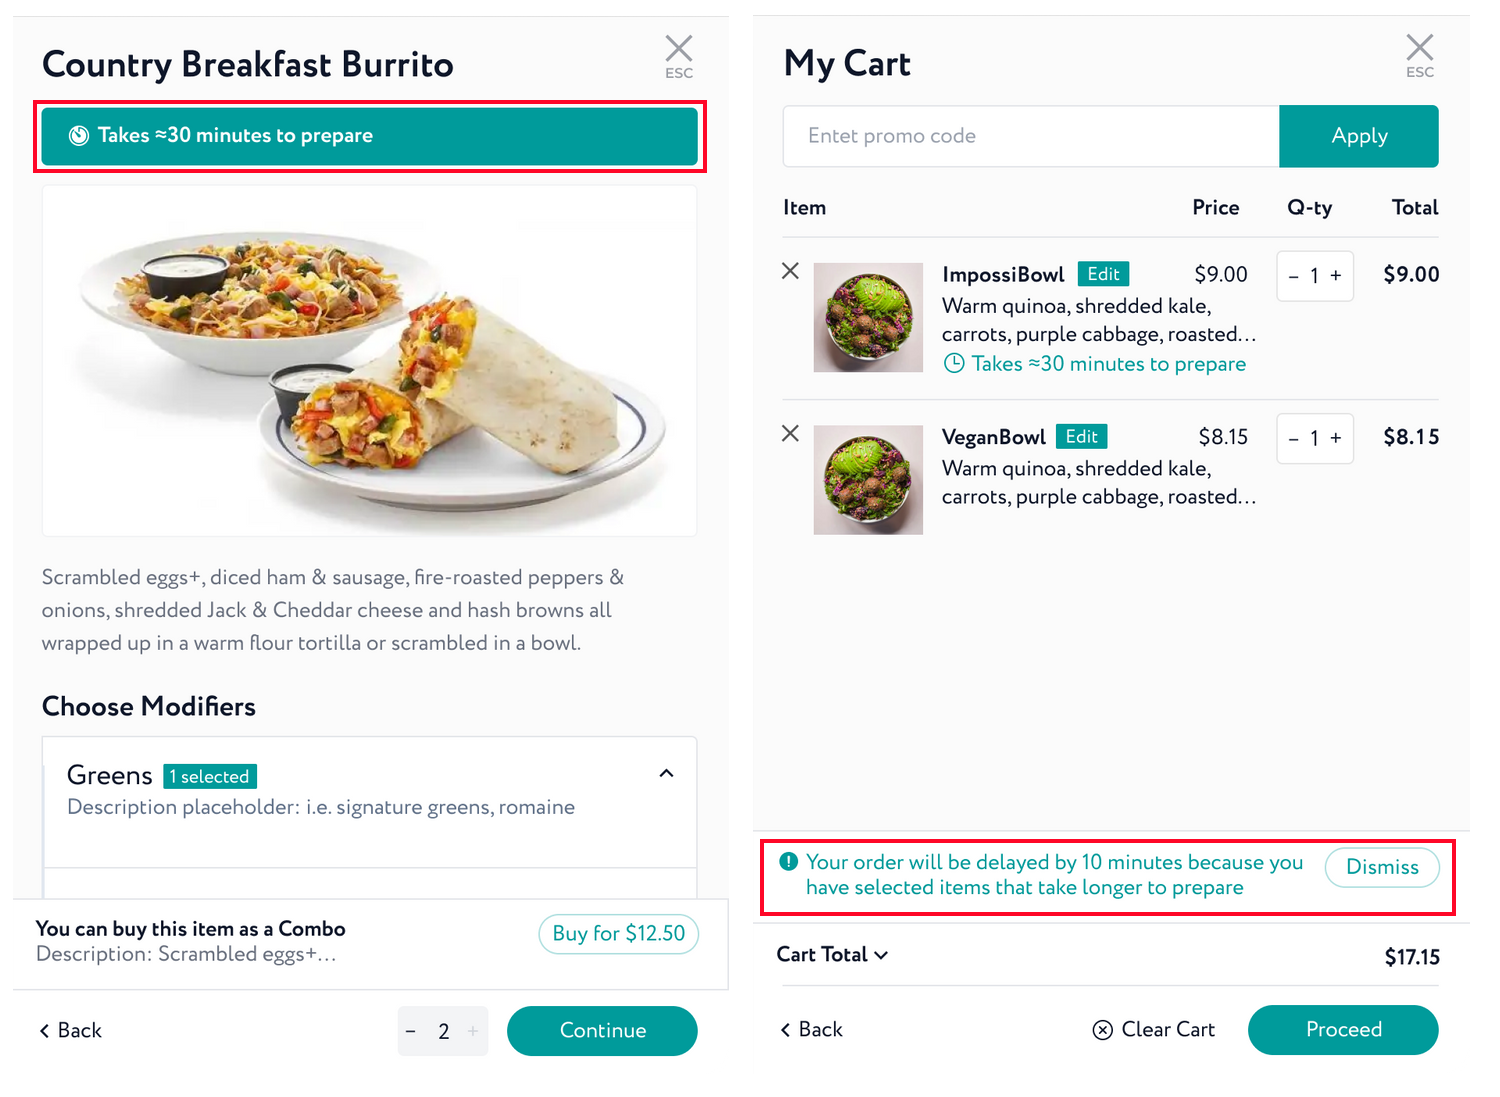
In this case, your customers will see an Advance Notice message on item detailed page: "Takes x time to prepare". The same message will be displayed when the item is added to the cart. Also in the cart, there will be a message "Your order will be delayed by x time because you have selected items that take longer to prepare".
[6] Handle Square Location Sold Out Flag#
For our partner restaurants that use Square as payment provider it became easier to mark sold out items.
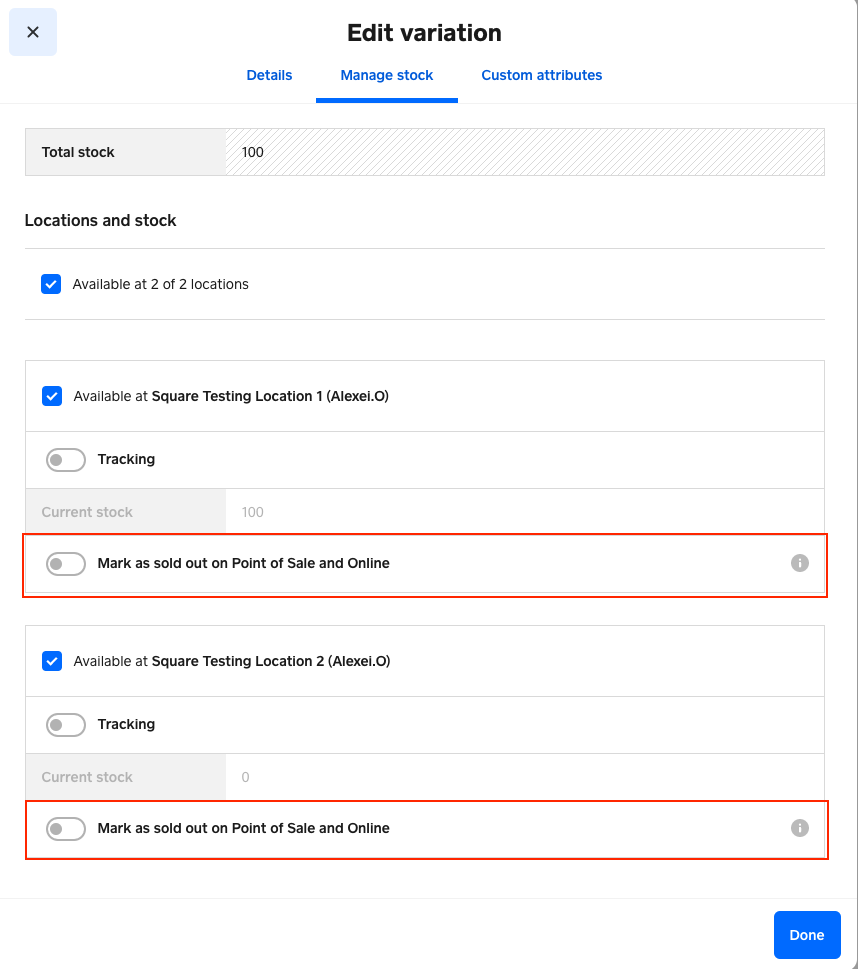
Now you can mark an item as sold out at each location by toggling “Mark as sold out on Point of Sale and Online”. You don't need to open GoParrot dashboard in order to perform any operation, just do it in your usual Square interface. The action will be synced automatically in a matter of seconds.
If you have questions, feel free to contact us at support@goparrot.ai.
September 2021 Update#
If you can't find something or anything is not clear feel free to contact support at support@goparrot.ai.
[0] Content#
| 1 | Dynamic Prep-time by schedule | Enable to define orders preparation time by hours | Jump |
| 2 | Menu Concepts | Add different brands/concepts that have their own menu to your online store | Jump |
[1] Dynamic Prep-time by schedule#
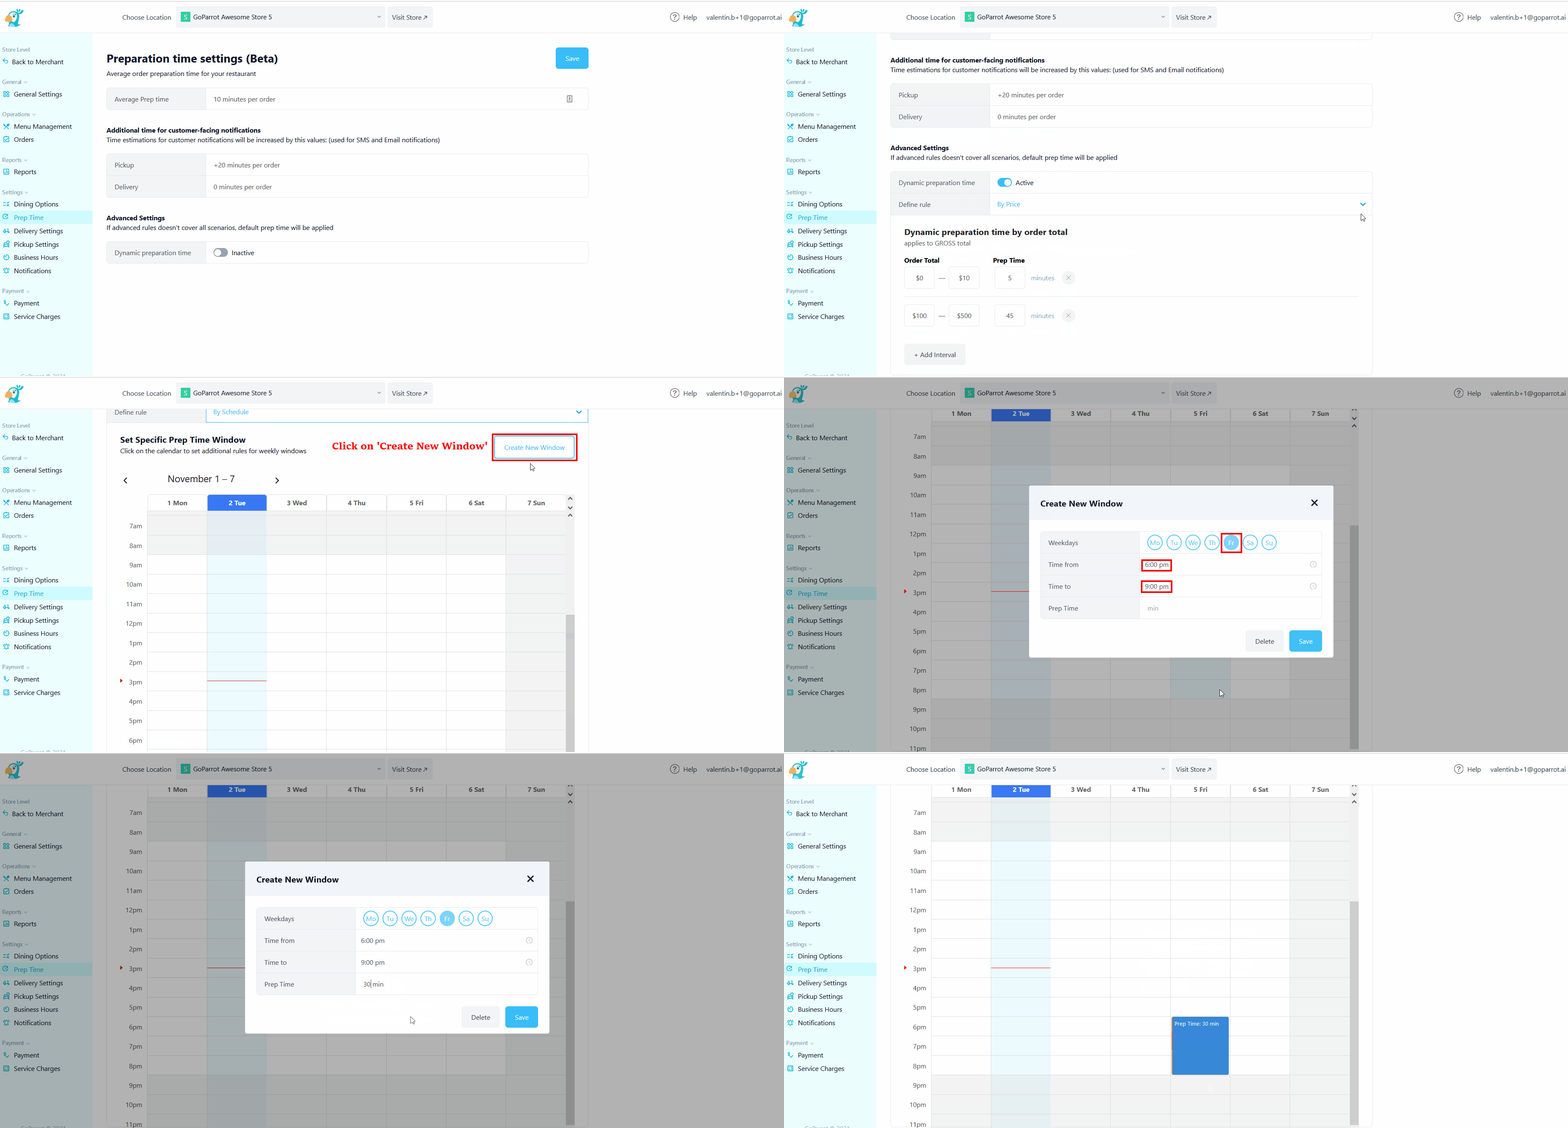
Now you have the second option to define your dynamic prep-time (order fulfillment time), based on schedule. This feature will allow you to override your Default prep-time and to better manage your orders and throttling during business hours. It’s an easy-to-use feature, that will allow to choose the hours that require a different preparation time. On Prep Time page, select Dynamic preparation time by Schedule, click on Create New Window button or click on the calendar to choose a certain hour interval to set weekly additional rules.
For example, your default preparation time is 10 minutes, but on Friday, between 8 and 9 PM you know the amount of your orders increases and you want to set your prep time to 20 minutes. In this case the orders received in that time interval will have a 20 minute prep-time. After 8 PM your preparation time will return to default (10 minutes).
[2] Menu Concepts#
A useful and important feature for restaurants that besides their basic menu, are preparing and selling food of other brands, or, they have certain themed menus (e.g seasonal, regional, vegan), that are different from the main one. It adds the possibility to bring and show on your online store different brands/concepts that have their own menu and it will become easier for you to accept and manage orders from multiple sources on a central platform.
We made easy for you to add one or several Menu Concepts to your restaurant, to set the order they will be displayed on your online store and set menu connections based on categories and items availability.
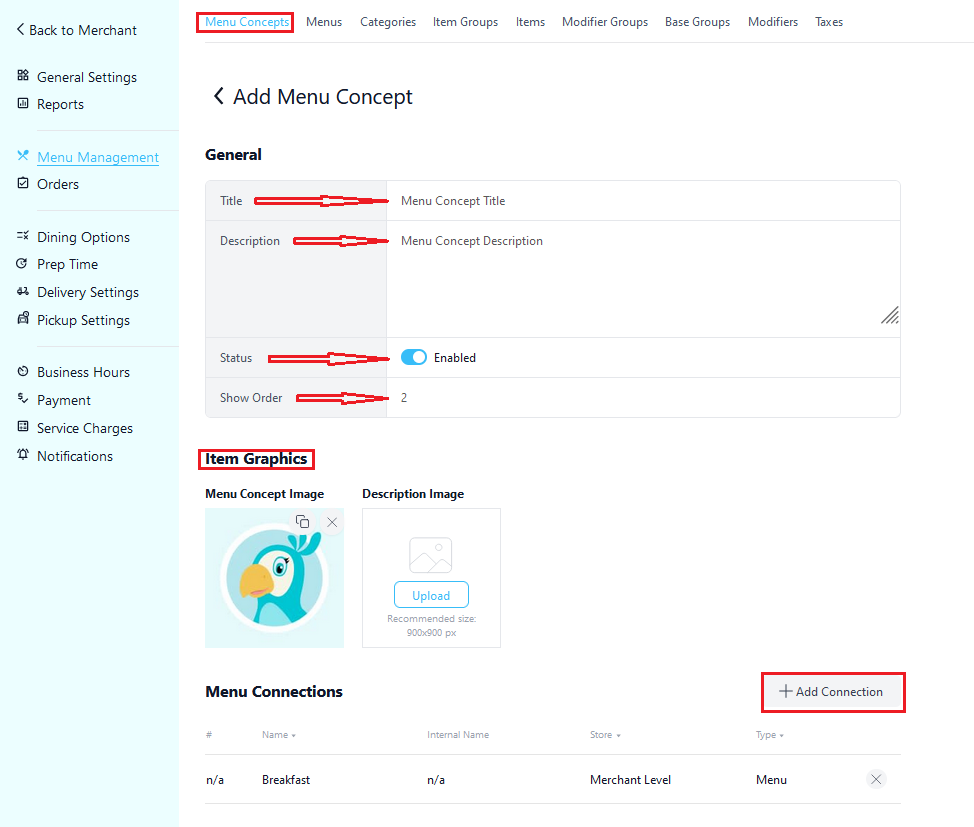
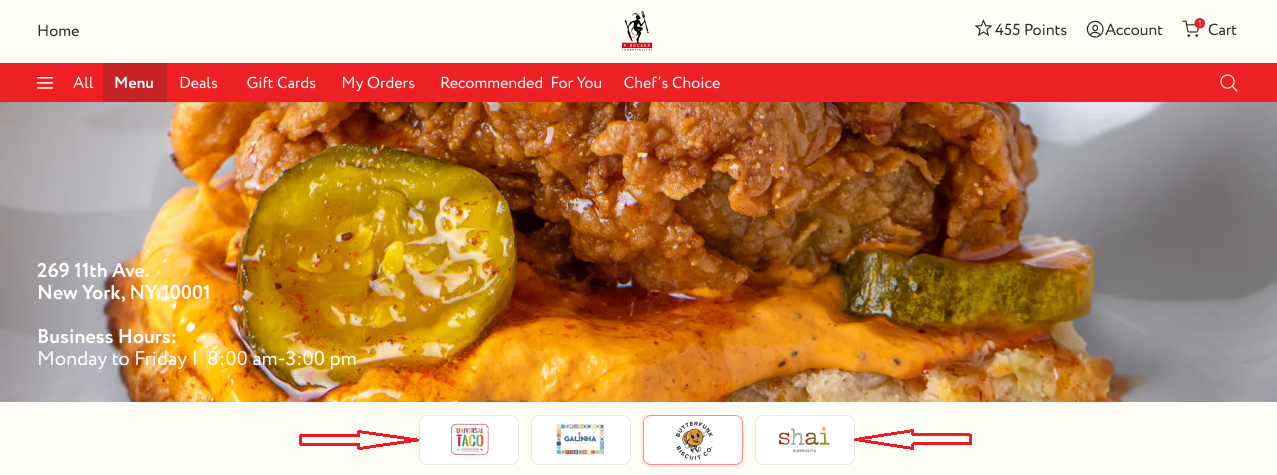
When Menu Concepts are set in the Dashboard and are enabled, they should be shown in the online store. The clients will be able to see the menus of all these concepts/brands and will have the possibility to add any item from different concepts to the same cart.
August 2021 Update#
If you can't find something or anything is not clear feel free to contact support at support@goparrot.ai.
[0] Content#
| 1 | Advanced Options for Order Operations Management | ||
| 1.1 | Order Throttling | Limit the volume of online orders during peak hours | Jump |
| 1.2 | Dynamic Prep-time | Enable prep-time to depend on the Order Gross Total | Jump |
| 2 | Info Message for Dining Option | Use Disclaimer for Dining Option to communicate with customers | Jump |
| 3 | Push Notifications Updated Experience in the Dashboard | Send PUSH notifications from GoParrot dashboard | Jump |
| 4 | Special Days | Use Special Days to define holidays and other custom, non-working days for your restaurant | Jump |
[1] Advanced options for order operations management#
Dear partner restaurants, we are constantly working to make your restaurants' operations more fluid and provide more clarity to your customers. Last month we added the ability to define a time range for the order. This month we are proud to introduce 2 new features that will significantly improve your ability to control orders and manage customers expectations.
- Order throttling - limit the amount of orders per time slot
- Dynamic prep-time based on order total - calculate and display correct prep-time / order fulfilment time to customer based on order total
[1.1] Order throttling#
A useful feature to prevent your restaurant from being overwhelmed with online orders during peak hours and provide a good and predictable experience for your customers.
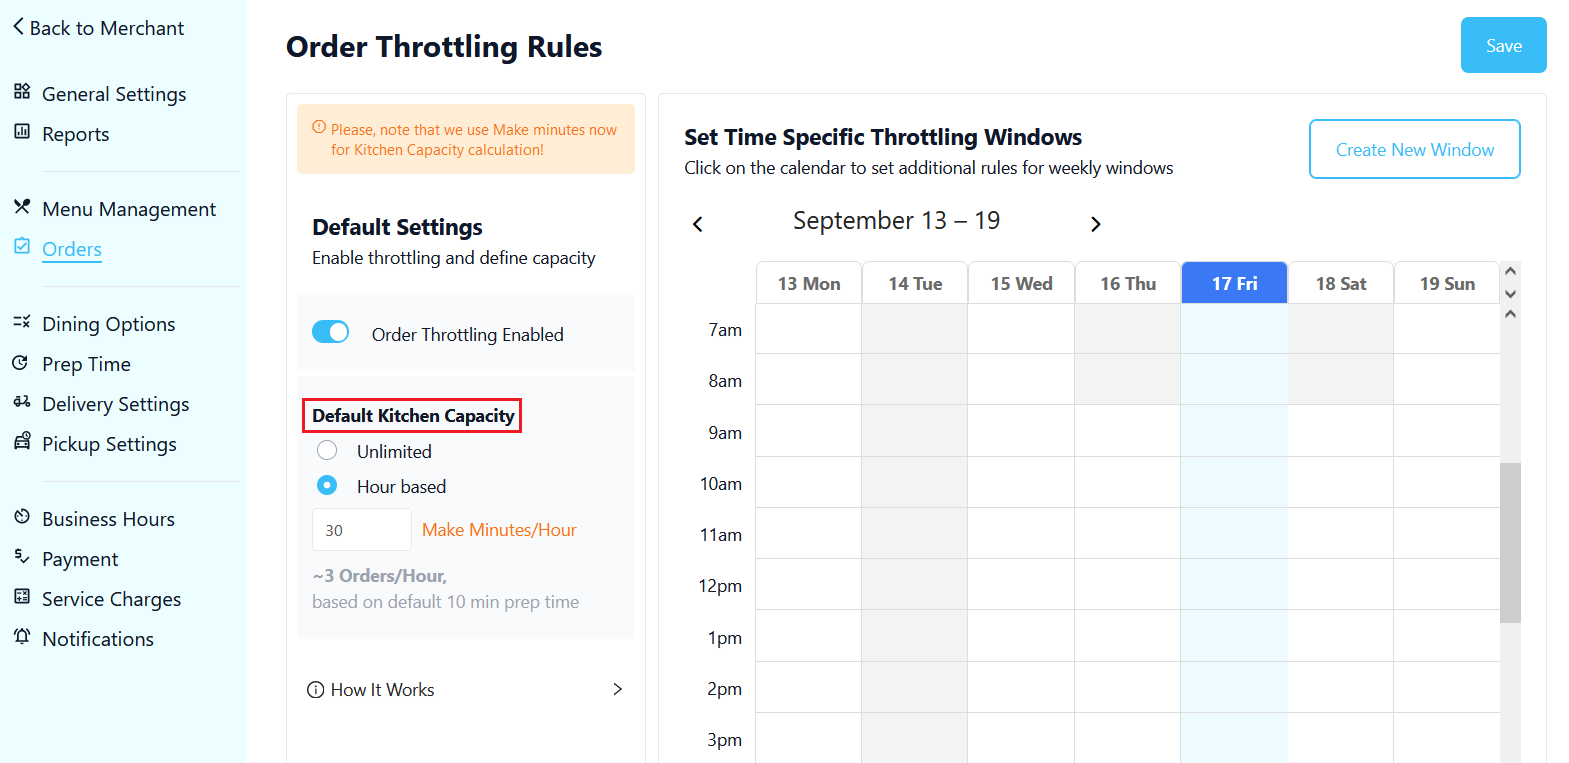
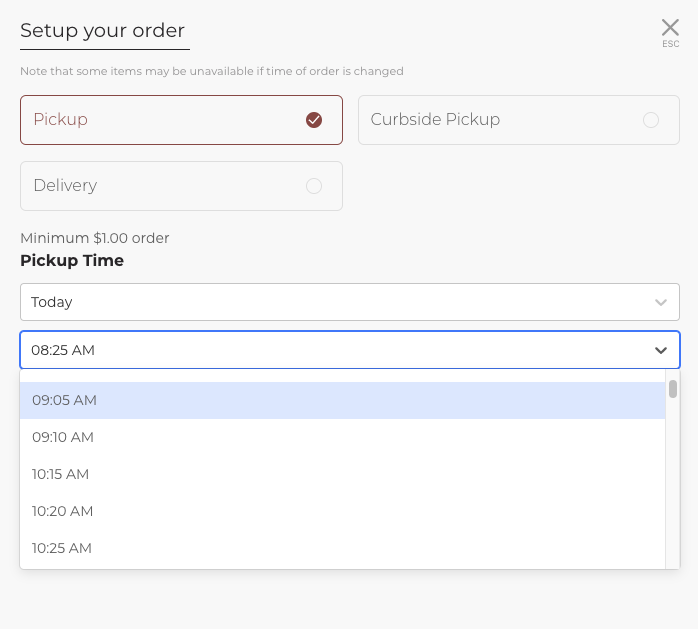
The Order Throttling feature gives you the opportunity to balance the number of online orders with your kitchen’s capacity at any given day and time. The feature is sophisticated and yet simple for the customer. A time slot with filled capacity will simply not be shown to the customer anymore when choosing a time slot to order for.
We made setting order throttling as simple as possible.
You can set a default capacity your restaurant can fulfill that will hold for all days of the week. And then you can override this with specific capacities per given days and times based on your expected load and staffing.
To learn more, go to our detailed explanation in the dashboard help section here.
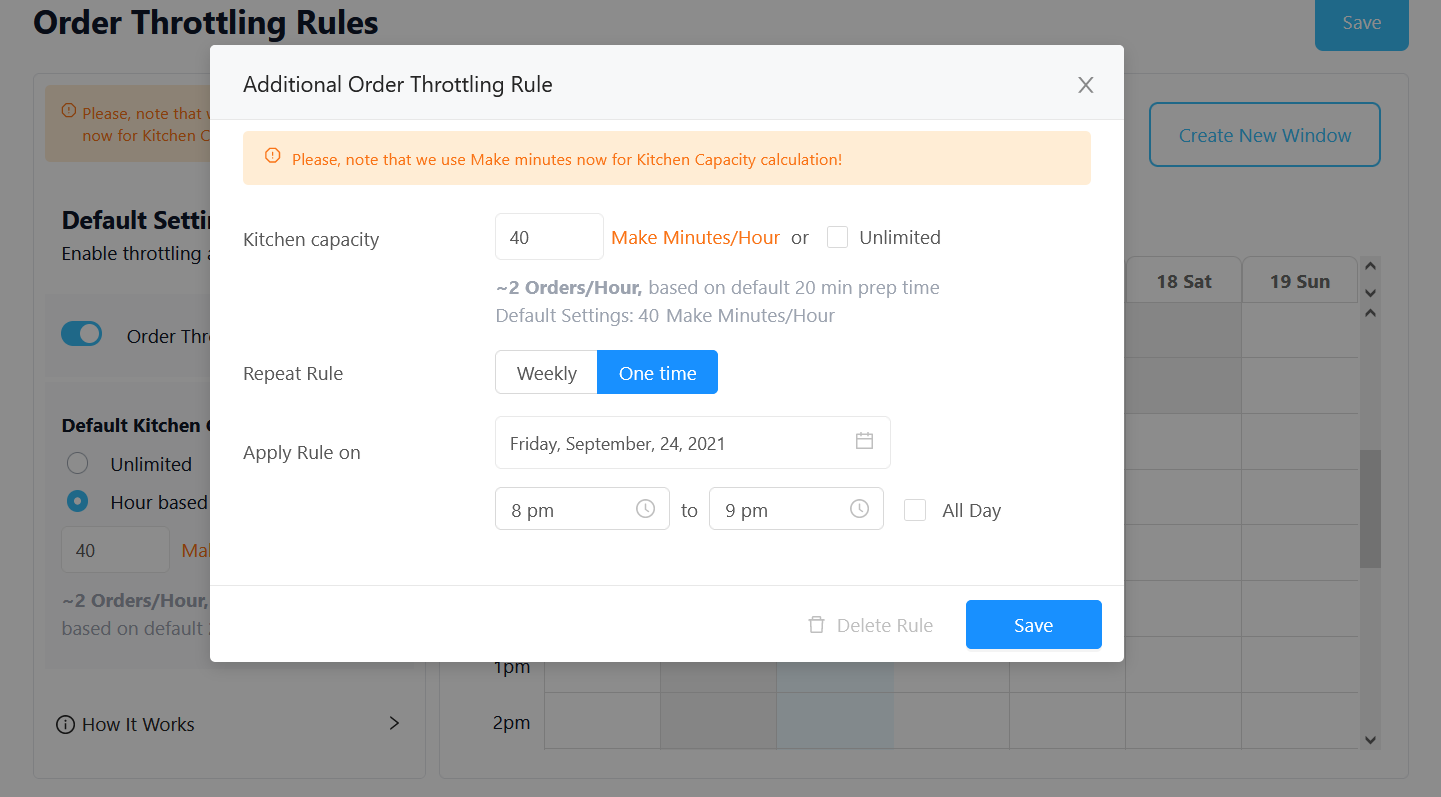
And as we mentioned, your customer’s experience will be seamless. They will only see available slots that have not been filled with orders already.
[1.2] Dynamic prep time based on Order Gross total#
Now you can define different prep-time (e.g fulfillment time) of orders based on their gross total. With this new functionality you can push bigger orders to a later time and alleviate the load when there is a big influx of orders.
For your convenience we’ve moved Prep Time to a separate page and it’ll be accessible from the navigation panel.
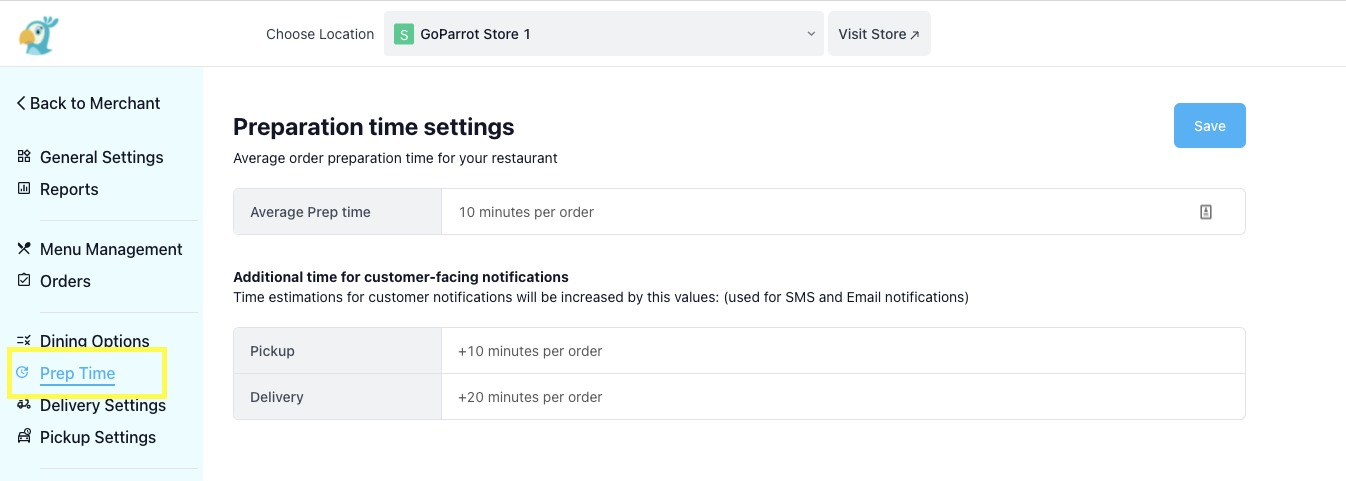
The default static prep time will remain the main value in case you didn’t set any additional rules. It’s customizable to your restaurant.
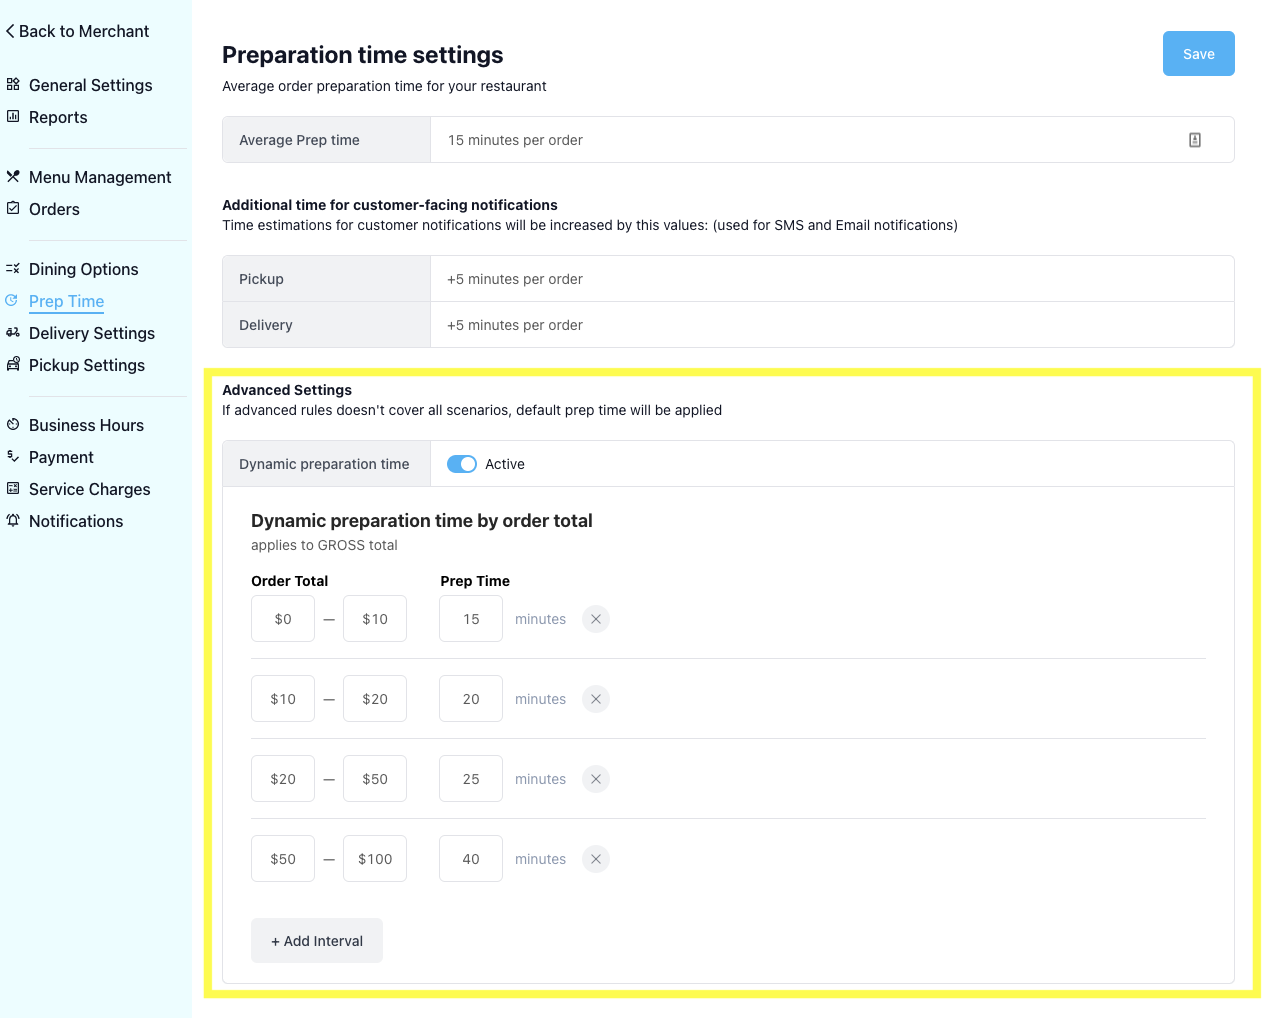
On the "Prep Time" page will see a new section with “Advanced Settings” that will allow you to set the additional rules for the prep time. You’ll be able to define tiers where each tier has the order total threshold and prep time associated with it. Each tier will override the Default prep time. For example, you can set small orders that are between $0-$10 to have a prep time of 5 minutes, and those orders $100 and over to have a prep time of 50 minutes. All other orders (e.g. $10-$100) will get the default prep-time.
[2] Disclaimer for Dining Options#
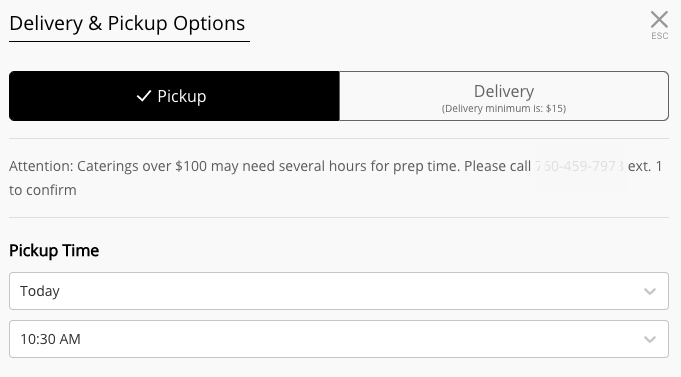
From now on, if you have a special disclaimer you would like to show your customers when they choose their dining options, you can do this.
How to configure:
Go to the "Dining Options" page in GoParrot Dashboard
Select desired Dining Option and press Edit
On Dining Option detailed page is a text field called "Disclaimer". Here you can set any text that you need to display to your customers, related to this specific dining option.
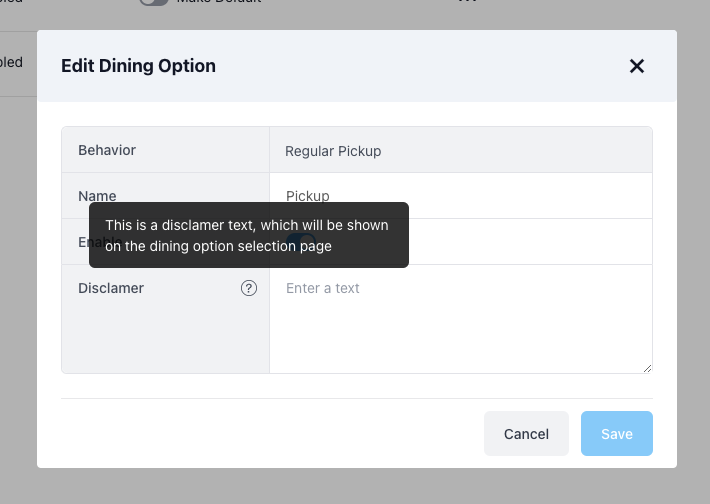
The disclaimer will be displayed to the customer when they select a Dining Option for which it's set. Here is an example:
[3] Push notifications updated experience in the dashboard#
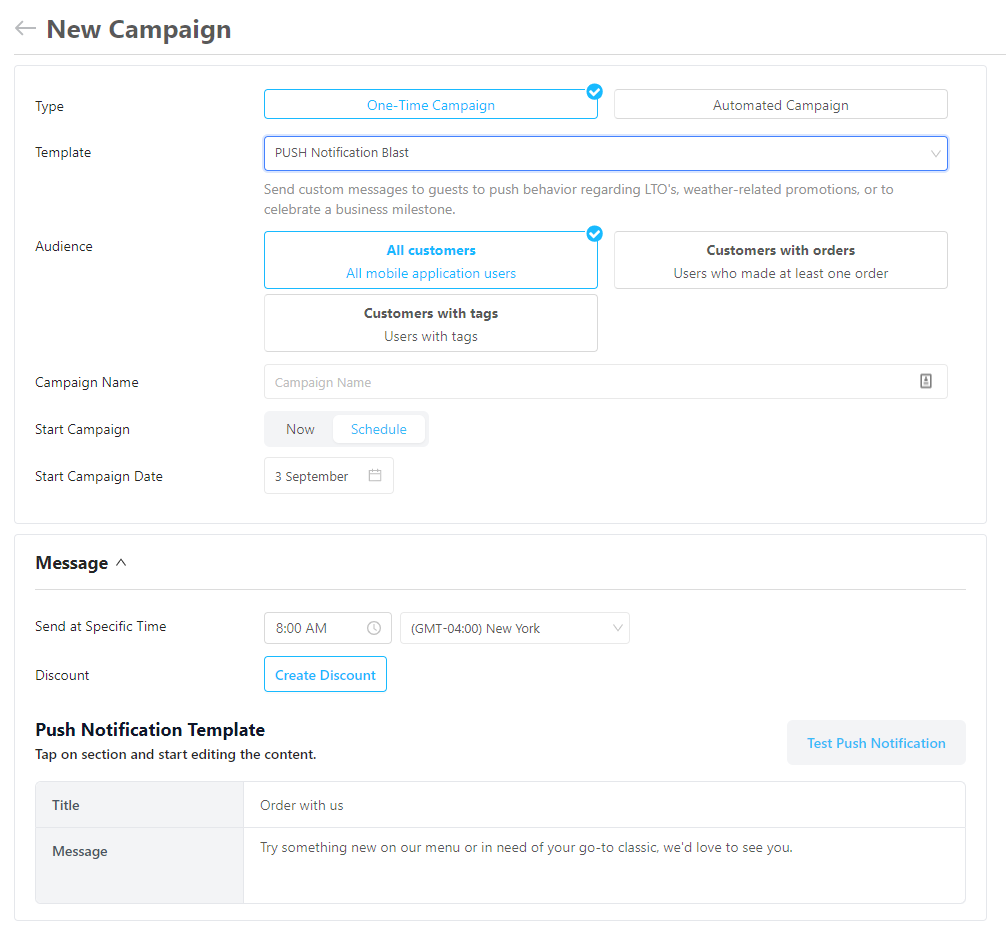
We updated PUSH notifications experience and now PUSH messages can be sent directly from GoParrot dashboard to the registered mobile application users.
To start sending PUSH notifications simply:
- Go to the Marketing Suite Page in the GoParrot dashboard
- Create a new campaign
- Click on one-time campaign
- and choose PUSH notification Blast in template
[4] Special Days#
Dear partner restaurants, we are happy to announce that we added the ability to define the days and holidays when your restaurant is not operating or is closing earlier than usually.
The Special Days page gives you the possibility:
- to add one day or a certain period when the restaurant is closing earlier than usually, including Opening and Closing Time;
- to add Closed All Day option;
- to a Select if your Special Schedule is applied to: Pick-Up and Dine-in, Delivery or both (All).
In this way, your customers will always be aware of your restaurant's working schedule during Holidays and custom, non-working days.
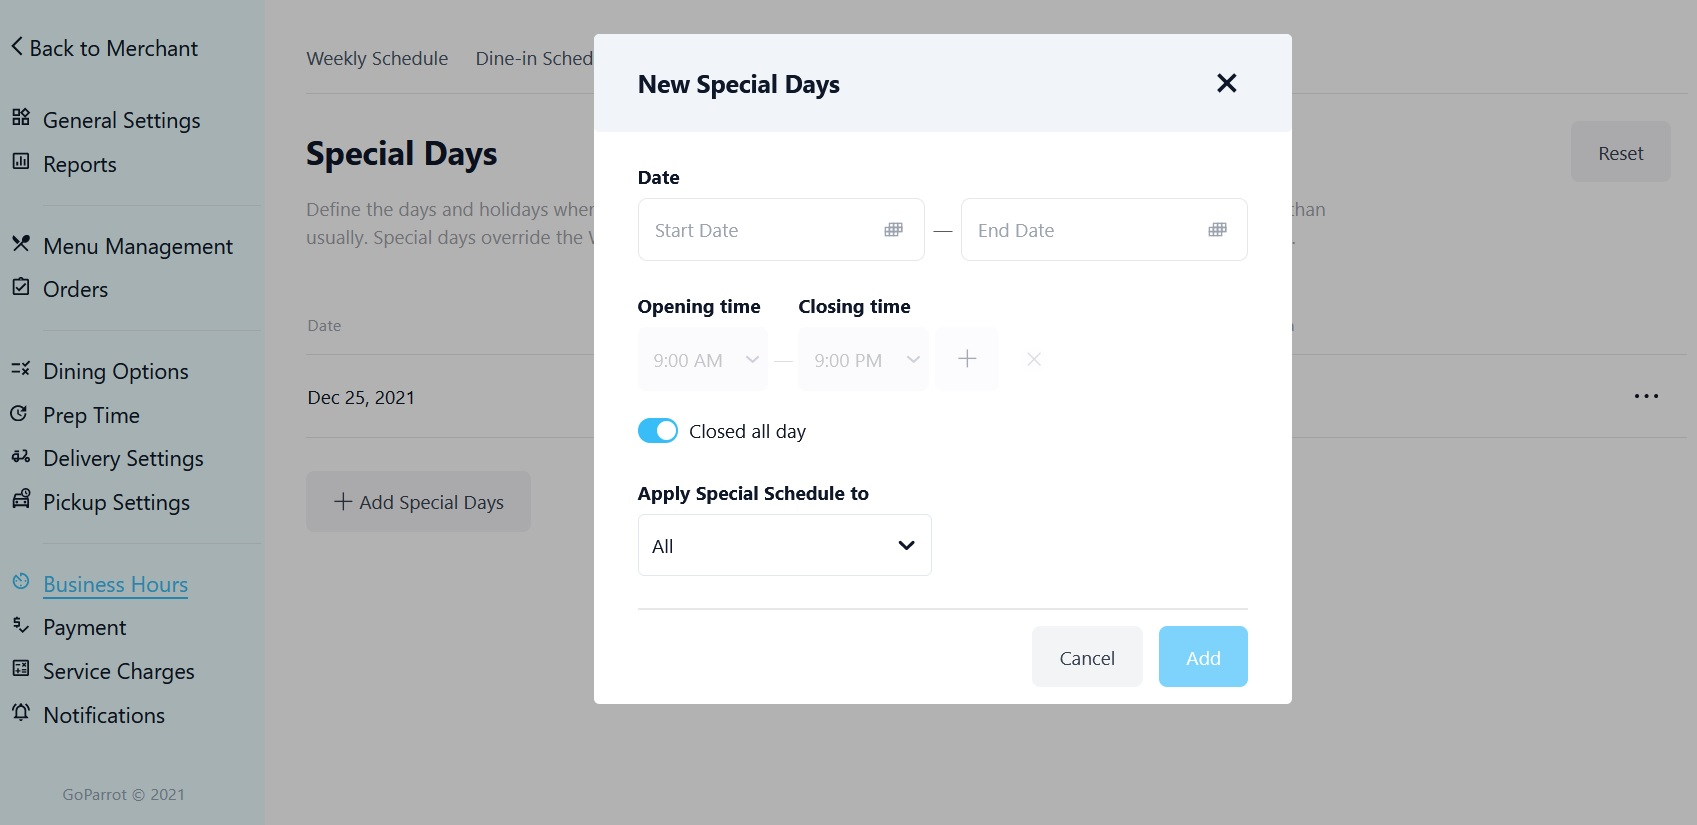
To add holidays and special schedules, on the navigation panel choose Business Hours and select Special Days.
July 2021 Update#
If you can't find something or anything is not clear feel free to contact support at support@goparrot.ai.
[0] Content#
| Digital Ordering Updates | ||
|---|---|---|
| New Version of Mobile APP | Our Mobile App got an upgrade. You're welcome to try it out! | Jump |
| Purchase Gift Cards (Square) | Enable you customers to purchase gift cards in your online store | Jump |
| Discount for paid modifiers | Apply discount for paid modifiers or for base item only | Jump |
| Auto-sync removing modifiers from modifier groups (Toast) | Remove modifiers and modifier groups in connections in Toast POS, we'll pull them automatically | Jump |
| GoParrot dashboard redesign | The GoParrot dashboard got a face lift. Isn't it beautiful | Jump |
| Sync refunds made in Square | Refunds are now pulled from Square, if it was performed from Square POS | Jump |
[1] Digital Ordering Updates#
[1.1] Release Mobile APP ver 2.0#
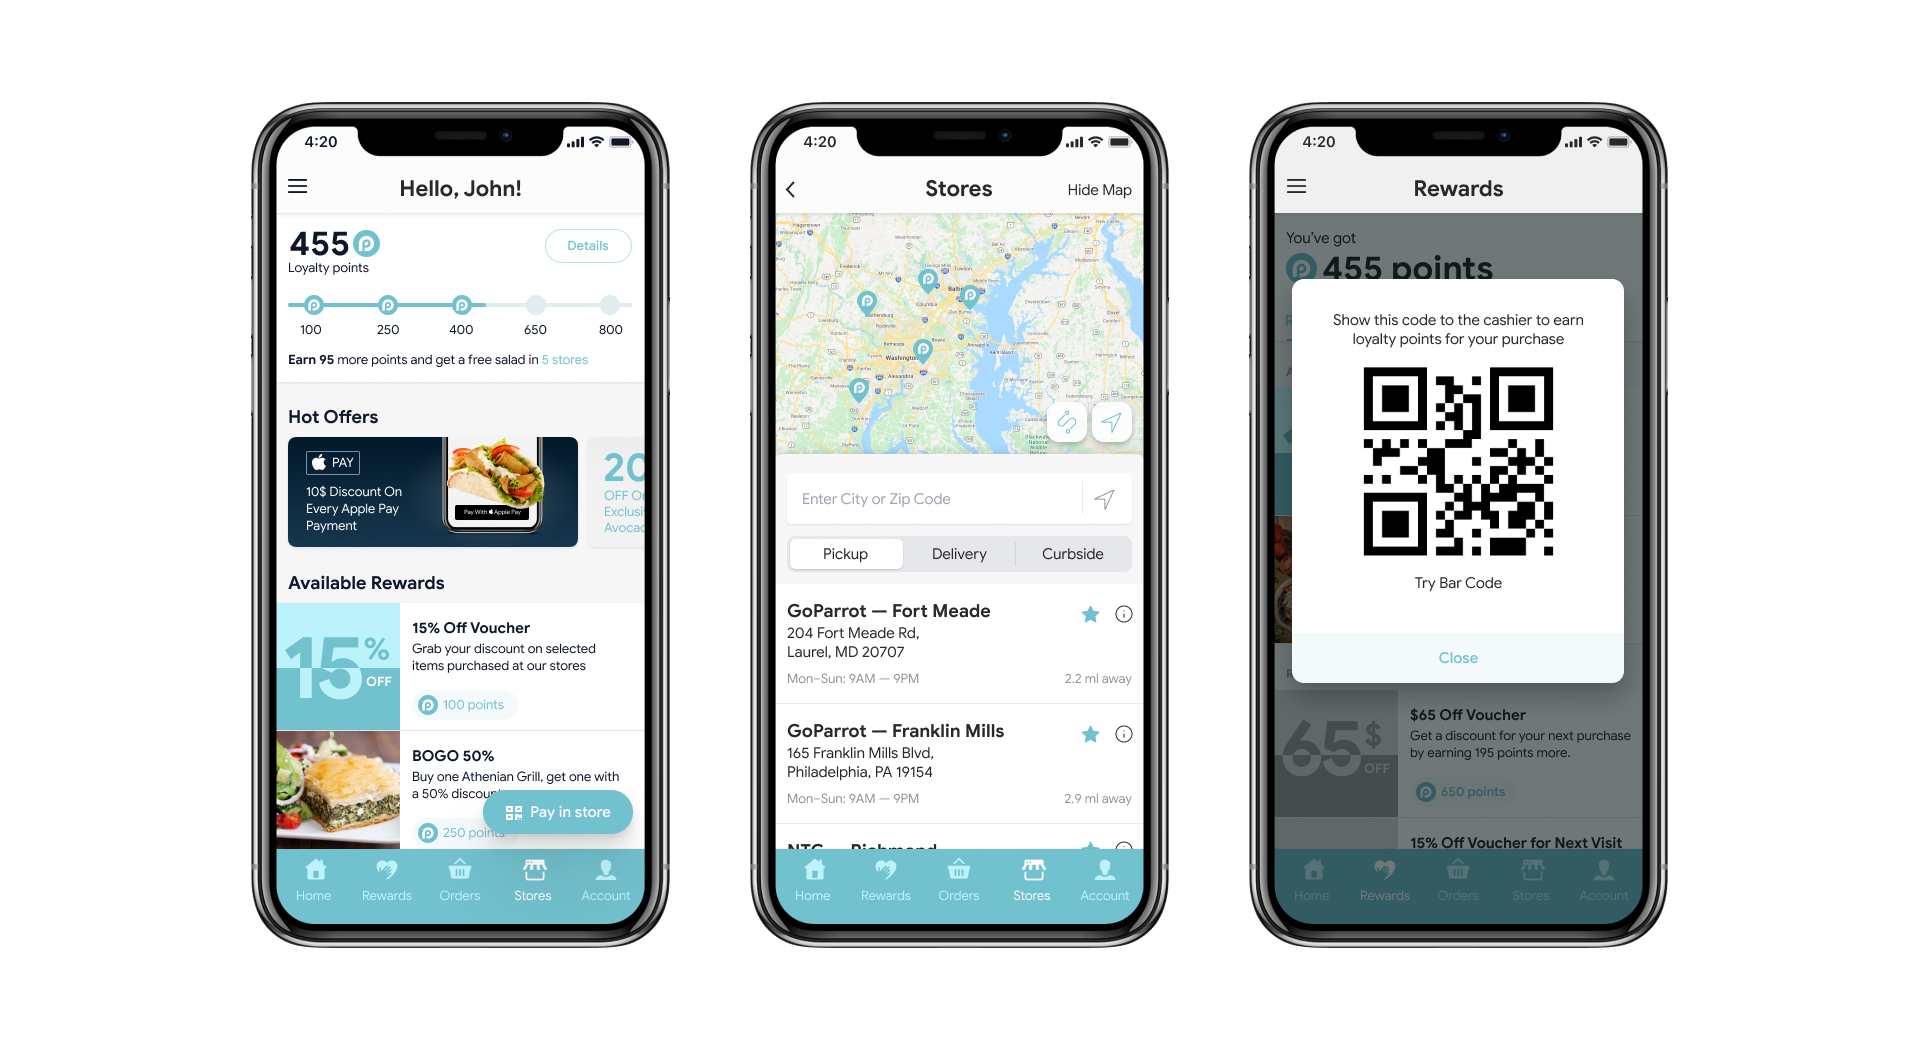
Dear Partner restaurants, we are happy to announce release of version 2.0 of the GoParrot branded Mobile App. It contains lots of improvements and new features:
Reduced loading time The app now loads faster on the first access. In general we improved the app speed, touch and feel.
Home screen with widgets for logged-in guests Logged-in guests now have a beautiful home screen showing them in one view all the interesting information they should know. They can click on any of the widgets to jump directly to more detailed info. Here's the list of widgets:
- Loyalty Widget - Track loyalty points
- Hot Offers - Find out the Hot Offers feed and tap on each banner to be redirected to the selected offer;
- Rewards Widget - View available rewards and redeem them by visiting the nearest store. On the "Rewards to Earn" widget you can view the rewards you may get by collecting more Loyalty points;
- Recent Orders Widget - Preview recent orders and quickly order again the favorite items by tapping the “Order from last visited store” button.
- Top Selling Items - Explore Top Selling items throughout the brand. Tap to order.
- Deals Widget - Discover exciting deals and save on your next order
Improved the look and feel of the Stores screen. Enjoy the new redesign of stores screen with multiple possibilities of elements customization:
- Show/Hide map option
- Stores can be sorted now by dining option: Pickup, Delivery or Curbside Pickup
- Users can mark the stores as "favorite" and these stores will remain on top of the list
- Each store in the list now has an "Info" page showing more information about the store and it's schedule
- Get directions to desired store.
Edit account A new feature was added for the Account screen: the possibility to edit your personal info. Tap on the “Edit” button and change the desired field: First Name, Last Name, Birthday, or email.
Scan my Code App only feature designed to quickly identify a customer in-store. The users will click on scan my code whenever they want to order in store, this will generate a barcode which the customer will show to the cashier to be scanned. More info about Scan my Code feature can be found here
Migration to ver 2.0 is not automatic. GoParrot partner restaurants that want to upgrade to ver 2.0 should contact support@goparrot.ai
[1.2] Purchase Gift Cards (Square)#
Toast gift cards coming soon. Stay tuned!!
For our partner restaurants that use Square POS you now have the ability to let your guests purchase Square gift cards directly from your online store. Guests will be able to seamlessly use the purchased gift cards online or in-store.
With this awesome new feature, your online store and app can now become a digital wallet
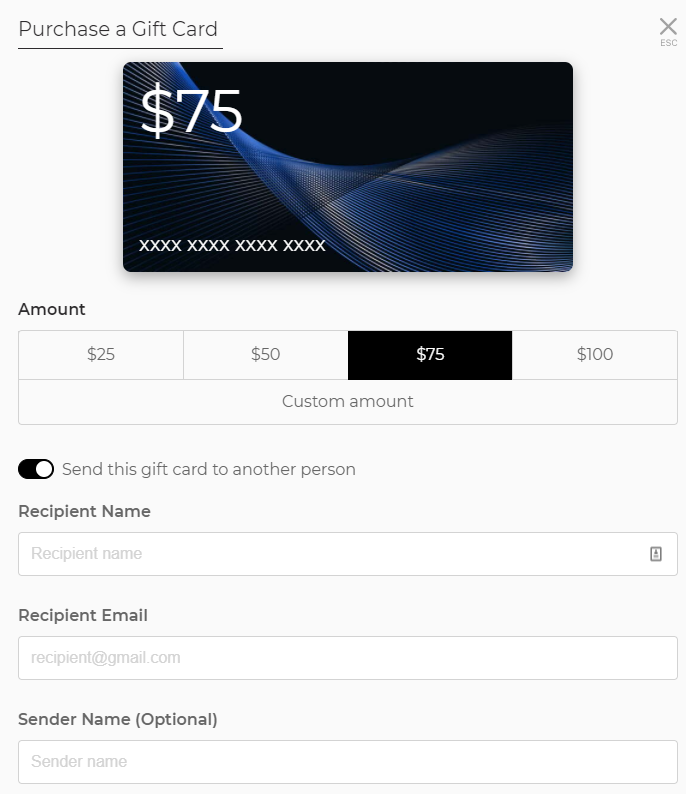
Here's what your guests will be able to do:
- View all their gift cards by navigating to "My gift card" under "My Account" section
- View up-to-date gift card balances from in-store and online transactions
- Purchase a new gift card
- Send a gift card as a gift to a friend via email
- Attach an existing physical gift card to their account
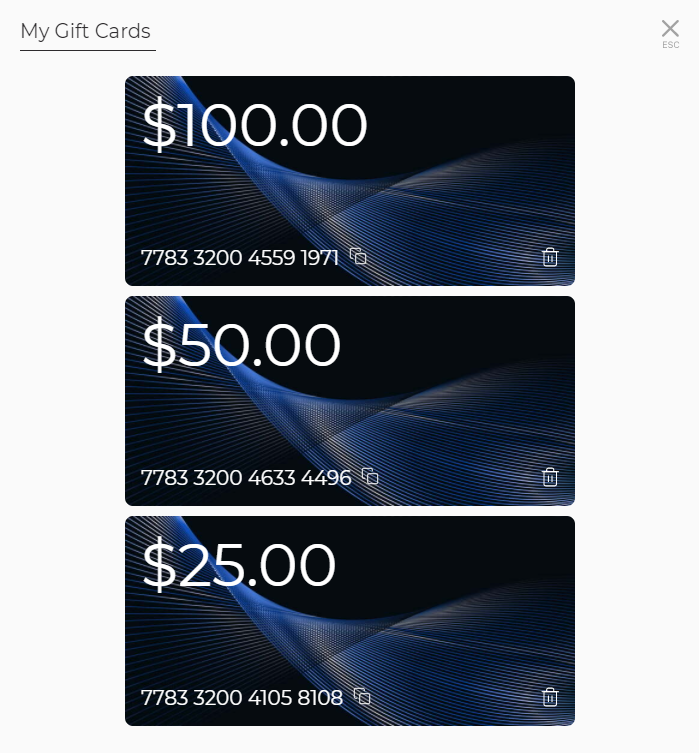
Gift cards is a paid feature. If it does not appear on your dashboard please contact sales or support.
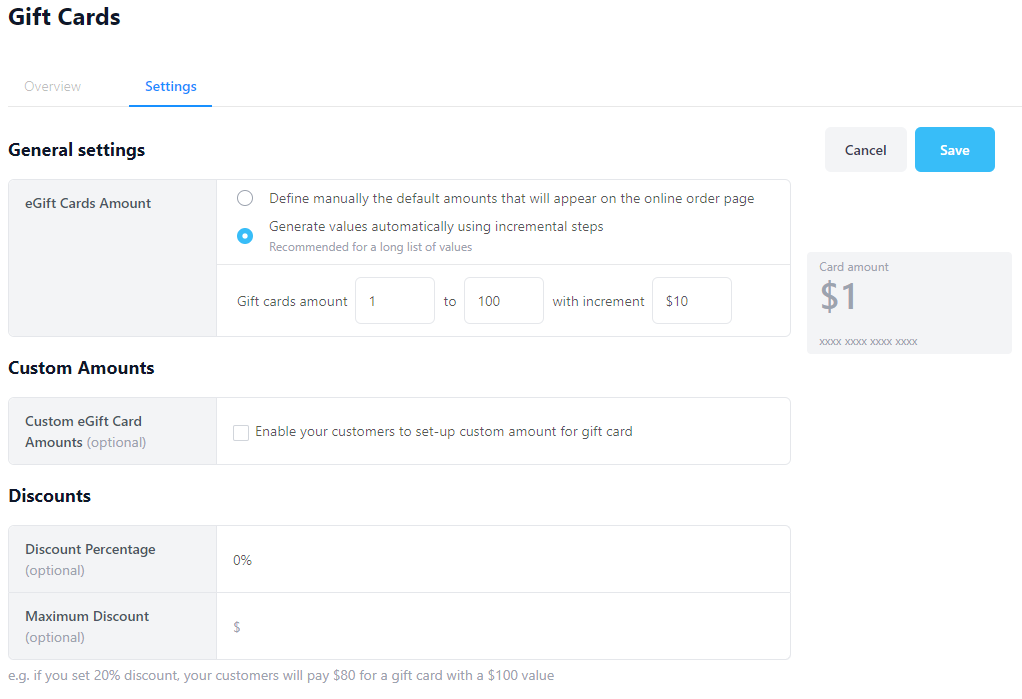
To setup gift card purchase via webstore:
- Go to Gift Cards in the GoParrot dashboard (merchant level)
- In General settings define gift cards amount
- Enable or disable your customers to set-up custom amount for a gift card
- Apply a discount (if you want) for a gift card (e.g. if you set 20% discount, your customers will pay $80 for a gift card with a $100 value)
[1.3] Discount for Paid Modifiers#
When you create a discount, you can now decide if you want to discount paid modifiers or discount only base item and paid modifiers will be paid by user as upcharges. To make sure guests are not confused, if paid modifiers are not discounted we will inform guest with the following message "Paid modifiers are not discounted".
In order to enable this we added additional toggle "Apply discount for paid modifiers" to the promotion rules section and to the loyalty rules section.
To activate this, simply:
- Go to the Promotion or Loyalty discount rules section in the GoParrot dashboard
- Create a new promotion or edit an existing one
- Find "Apply discount for paid modifiers" toggle
- Leave "Apply discount for paid modifiers" toggle ON and paid modifiers will be discounted by default
- Or switch OFF toggle to discount only base item and leave paid modifiers un-discounted

[1.4] Auto-sync removing modifiers from modifier groups (Toast)#
For our partner restaurants that use Toast POS we've enabled additional option to auto-sync:
- Removal of modifiers from a modifier group,
- Removal of a modifier group from an item.
If in Toast POS a Modifier was removed from a Modifier Group or a Modifier Group was removed from an Item, GoParrot will automatically pull this update.
The backward action won't be applied automatically. If you've added a new Modifier to a Modifier group or a Modifier Group to an Item, there is a need of a manual re-sync of the Item or Modifier Group that will pull the updates from the POS.
Auto-sync works each 10 minutes.
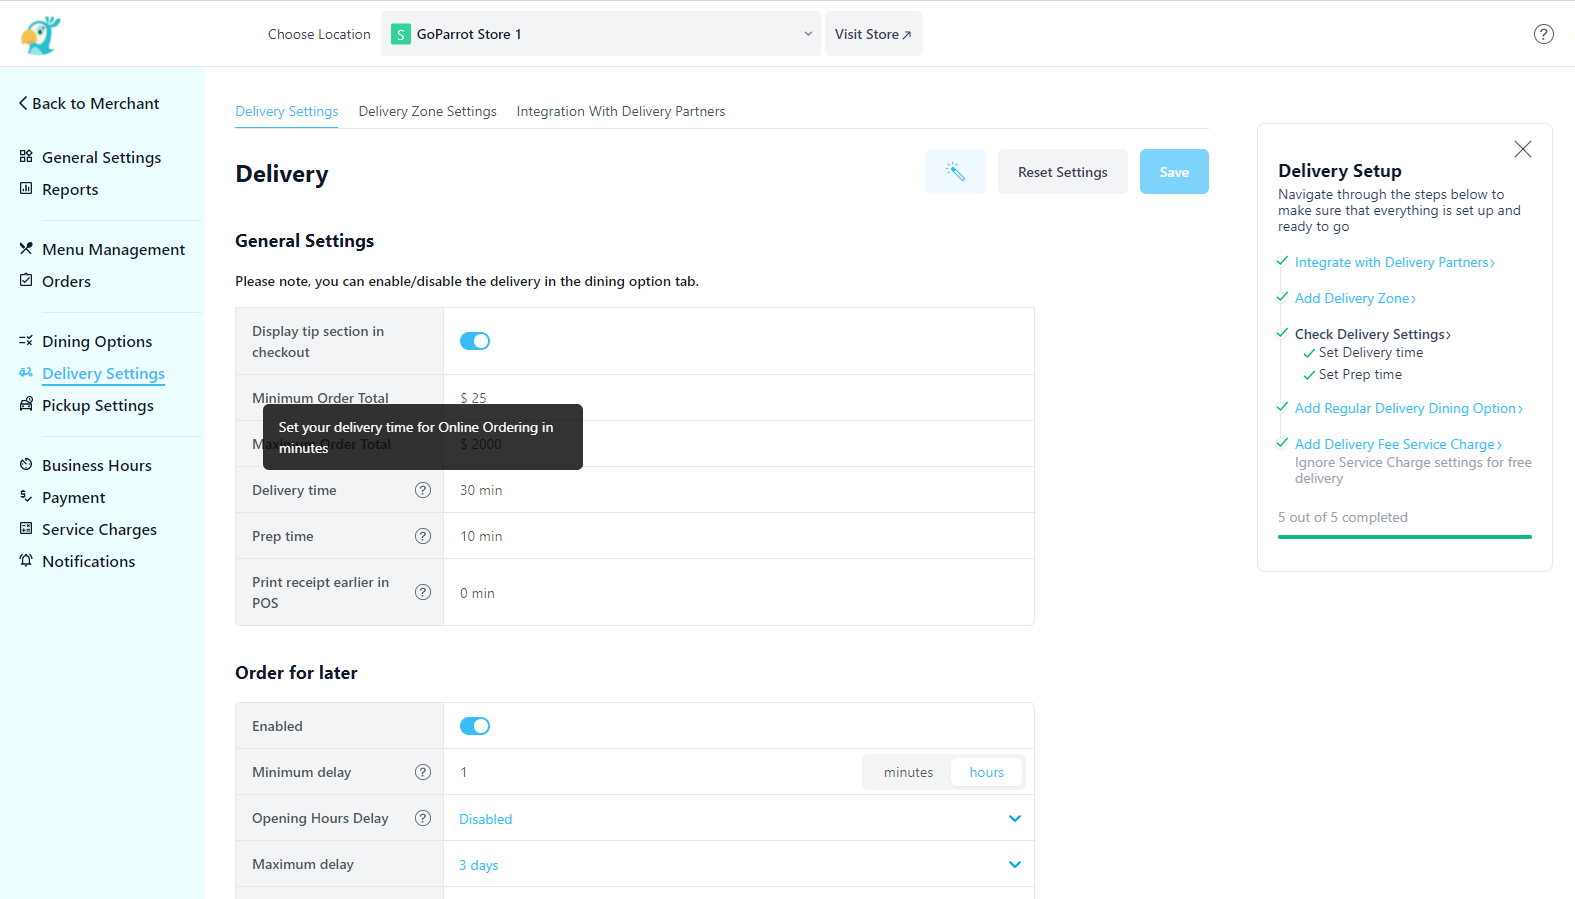
[1.5] Redesign of GoParrot Dashboard#
We've been working in the background to make the GoParrot dashboard experience more beautiful and convenient for you, our partner restaurants. For easy navigation, we have organized the left side bar into more convenient categories and added icons. New pages now have helpful instructions on the right side of the screen. New pages are divided into blocks, are cleaner, more modern and also include small tips of info when hovering over the small question mark icon.
This update is part of a bigger change that we are working on to also make the GoParrot dashboard more mobile friendly. This will released later this year.
[1.6] Sync refunds made in Square#
For our partner restaurants that use Square as payment provider it became easier to refund transactions.
Now you can perform the refund in both GoParrot dashboard and Square account. You don't need to open GoParrot dashboard in order to perform a refund, just do it in your usual Square interface. Refunds will be synced automatically in a matter of seconds.
You can also now perform partial refunds per item in Square. The system will automatically pull the partial refunded amount.
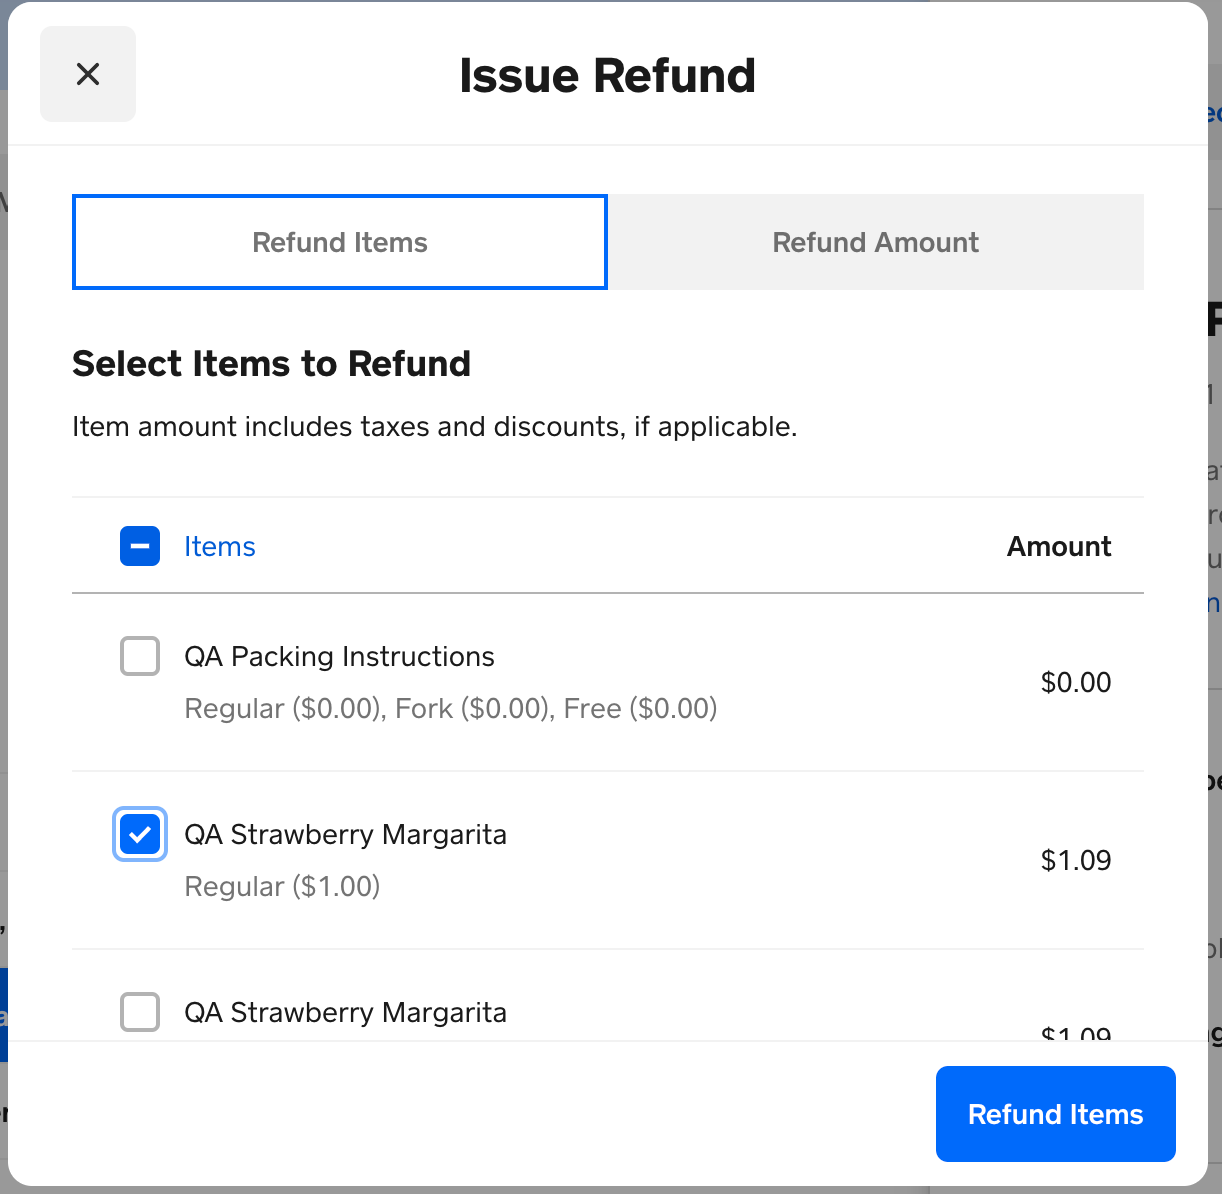
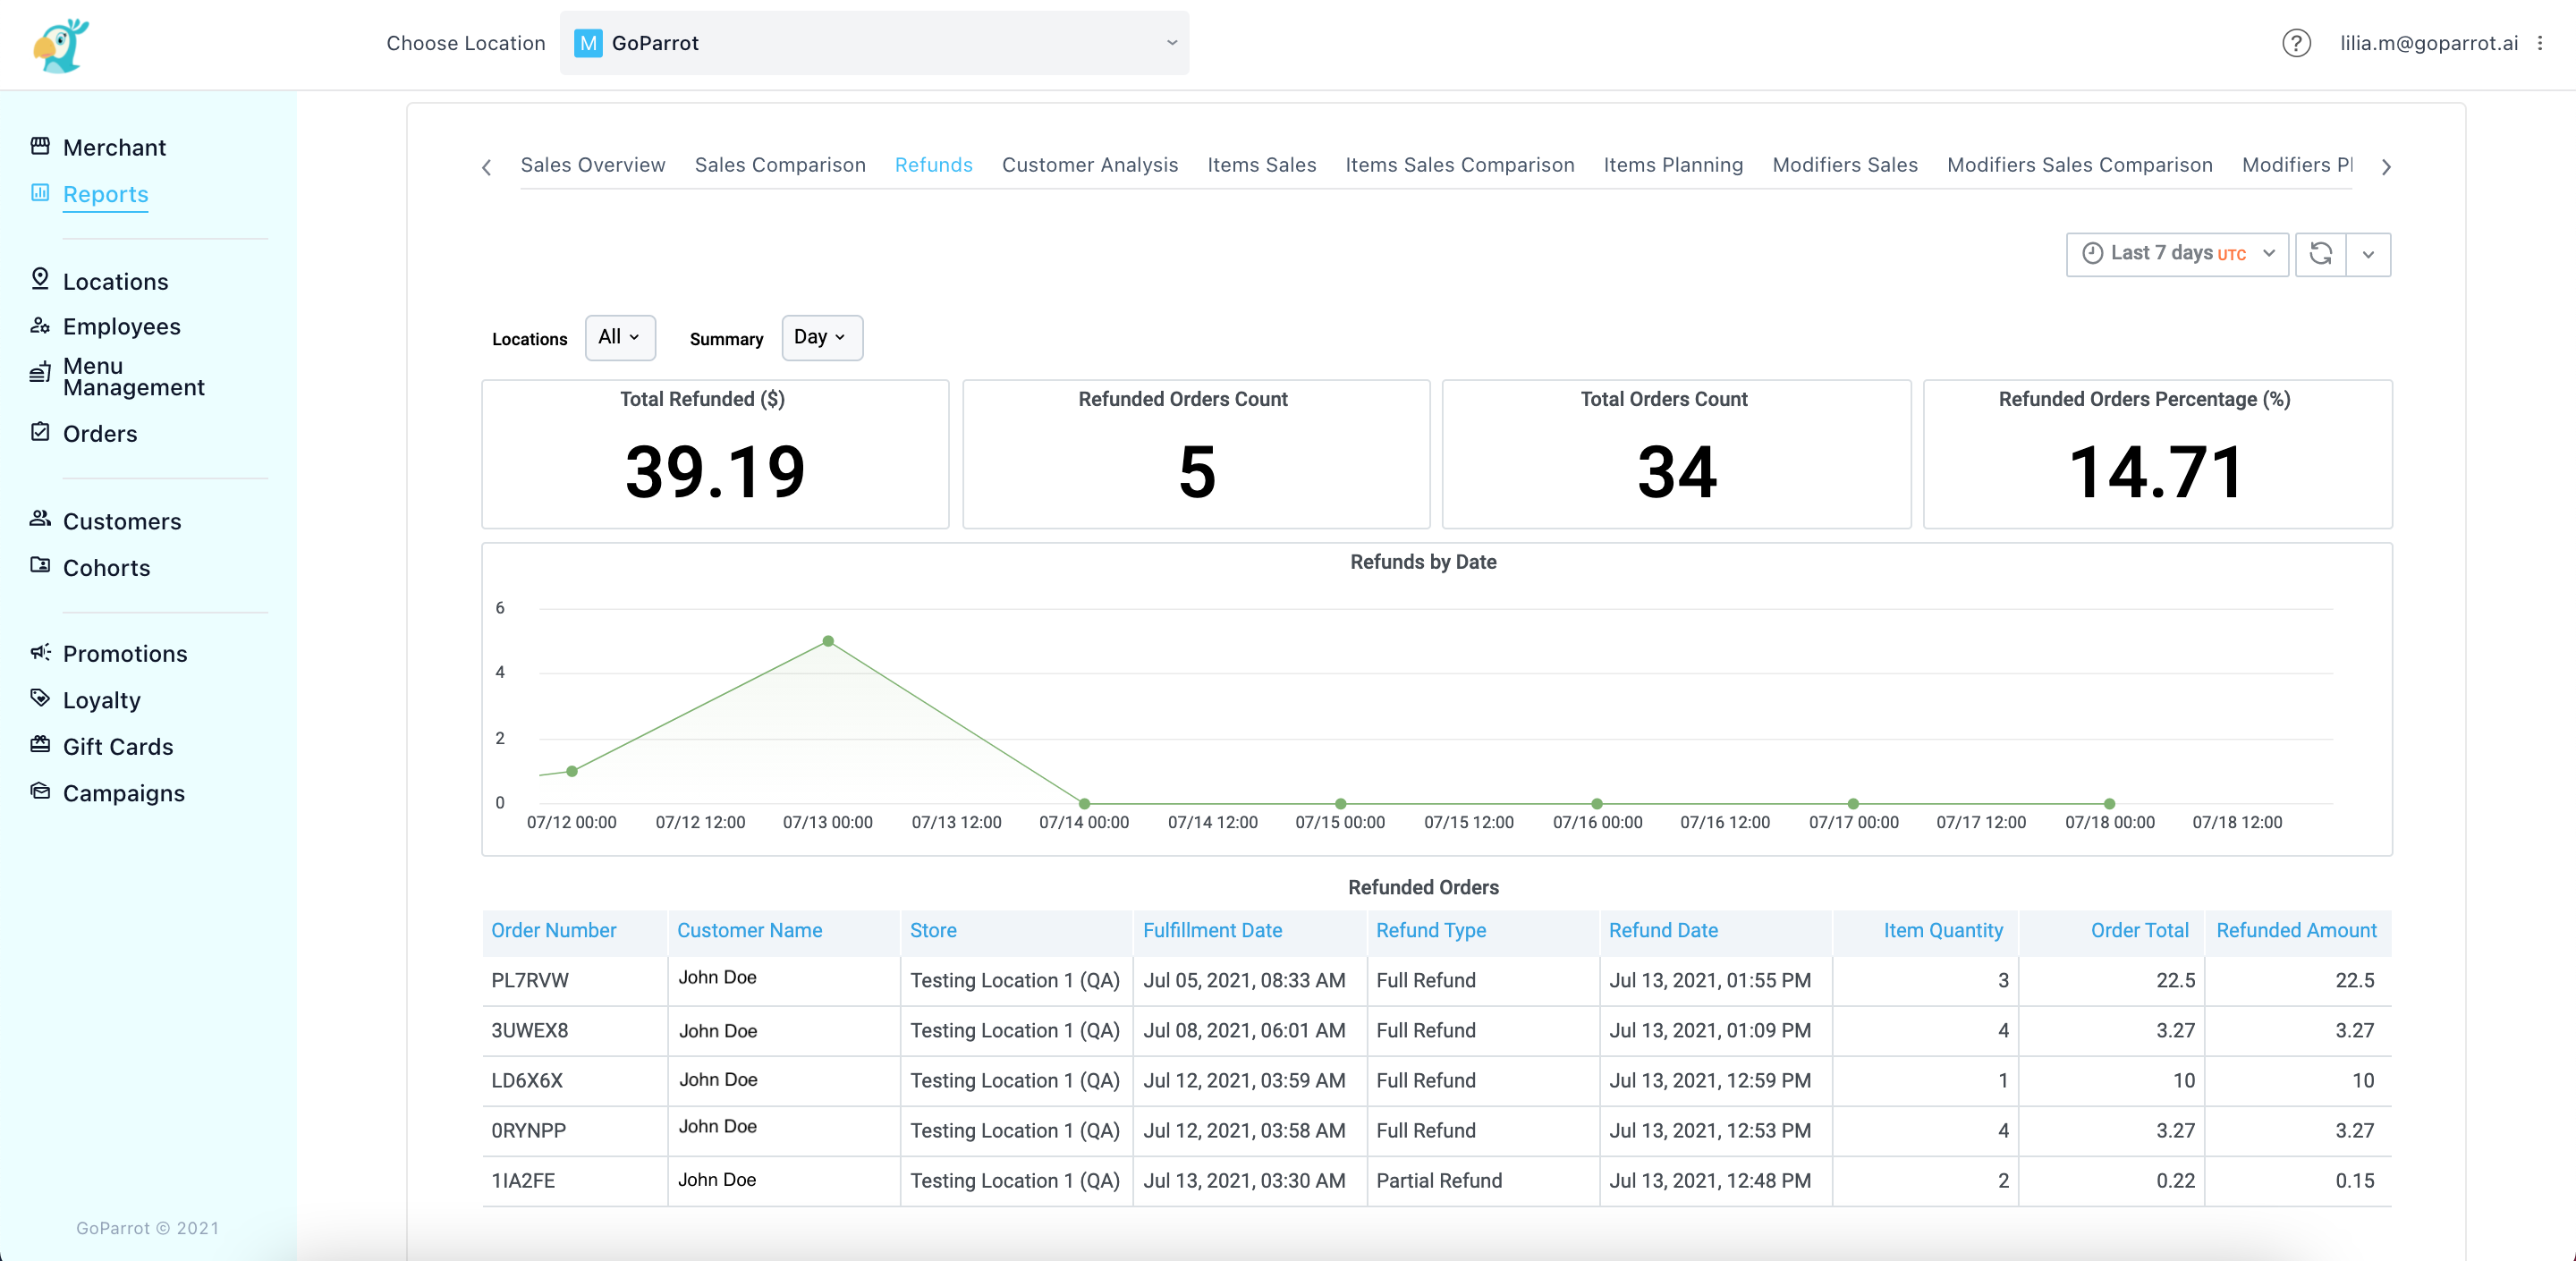
All the refunds can be viewed in Square but are also available in a report called "Refunds", that can be found by accessing Reports page in the navigation panel of GoParrot Dashboard.
June 2021 Update#
June has been a very busy month at GoParrot. A LOT of exciting feature releases. If you can't find something or anything is not clear feel free to contact support at support@goparrot.ai.
[0] Content#
| Marketing Suite Updates | ||
|---|---|---|
| New SMS Channel | Send campaigns to your customers through SMS | Jump |
| All new Automated Birthday Campaign | With happy birthday and present with a a 3-stage drip campaign | Jump |
| Digital Ordering Updates | ||
| Webstore customization in Dashboard | Customize Your Online Store Through the GoParrot Dashboard | Jump |
| Deep links to items & categories | Share Links to Categories & Items on your Online Store | Jump |
| Time range on order ready times | Give Your Customers a Time Range For Their Order | Jump |
| Multi-Delivery Zone | Take delivery to the next level with multiple zones and providers | Jump |
| Proof of delivery | Combat fraud with proof of delivery from delivery providers | Jump |
| Time Specific Menus | Show menus in specific times/dates | Jump |
[1] Marketing Suite Updates#
We're here to help you WORK LESS and EARN MORE ' With just a few minutes of your time, you can set up automated campaigns that will run in the background and engage with your customers to get them to coming back more frequently, ordering more and spending more.
If you are already using a marketing tool that's ok. We highly recommend that you just enable automated campaigns through the GoParrot Marketing Suite and enjoy automatic engagement with zero effort giving you more time to worry about your business. '
[1.1] New SMS channel#
You can now send campaigns to your customers not only through email, but also through SMS. To start sending SMS campaigns simply
- Go to the Marketing Suite Page in the GoParrot dashboard
- Create a new campaign
- Click on one-time campaign
- and choose SMS Blast in template

[1.2] All new Automated Birthday Campaign#
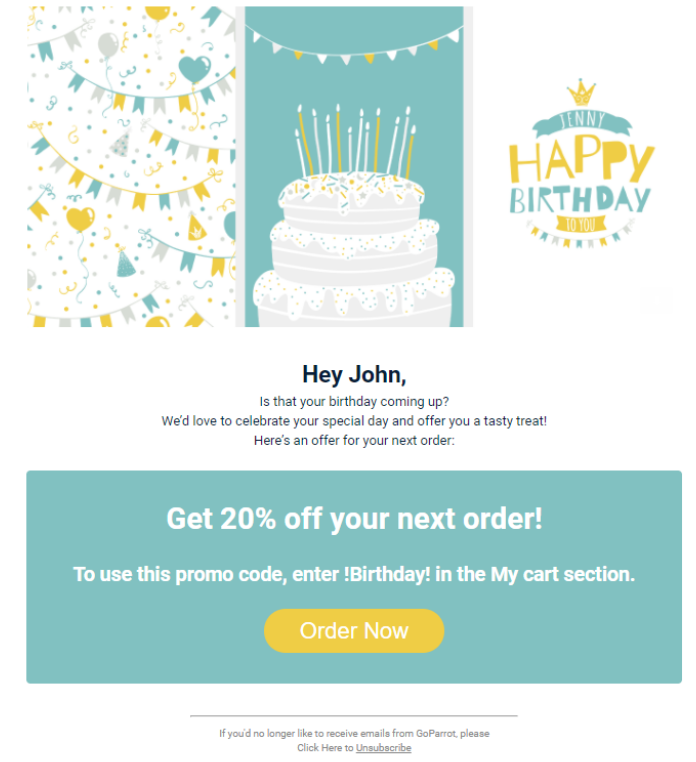
In just 5 minutes you can set up a 3-stage automated drip campaign that will permanently run in the background and send branded messages with dedicated discounts to your customers on their birthday.
To activate simply
- Go to the Marketing Suite Page in the GoParrot dashboard
- Create a new campaign
- Click on Automated campaign
- Select "Wish your customer a happy birthday"
[2] Digital Ordering Updates#
[2.1] Webstore customization in Dashboard#
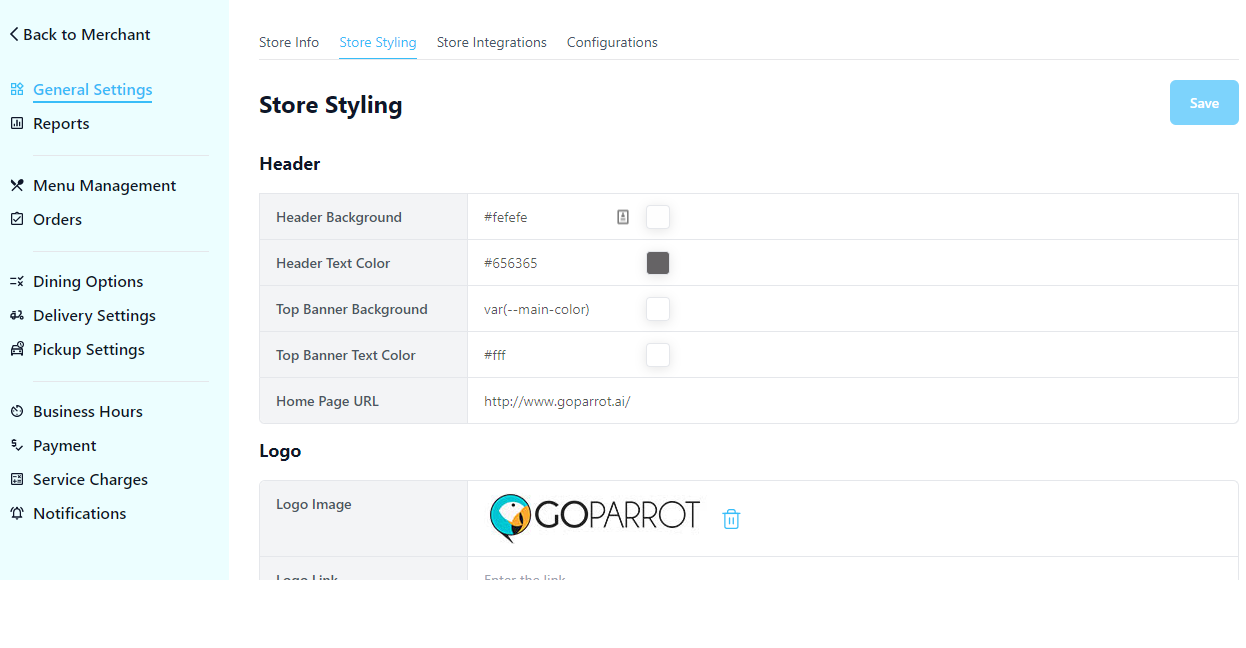
Hurray!! It is now possible to customize many of the basic image and styling options of your online store through the GoParrot dashboard.
To start customizing simply:
- Go to the Marketing Suite Page in the GoParrot dashboard
- Choose a store from the top bar location selector
- In the store level configuration options click on General Settings
- Click on Store Styling in the top menu
- And start customizing
[2.2] Deep links to items & categories#
All categories and items on your online store now have direct links that can be shared so that guests can get to them directly.
Getting the direct link of an item can be done by clicking on the item in the online store and copying the url from the browser address bar.
Getting the direct link of a category can be done by clicking on the category in the top category navigation bar and copying the url from the browser address bar.

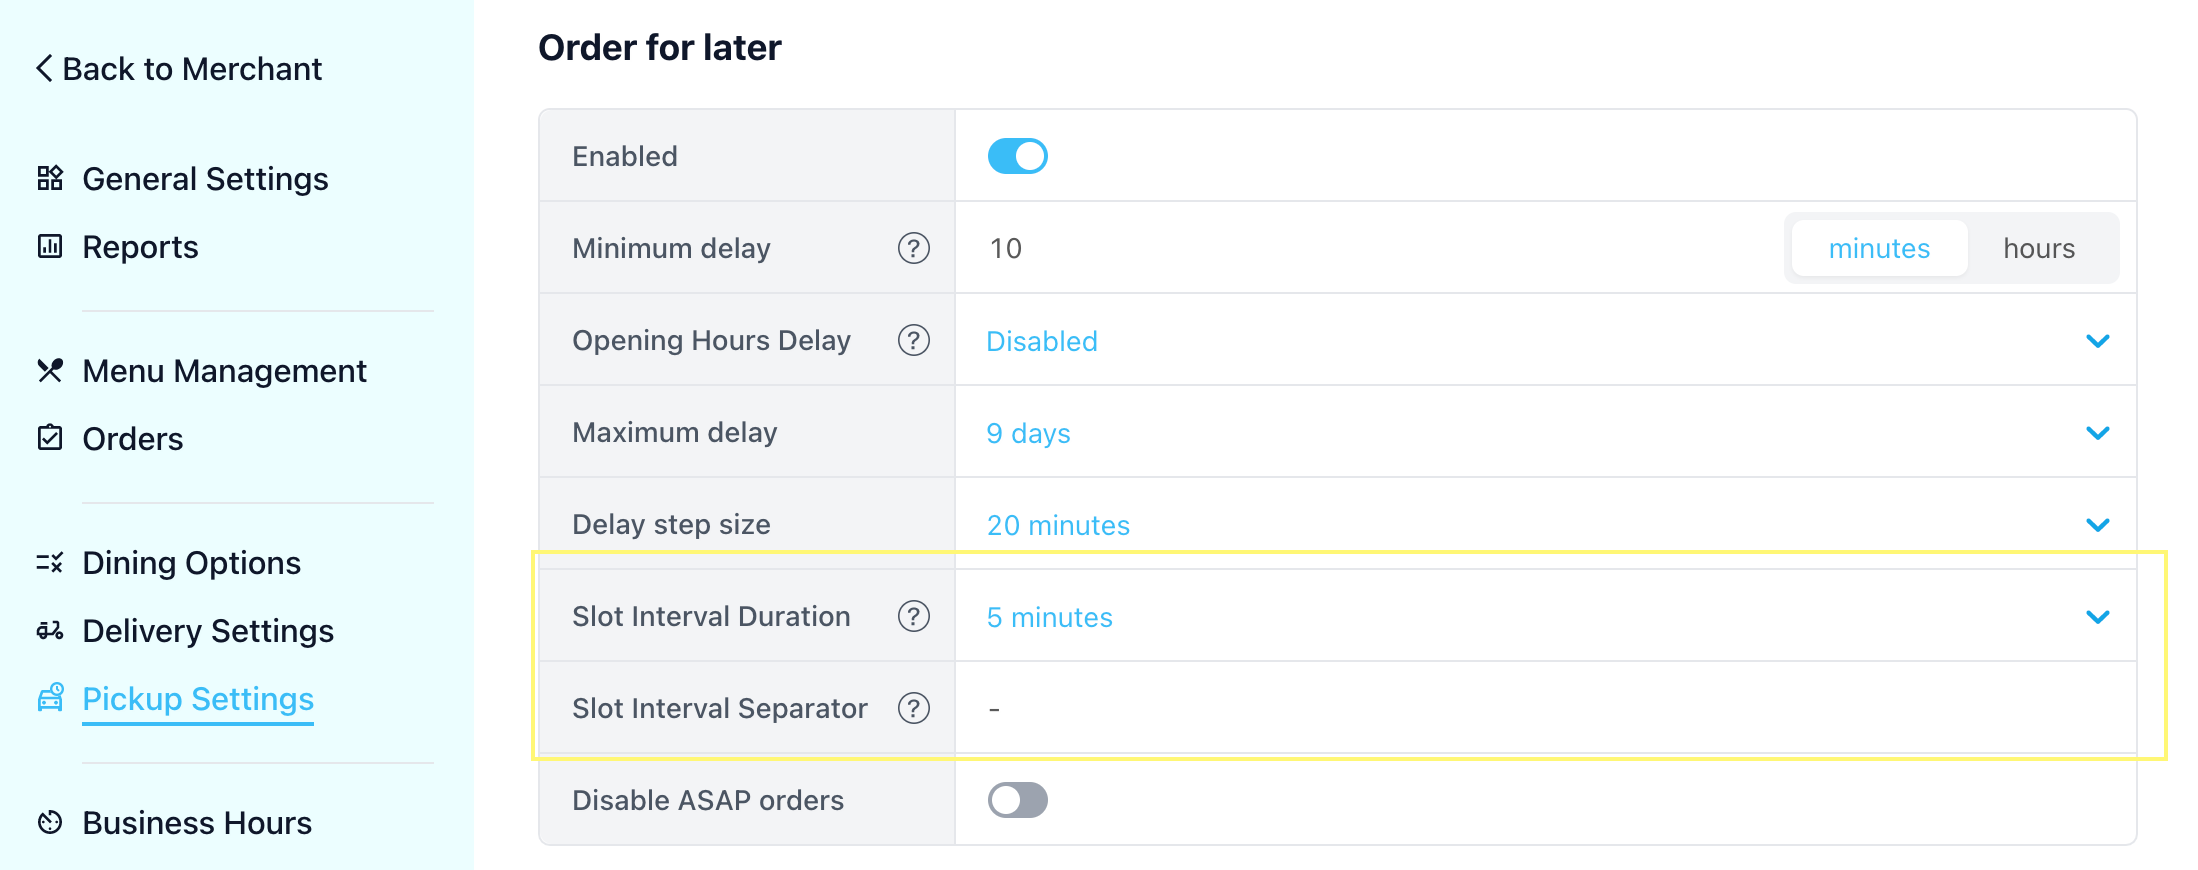
[2.3] Time range on order ready times#
We heard multiple complains that customers complain that their order was not ready at exactly the time that was given to them. To resolve this problem we now enable you to define a time range that will be presented to the customer. So instead of showing the customer "You order will be ready at 5:30pm" you are now able to show customers "You order will be ready at 5:30pm-5:45pm"
To set this up, simply:
- Go to the Pickup settings in the location specific page in the GoParrot dashboard
- Update Slot settings
[2.4] Multi-Delivery Zone#
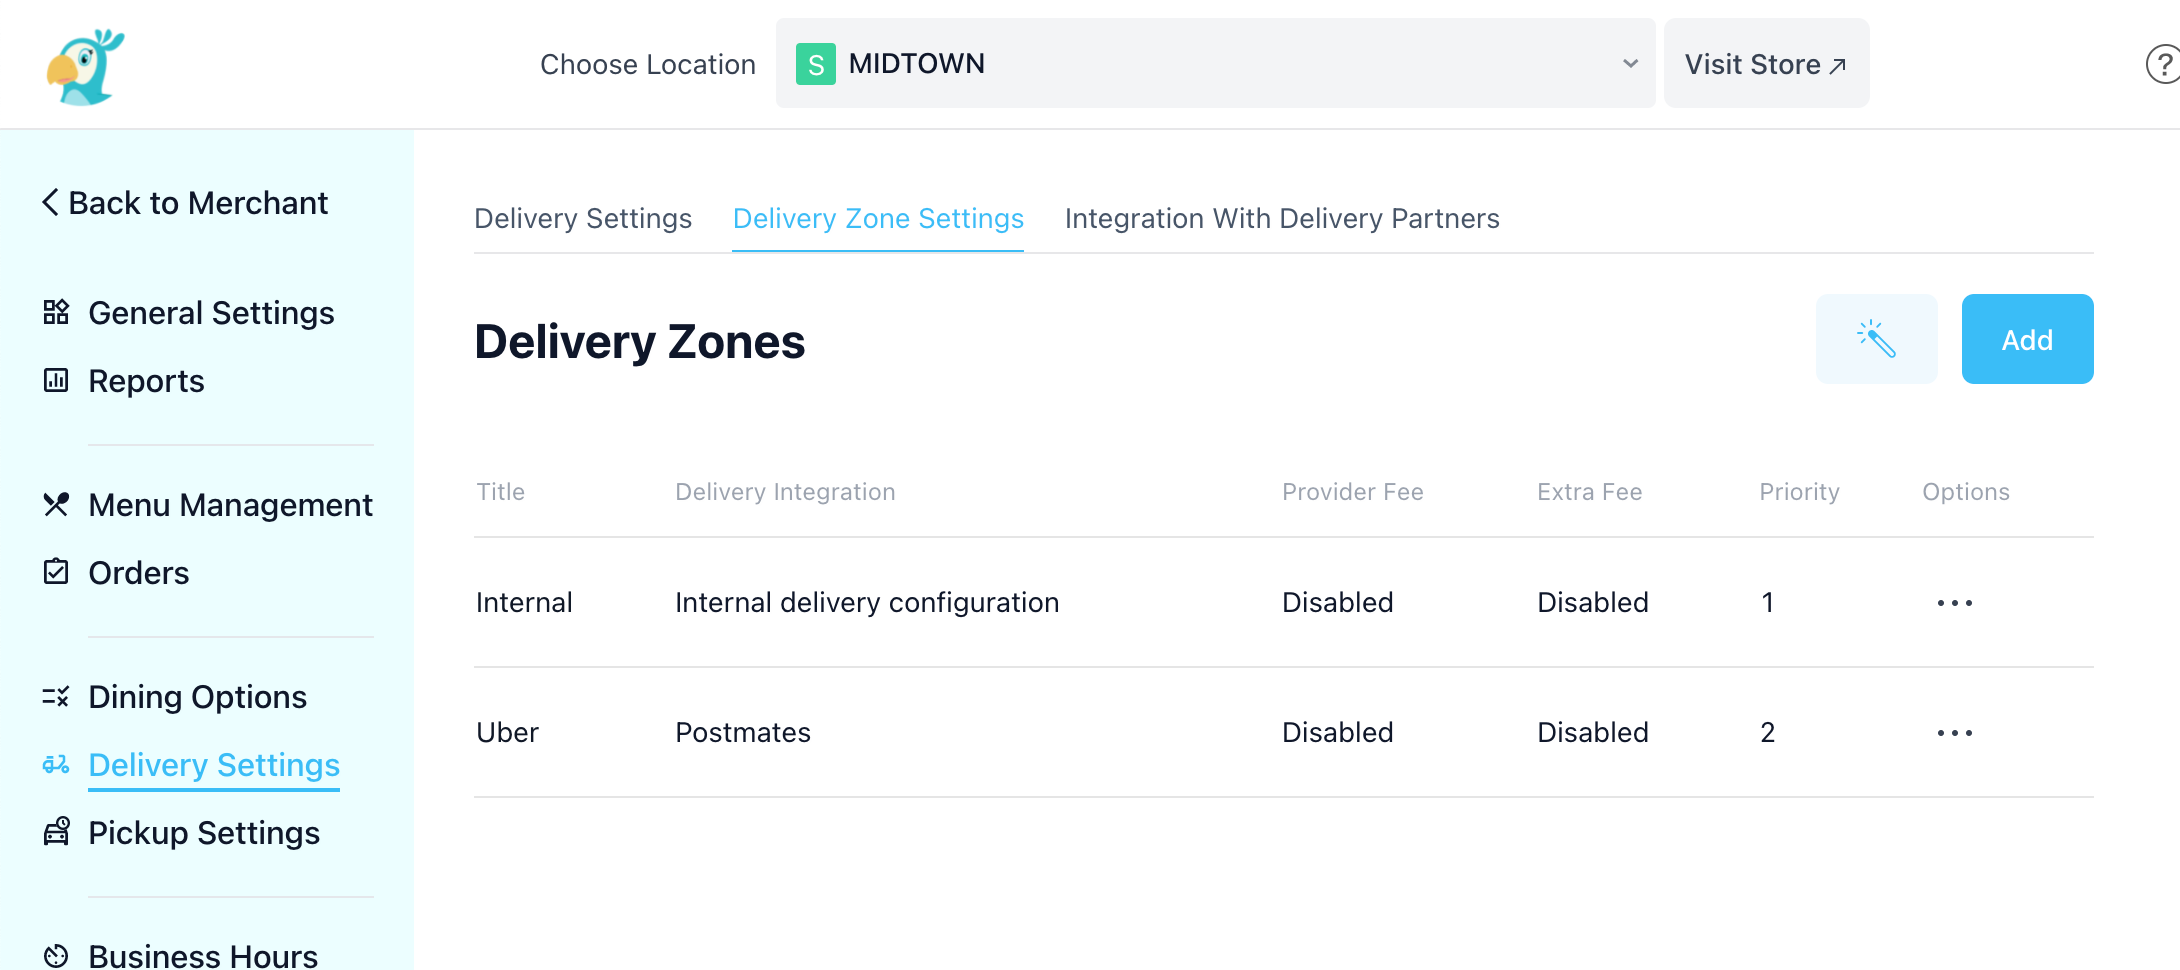
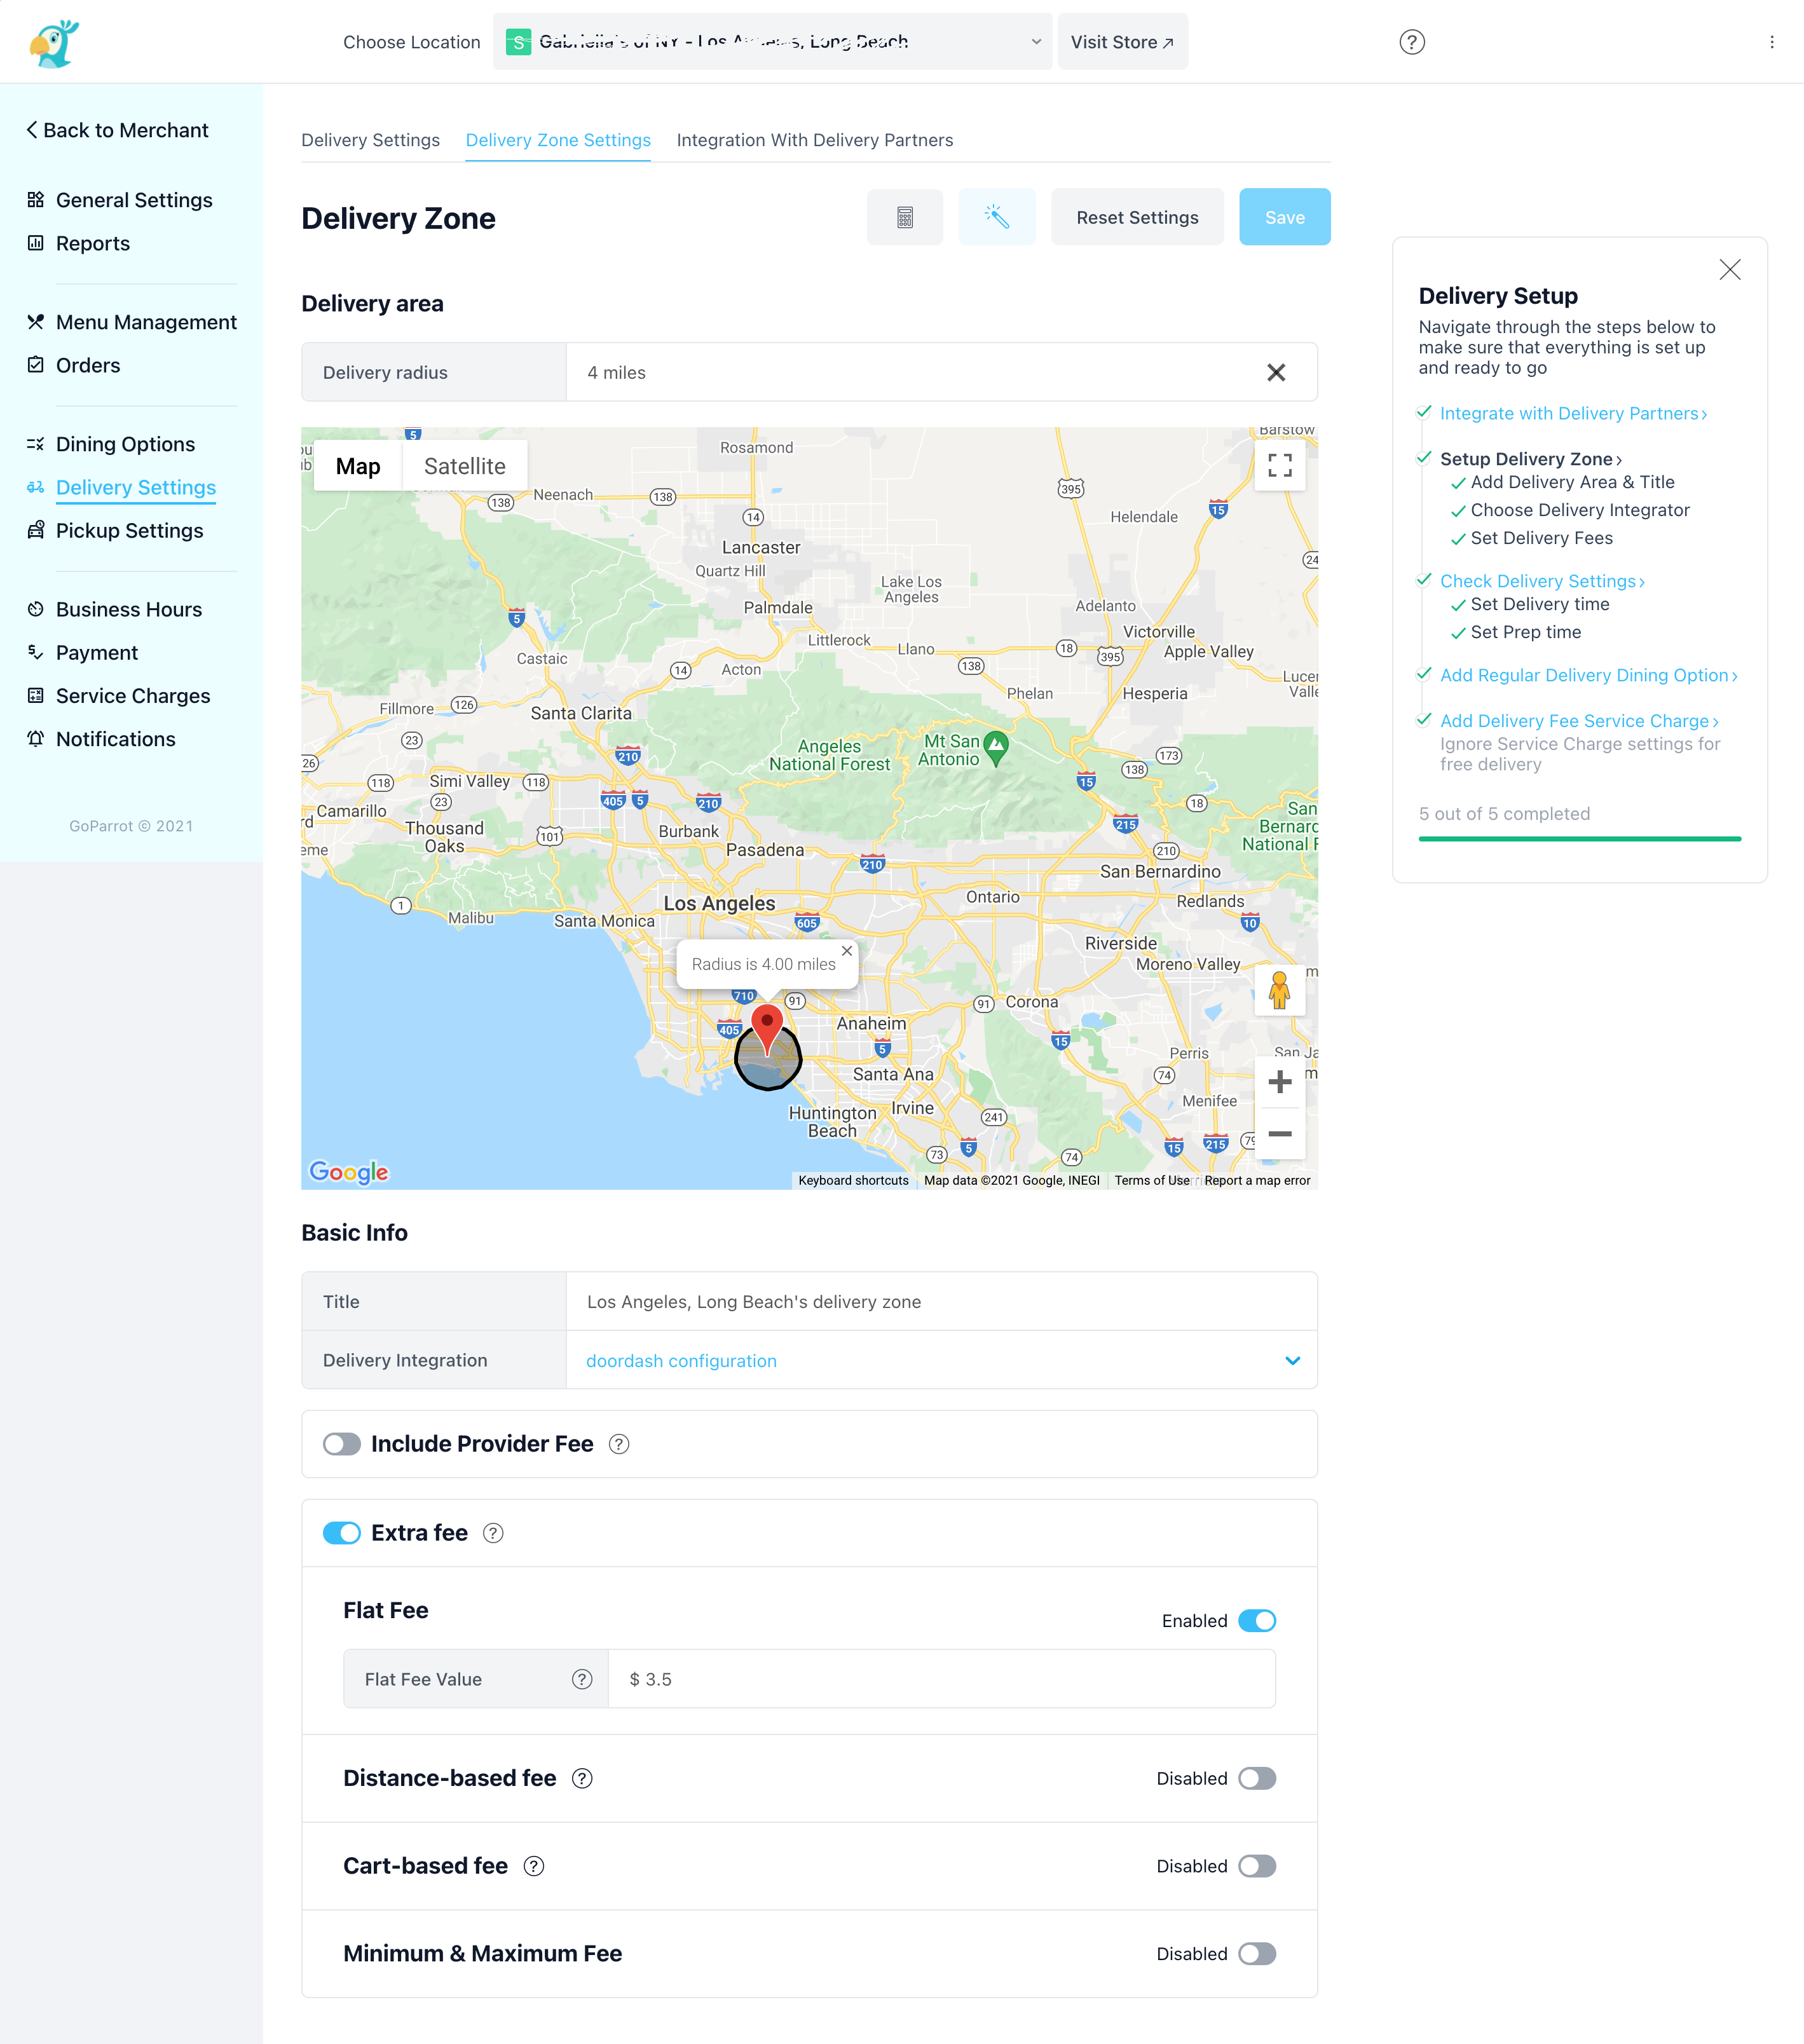
Take delivery to the next level!!
You can now define multiple delivery zones around your restaurants and for each delivery zone define a specific delivery provider and rules around delivery fee and more.
To set up delivery zones go to the delivery Settings page of a specific location in the GoParrot dashboard and on the top navigation clock Delivery Zones settings.
[2.5] Proof Of Delivery#
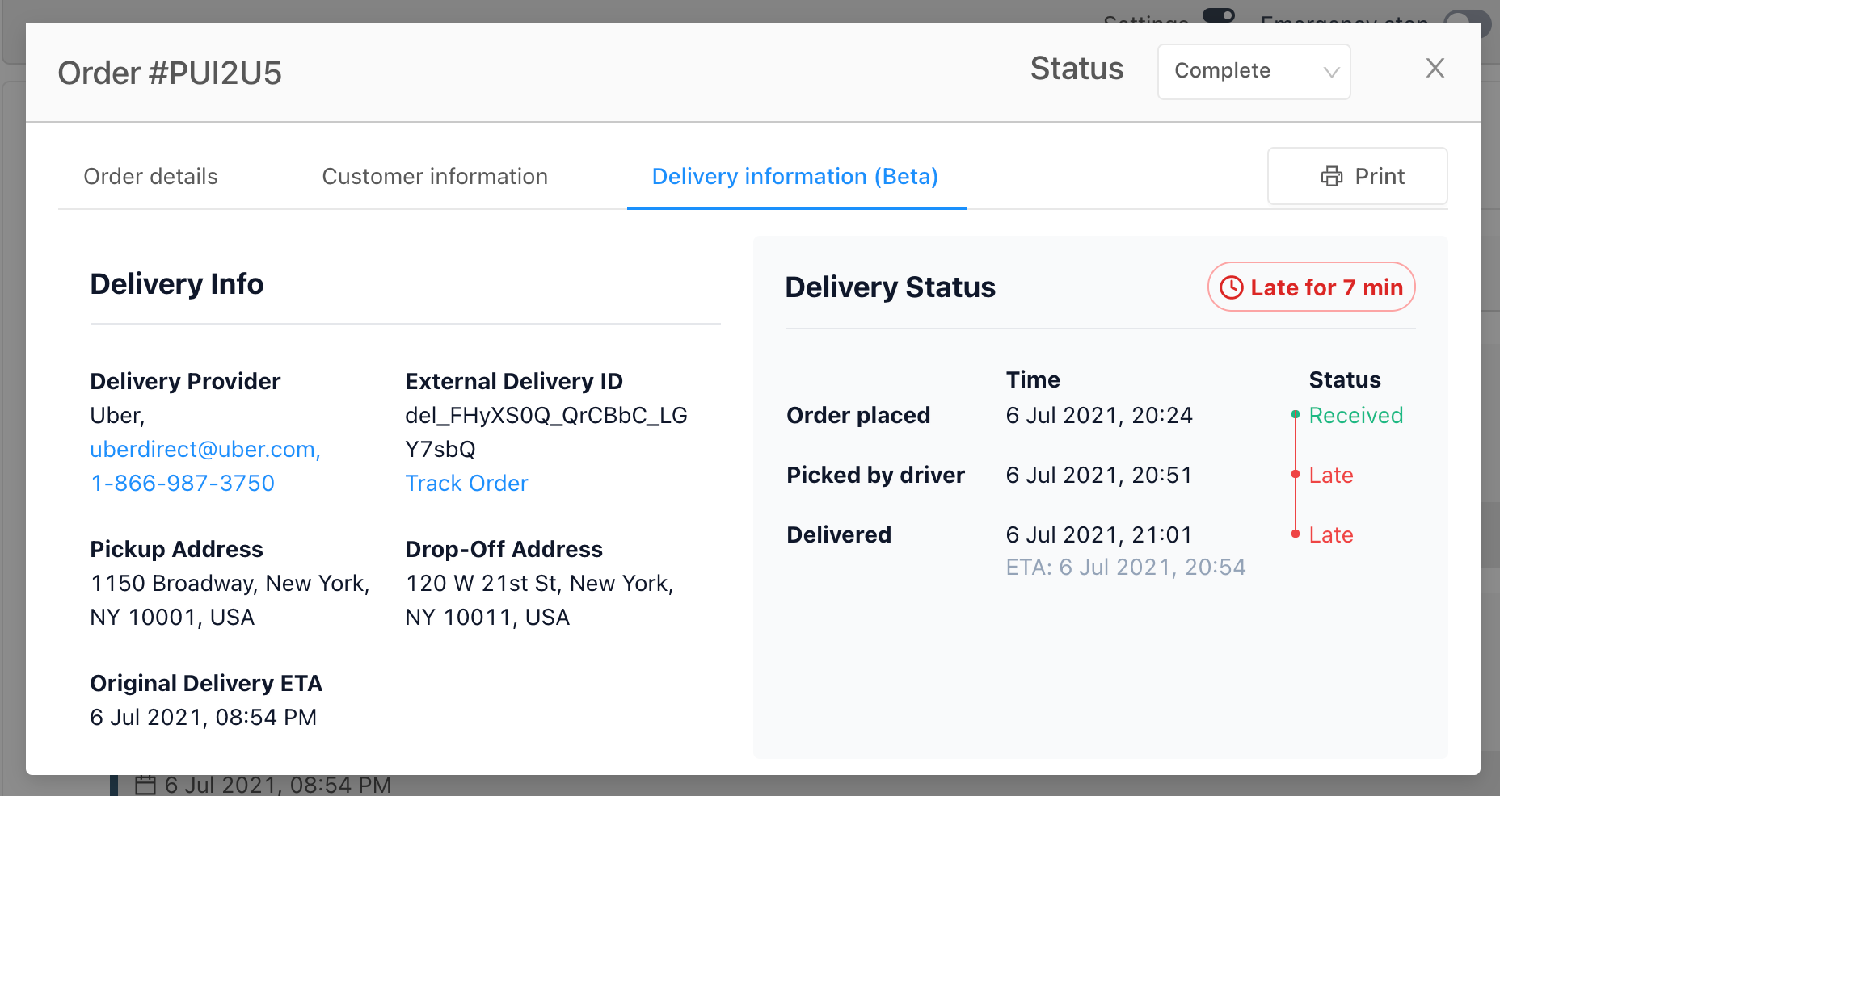
Chargebacks and fraudulent orders are harmful and painful for your restaurant!! We now have a way for you to more easily combat fraudulent delivery orders. You can now find the GoParrot dashboard proof of delivery that we receive from the delivery providers. In case of dispute, this proof of delivery will help you win the case. To view proof of delivery, go to the order page of a specific location in the GoParrot dashboard, find and open an order and click on delivery information in the top bar.
[2.6] Time Specific Menus#
Now you can configure your menus to show on specific days and hours of the week or specific dates. You can set multiple menus to appear at the same time if you so choose, so you can have a Christmas menu along with your regular menu. And for order ahead, the customer will see the menu for the day/date that they requested.
Setting menu times can be done in the Menu Management page in the menu tab in the top navigation bar.
